3D welding symbols help you show directly on the model how your assembly should be manufactured.
To create a welding symbol,
1. Click 3D Documentation and then, in the Annotate group, click Symbol.
2. In the template browser, click Welding.
3. Double-click the Welding symbol.
4. Position the symbol on the active docuplane in the viewport. If no docuplane is active, click a reference element and then position the symbol.
5. Complete the operation as described below.
To define welding symbol parameters,
1. Click Grab, then click an existing welding symbol from the viewport to copy its parameters, or specify the following parameters:
Shape
Select the type of welding symbol.
Position
Select the orientation of the symbol.
Geo Var
Click to display the geometric variable g1 to g7 boxes. Select the required geometry elements from the boxes. The elements comply with the DIN 18800-1 standard.
Text Var
Click to display the text variable t1 to t7 boxes. Enter the required values in the boxes.
2. Optionally click Swap Side to exchange parameters between the arrow side and other side of the welding symbol.
3. To add primary references, click Add, then click the elements on the model to which you want to add reference lines.
4. To remove a reference already specified , click Remove and click the reference element.
5. To select secondary references, click 2nd Refs.
◦ Click edges, faces, parts or assemblies to select secondary reference elements. Selected element turn red while the command is active.
◦ Clear 2nd Refs to remove all secondary references.
6. If necessary, specify whether the symbol is free or attached to a docuplane. If necessary, select the docuplane.
7. Specify whether the symbol is oriented horizontally or vertically (if you specified a docuplane), or click User def. and define a direction in the viewport.
8. Optionally specify either a Reference File or a Reference URL for the symbol.
9. You can end the current symbol creation in one of two ways:
◦ Click Next to complete the current label and continue creating new labels with the current menu settings.
◦ Click Reset to cancel the current label but keep the menu open with the same settings.
10. Click to complete the operation.
Immediately after clicking Symbol, click an existing welding symbol in the viewport to grab its parameters.

 Symbol.
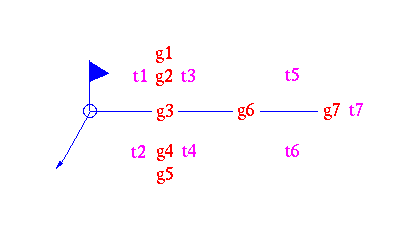
 to complete the operation.