Creo Elements/Direct Modeling allows you to add an image to a workplane. A workplane image helps you to create 2D geometry or construction lines for conceptual design. You can also change the position of a workplane image or remove the workplane image.
To add a workplane image,
1. Click Structure and then, in the Workplane group, click Add Image. The Add WP Image dialog box and the File Browser open.
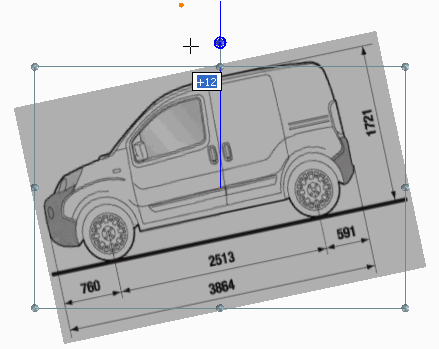
2. In File Browser, browse to an image file and click OK. The selected image opens in a workplane in the viewport with several handles on the image as shown below.
a. Top handle: Drag the top handle to rotate the image around the center of the image.
b. Corner handle: Drag the corner handle to resize the image and maintain the aspect ratio.
c. Mid-point handle: Drag a mid-point handle to resize the image without maintaining the aspect ratio.
• When you move the cursor (hover) over a handle, Creo Elements/Direct Modeling displays a tooltip and changes the cursor to indicate the operation, which you can perform with this handle.
• To resize an image, when you drag a corner handle, the corner handle which is opposite, is fixed.
The supported image types are JPG, JPEG, PNG, GIF, TIF, TIFF, BMP, and PPM.
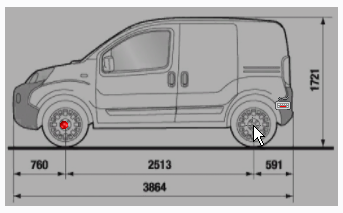
3. Select the workplane image and drag (move) the cursor to move or reposition the workplane image in the viewport as shown in the following image.
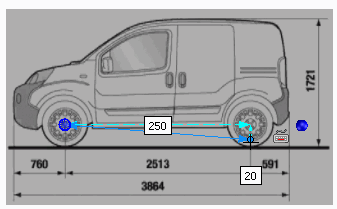
4. Under Scale to match positions,
a. Click Start.
b. Select a fixed position such as the center of the left wheel as shown in the following image.
c. Select the start position for the scaling operation such as the center of the right wheel.
d. Move the cursor to scale the image. The visual feedback shows polar or Cartesian coordinates as shown in the following images.
• Click on the status bar to display Cartesian coordinates.
• Click on the status bar to show the polar coordinates.
e. Click somewhere in the viewport to select the final position for the scaling operation. You can also type polar or Cartesian coordinates to set the final position. For more information about coordinates, see
Draw a line or an arc.
You can scale a workplane image so that the displayed dimensions in the image match the actual values on the workplane. As the example images show, the image scales to real world dimension of 2513 between the two wheels.
5. Click Keep Aspect Ratio to maintain the aspect ratio of the image during the scaling operation.
6. Click to complete the operation.
To change the position of a workplane image,
1. Click Structure and then, in the Workplane group, click Position Image. The Position WP Image dialog box opens.
2. Select a workplane image in the viewport. The selected image shows several handles. For more information, see
To add a workplane image.
 Add Image. The Add WP Image dialog box and the File Browser open.

 on the status bar to display Cartesian coordinates.
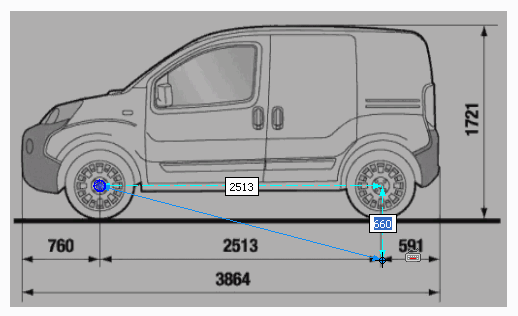
 on the status bar to show the polar coordinates.
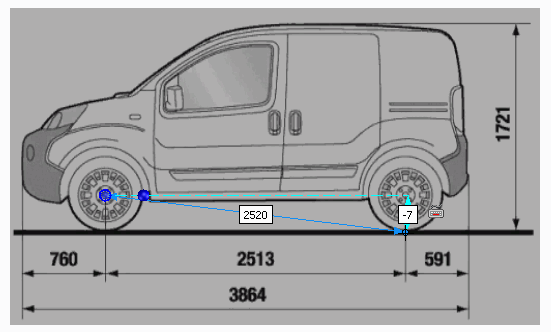
 to complete the operation.
 Position Image. The Position WP Image dialog box opens.