A versatile way to add material to a part is to paste another feature onto it. Paste allows you to grow an existing tool part to intersect it with a target part, the blank, which then incorporates it, resulting in a modified part.
The open edges of the tool, which must be a face part, indicate in which direction the part can grow. Before pasting, you must position and modify the tool using other modeling functionality. You can then grow all open ends of the tool to a single target blank (a face or a part), or if there are multiple open loops you can use the Advanced Paste mode to grow individual loops to different targets. The extended tool is then united with the blank.
When the tool grows, it must be able to hit the blank part at the specified faces. It can also hit the infinite plane which includes the specified face. Creo Elements/Direct Modeling grows the tool up to this plane and creates a face where the extended tool touches the plane.
Depending on the location and orientation of the tool part, a paste operation will result in material being added to or subtracted from the blank, or even both. Creo Elements/Direct Modeling selects the type of operation automatically when you specify the tool, and labels the tool with a 3D note indicating "Add" or "Subtract". You can change Creo Elements/Direct Modeling's intentions if necessary, but normally an unexpected reference indicates a problem with the orientation of the tool part's faces. It is useful to remember that bosses and pockets are essentially the same features but with opposite orientations.
Paste's default behavior is to grow the tool whenever necessary. However, if you are certain that no extending is necessary in a given operation, you can switch it off manually. This can save processing time; but if you use this switch in a case where growing really is necessary, the paste operation will fail.
A Redo Blend option is also provided with Paste, which applies blending from the tool part to the target blank. The option first suppresses any blends on the tool, and then replaces them on the blank, if possible. If some blends cannot be recreated on the blank, 3D notes displaying the failed blends' radii are attached to the resulting part at the edges where the blends should have been created. This information is provided to help you adjust the model to achieve a suitable result.
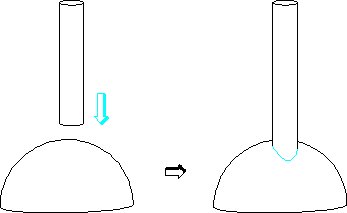
The diagram shows a boss pasted onto a sphere.
To paste a boss or pocket,
1. Click Modeling and then, in the Modify 3D group, clickPaste. The Paste dialog box opens.
2. Select the blank to which the tool part is to grow:
◦ Click To Part, then click the part.
◦ Click To Faces, then click the faces of the blank part. You need to use Select if the tool is to extend to more than one face.
3. Click Tool, then click the tool face part. Creo Elements/Direct Modeling attaches a 3D note to the tool indicating whether the operation will Add or Subtract material from the blank.
4. If necessary, click Add/Subtract to reverse this situation.
5. If there are multiple open loops on the tool to paste, you can select the Advanced option from the Mode list and specify a different target face for each loop:
a. Click Loops and specify the loop to grow, or use the Select tool to select a series of edges defining loops.
b. Click Trim Faces and specify the face to which the selected loop is to extend.
c. Click Update Tool. Creo Elements/Direct Modeling shows a preview of the paste action for the selected loop.
6. To avoid growing a tool when it is not necessary, click Extend off. Only do this if you are certain that extending the loops is unnecessary. Although switching Extend off may save processing time, the Paste operation will fail if growing really is necessary.
7. If you want to keep the tool part, click Keep Tool.
8. Click to complete the operation.
Limitations
• All open ends of a tool part are extended simultaneously, and the extended tool must hit the blank (or a plane).
• In most cases, only one open end can grow to an infinite plane.
• If you select the Redo Blend option, the system will attempt to recreate the blend with the same blending options. However, in some situations that may not be possible. If the blend was created with the RollAtSharp or RollAtSmooth options, the blend may be recreated without those options.
 Paste. The Paste dialog box opens.
 to complete the operation.