With Align, you change the surface geometry of a target face so that it aligns with the geometry of a reference face or reference plane. The target face and reference face do not need to be parallel. The Align operation is good for modifying freeform surfaces using a reference part, rather than creating a new surface from scratch.
This command changes the geometry of one face so it is aligned with another face. If you need to position parts so they are aligned, please see
Mate or align parts and assemblies.
When aligning faces, topology changes are permitted. Faces, edges, and vertices can be added or removed, depending on the position of the reference faces relative to the target faces.
In a single operation, you can define multiple reference faces and the target faces to be aligned with each of the references.
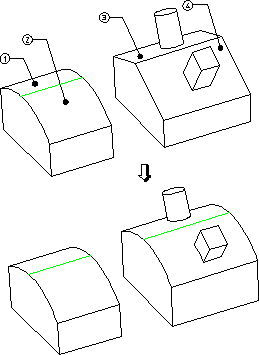
Example
In the figure below face 1 has been defined as the reference for the alignment of face 3, and face 2 as the reference for the alignment of face 4. The profile of the part under target faces 3 and 4 is extended until it meets the projection of the curved geometry formed by faces 1 and 2.
You will see that in the resulting figure A, the recognized features in the two target faces are maintained.
You can also choose to align selected faces with a single reference plane. You can define the reference plane using the Direction 3D tool to specify the direction and origin of the plane.
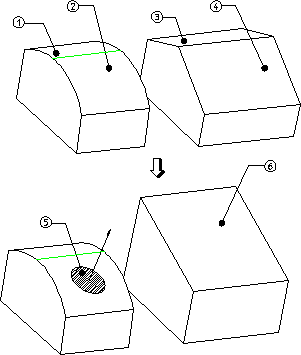
Example
The figure below shows how two target faces are aligned with a reference plane 5 that is defined as the normal direction to a point on face 2. It is not permitted to mix reference planes and reference faces in the same align operation.
To align a face to a reference face, plane, or a 2d edge,
1. Click Modeling and then, in the Modify 3D group, click Align. The Align dialog box opens.
2. Select a reference element:
◦ Ref. Face: Select the face to be used as a reference; press SHIFT to select multiple faces.
◦ Ref. Plane: Select the plane to be used as a reference using the
Direction 3D CoPilot.
◦ Ref. Edge:
▪ Linear: Select the 2D edge to be used as a reference. Creo Elements/Direct Modeling performs a linear sweep on the 2D edge (in a direction normal to the workplane, in which the selected 2D edge lies) and creates linear swept reference geometry, to which the face is aligned.
▪ Rotational: Select the 2D edge to be used as a reference. Creo Elements/Direct Modeling performs a rotational sweep on the 2D edge and creates rotational reference geometry, to which the face is aligned.
▪ Axis: Specify the axis of rotation around which the reference edge is swept to create reference geometry. The Axis button is activated only if you click Rotational.
The axis of rotation and the reference edge must lie on the same workplane.
3. Click Change Face, and then, select the face to be aligned; press SHIFT to select multiple faces.
4. To align additional faces, click Accept Faces and repeat the steps to select reference elements and faces (Steps 2 and 3).
5. Set the following options:
◦ Offset: Align specified faces with an offset. The direction of the offset depends on the face normal of the reference face. Creo Elements/Direct Modeling displays a preview of the offset.
◦ Keep Tan: Preserve the tangential transitions between neighboring faces. Click Control to fix or unfix edges and faces. If you choose not to Keep Tan, smooth tangential transitions are replaced by edges.
◦ Redo Blend: Allow the operation to make automatic adjustments to blends. Click Control to specify the blends to redo.
◦ Opposite: Align two opposing face normals with one another. If Creo Elements/Direct Modeling can detect opposite face normals, it will automatically select Opposite.
◦ Chk & Fix: Use when you suspect a part is corrupt. Chk & Fix checks for self-intersections, knife edges, and void shells and attempts to fix them. If a part fails the check and fix, it is not modified and remains in its original state.
◦ Enlarge Sfs: Enlarge surfaces that are adjacent to the faces you are aligning.
6. Click Preview to see a preview of the alignment.
7. The Upd Relsoption is available when the Parametrics module is active. Select this option to update relations with your changes.
8. Click to complete the operation.
Limitations
• All reference faces must be within one body, and all faces to be changed must be in one body. The reference and target faces, however, can be located in two different bodies.
• You can choose whether the normal directions of the reference faces and change faces are in the same or opposite directions. However, you can only set the face normal direction once, for all selected faces, before starting the align modification.
• If the reference faces are smaller than the target faces when aligning the surface of a body, the align operation will fail. The intersection curve of the reference faces must be long enough to act as the intersection curve of the target faces.
• The alignment of faces is limited by the size of the surface geometry of the reference face. This must be large enough to reach the faces to be aligned. This is especially relevant for curved geometries like cylinders, tori, etc.
• The Offset option will not work if the offset distance is too large so that the resulting surface would self-intersect.
• If you select the Redo Blend option, the system will attempt to recreate the blend with the same blending options. However, in some situations that may not be possible. If the blend was created with the RollAtSharp or RollAtSmooth options, the blend may be recreated without those options.
 Align. The Align dialog box opens.
 to complete the operation.