A partial view is identical to a detail view, but in this case the original full view is replaced by the detail. A partial view is created similarly to a detail view. Specifically, you define a partial view border the same way as a detail border.
You can restore the full view later with the Partial to Full command.
• All annotations, detail borders, and section lines added to the parent view are lost when you create a partial view. This information is not recovered by restoring the full view later.
• Creo Elements/Direct Annotation applies the Detail view positioning strategy to Broken views and Partial views.
To create a partial view,
1. Click Annotation and then, in the Setup group, click the arrow next to Dep View.
3. Specify the parent view in one of the following ways:
◦ Type the name and path of the view in the Parent View box.
◦ Click the view in the Creo Elements/Direct Annotation Viewport.
◦ Select the view from the Drawing Browser.
The partial view border options are visible under Create Border.
4. Click one of the border types:
◦ Rectangle
◦ Circle
◦ Polygon
◦ Spline
You can define the default border type in Default Setting Browser.
5. Click the first point of the border.
6. Complete the border:
◦ For rectangles and circles, click the other point to define the border.
◦ For polygons and splines, continue clicking points as required. You can click Back to undo the last specified point of the border. When you are finished, click Accept.
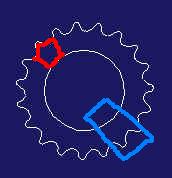
To avoid problems, define borders as shown in the image in blue. Avoid following part borders (shown in red).
7. If necessary, type a new partial view number in the Number data entry field.
8. Type a scale factor for the partial view in the Scale data entry field.
9. Accept or change the Profile default setting.
10. To preview the view in a 3D viewport, click Preview.
11. Click to complete the operation.
12. Move the cursor into the Creo Elements/Direct Annotation Viewport.
A boxed view placeholder will follow the cursor.
13. Click the view position to fix the placeholder on the sheet.
Again, the original view is removed from the sheet. You can update a view of a large assembly right now or later.
To reset a partial view to the original full view,
All annotations, detail borders, and section lines added to the detail view are lost when you reset it to a full view.
1. Click Annotation and then, in the Setup group, click the arrow next to Dep View.
2. Click Partial to Full. The Reset Partial dialog box opens.
3. Specify the partial view in one of the following ways:
◦ Type the name and path of the view in the Parent View box.
◦ Click the view in the Creo Elements/Direct Annotation Viewport.
◦ Select the view from the Drawing Browser.
4. Accept or change the Profile default setting. See
Set view profiles for more information.


 to complete the operation.