Load a model from Creo Elements/Direct Model Manager
When you use models from the Creo Elements/Direct Model Manager database, you can take advantage of these powerful options:
• Use different revisions of a specific model within an assembly for "what if" analysis.
• Easily identify if you or others have reserved the model.
• Receive notification when a model you are using changes in the database.
Load a model from Creo Elements/Direct Model Manager to Creo Elements/Direct Modeling
1. Start a new session in Creo Elements/Direct Modeling and start Creo Elements/Direct Model Manager.
2. In Creo Elements/Direct Model Manager, click the Recent List tab in the Workspace bar.
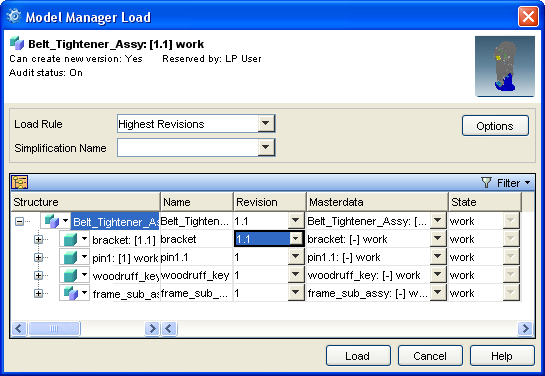
3. Right-click a model in the workspace (like the one you used in Part 1) and click Load. Creo Elements/Direct Model Manager uses the latest revision of the assembly. The Model Manager Load dialog box opens. Alternatively, you can double-click the model.

4. Select from several load options in the Model Manager Load dialog box:
◦ Select a Load Rule to specify the versions you want to use.
About load rules | ||
|---|---|---|
By default, Creo Elements/Direct Model Manager loads the highest revision of all models in the assembly. Use As Stored to load an assembly with the revision in which it was last stored, or select specific revisions for specific parts.
|
◦ Select a load type to load only as much data as you need. Click the arrow next to  to select a load type. The default is Full Geometry.
 to select a load type. The default is Full Geometry.
You can save significant amounts of download time and disk space by selecting a lightweight or partial load. |
About load types | ||
|---|---|---|
There are three load types: full, lightweight, and partial. Full loads the full model (default). Lightweight loads a 3D representation of the model. Partial loads only the structure of the model. When working on a very large assembly, decrease load time and improve Creo Elements/Direct Modeling performance by loading the full model files for only the models you plan to modify. Easily change the load type using the Change Load Type command in the Creo Elements/Direct Modeling Structure Browser. The Change Load Type command is only meant to be used on single parts, so it is much slower than reload or update on multiple items.
|
5. Click Load and the model loads in Creo Elements/Direct Modeling.
Modify the model in Creo Elements/Direct Modeling
See additional Creo Elements/Direct Model Manager features when you modify your model.
1. Make some changes to your model. Creo Elements/Direct Model Manager knows the local model is different from the one in the database: Locally Modified appears next to the model in the Creo Elements/Direct Modeling Structure Browser.
2. Save the model to Creo Elements/Direct Model Manager. From the Save dialog box, choose Major Rev as the Save Type, and add a Change Note that explains your modification.
About Change Notes | ||
|---|---|---|
In the Save dialog box, click  to open the Change Note dialog box. The number in Change Index is the revision of the model. to open the Change Note dialog box. The number in Change Index is the revision of the model.• Type a Comment that describes your changes. • Type a Title for the change note. To view the Change Notes later, open the DB Properties menu and click the Notes tab.
|
Will it work for you?
You've loaded and modified 3D data. Now look at your options with Load features and see the advantages of loading your data from the database:
• Work only with the data you need.
• Look at properties of your data.
• Know immediately when a colleague changes a model.
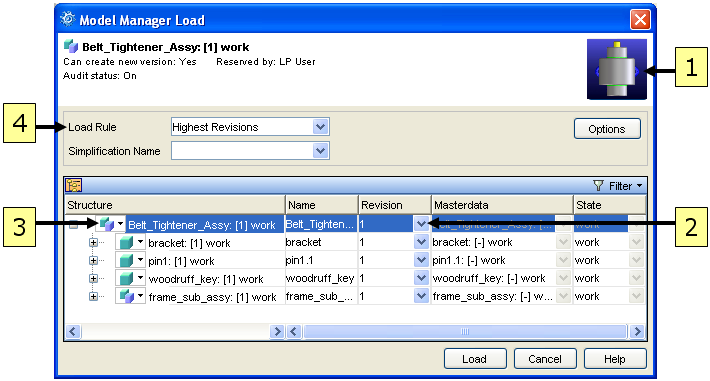
Tour the Creo Elements/Direct Model Manager Load dialog box |
|---|
 1. Preview: A thumbnail image of the model. 2. Revision: Choose the revision you'd like to load. You can choose different revisions for each part. 3. Load Type: Click the down arrow to access the load types: Full, Lightweight, and Partial. 4. Load Rule: Select a Load Rule for the entire assembly. Selecting a revision will override the load rule. |
Try this on your system
• Load only the geometry you need.
◦ Load your data from Creo Elements/Direct Model Manager to Creo Elements/Direct Modeling using the lightweight load type. In the Model Manager Load dialog box, click the arrow next to  and select Lightweight Model. Notice that the model and assembly icons in the Structure Browser look different - pastel colors. Now try to modify the model in Creo Elements/Direct Modeling. You will receive an error message from Creo Elements/Direct Modeling. Now, change the load type. Right-click the model and select Change Load Type.
 and select Lightweight Model. Notice that the model and assembly icons in the Structure Browser look different - pastel colors. Now try to modify the model in Creo Elements/Direct Modeling. You will receive an error message from Creo Elements/Direct Modeling. Now, change the load type. Right-click the model and select Change Load Type.
• Load a model with different load rules.
a. Load and modify a part. Save only the part as a new revision. (Don't do a top-down save at the assembly level.)
b. Reload the assembly in Creo Elements/Direct Modeling with the load rule As Stored. The assembly uses the older part, without the modifications.
c. Reload the assembly in Creo Elements/Direct Modeling with the load rule Highest Revision. The assembly uses the newest version of the modfied part.
• View the properties of models and Masterdata.
◦ From the workspace, right-click a Masterdata and select > . Click the Edit check box to change the Description of the part, choose a different Material, type a different Name, choose a part Type, and specify the Unit.
◦ Back in the workspace, right-click an assembly/model and select > . Click the Structure column to change the order of the revisions from ascending to descending. Open other tabs to see additional assembly information.
• View the state of a model.
◦ From the workspace, click a model. Use the Details pane to identify the state of parts and models in your assemblies: Approval, Released, and Work.
• Receive notifications of changes.
Creo Elements/Direct Model Manager sends a pop-up notification to Creo Elements/Direct Modeling when a model you're working on changes.
a. Click the Recent List tab in the Workspace bar. Right-click a model and select > .
b. Click Edit and type a description in Description_2.
c. Click Apply and OK.
d. In Creo Elements/Direct Modeling, click > > . A toaster notification pops up in the bottom right corner of Creo Elements/Direct Modeling.
e. Click the notification and the model is highlighted in the Structure Browser and the geometry is highlighted in the viewport.
f. In Creo Elements/Direct Model Manager, click the Notifications tab in the Workspace bar. The notification time and the task-alerts are displayed.