Advanced topics
The information and tips in this page help you become a power user of Creo Elements/Direct Model Manager.
Organize your workspace
You can rearrange your workspace and the display order to fit your needs. You can
• Sort the display order by clicking the column name.
• Drag and drop columns to rearrange their order.
• Add new columns. Right-click in the workspace and select Layout. Make sure to click outside of the Structure column and in the white space.
Masterdata
Masterdata is an important concept in data management and Creo Elements/Direct Model Manager. Think of masterdata as a collection of models, drawings, viewables (eDrawings and XVL), specification documents, pdf files, other related engineering documents that define and describe the complete manufactured part. Masterdata has a real part number such as 001-234. The part number may be different from the Model Name.
Masterdata organizes its design data in a hierarchical structure.
• Models and Drawings are listed underneath the Masterdata and can have many revisions and change notes.
• Other documents such as specifications, viewables, and pdf files are also listed underneath the Masterdata and are kept in the Attachments folder.
Working with assemblies
After modifying a model in Creo Elements/Direct Modeling, use a top-down save in Creo Elements/Direct Model Manager. Select the top level assembly to save. Creo Elements/Direct Model Manager will identify and save only the parts that changed.
• If you save the part instead of the top level assembly, Creo Elements/Direct Model Manager uses a roll up save process for each of the parent assemblies that is loaded in Creo Elements/Direct Modeling. For example, if you modify a part several levels deep in an assembly and save it as a new Minor Rev or Major Rev, Creo Elements/Direct Model Manager will automatically identify the parent assembly to be saved. If you save the parent assembly as a new Minor Rev or Major Rev, Creo Elements/Direct Model Manager will roll up and identify the parent assembly's parent to be saved as well. The roll up process continues to the top of the structure tree or until you save one of the parent parts as an Overwrite instead of as a new Minor Rev or Major Rev.
Naming shared parts
Naming your data is an important part of managing your design data. Use these suggestions to help you name your shared parts, which are a convenient way to re-use common data.
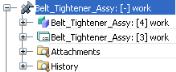
Use base name logic when naming your shared parts. When a shared part exists in
• One level of an assembly: Use a base name. Creo Elements/Direct Modeling names the original part with the base name and then increments the other parts by .1. The pseudo folder in the Creo Elements/Direct Modeling Structure Browser  tells you the base name of the part.
tells you the base name of the part.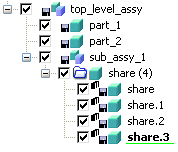
• Multiple levels of different assemblies: Use the same base name for all shared parts.

Snapshots
Retain the way your models are loaded in Creo Elements/Direct Modeling with Snapshots  . A snapshot file tells Creo Elements/Direct Model Manager what to load (which parts and assemblies) and how to load it (the environment settings). When you save a snapshot to Creo Elements/Direct Model Manager, the snapshot retains your environment settings: the number of open viewports, the camera position on each item, whether items are displayed or turned off, load rules, and any active 3D configurations such as exploded views. The next time you load the snapshot into Creo Elements/Direct Modeling from Creo Elements/Direct Model Manager, you'll have the entire product development environment back, just the way you left it.
. A snapshot file tells Creo Elements/Direct Model Manager what to load (which parts and assemblies) and how to load it (the environment settings). When you save a snapshot to Creo Elements/Direct Model Manager, the snapshot retains your environment settings: the number of open viewports, the camera position on each item, whether items are displayed or turned off, load rules, and any active 3D configurations such as exploded views. The next time you load the snapshot into Creo Elements/Direct Modeling from Creo Elements/Direct Model Manager, you'll have the entire product development environment back, just the way you left it.There are three main reasons to use snapshots:
1. Save your work at the end of the day so you can quickly come back to it later.
2. Send your data to others. They can see what items you've zoomed in on and put a note on your design.
3. Prepare for a design review meeting. Set up Creo Elements/Direct Modeling with multiple viewports, multiple parts and assemblies, configurations, etcetera so that you're ready when the design review begins.
With snapshots, you can
• Load multiple assemblies, or parts of assemblies, in one step.
• Open your models or assemblies with the same number of viewports that you had open when you saved the snapshot.
• Retain the camera position on each item.
• Load the 3D configurations that were active when the snapshot file was saved.
• Use load rules to update models if they've changed since they were captured in the snapshot.
The models are not actually saved in the snapshot. Instead, the snapshot saves only the load and environment settings, not the models or their geometry. |