Creating a Polyline
Polylines can be created with Poly Element.
Polylines facilitate design modifications.
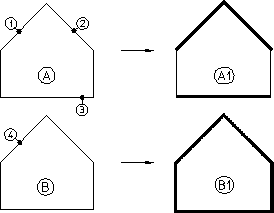
The following example shows some of the differences of working with polyline elements and non-polyline elements. Drawing A is a standard polygon created with Polygon in Line. To modify the pensizes of drawing A to produce drawing A1, you need to click points 1, 2, and 3 (for the purpose of this example, it is assumed that only individual elements can be clicked).
Drawing B is similar to drawing A but has been converted into a polyline. Because drawing B is a polyline, it acts like a single element and you need only click point 4 to modify the complete shape (drawing B1).
Modifying Polyline and Non-Polyline Elements
The following procedure describes how to create a polyline from a polygon and then modify the polyline by changing its pensize and shape.
To create a polyline:
1. Create a polygon.
2. Click Poly Element in Line.
3. Click a vertex of the existing polygon.
4. Click a polygon element that ends at the vertex.
5. Click adjacent elements or click the last element.
6. Click End when the desired shape is defined.
The polygon is now a polyline. To test it, change the pensize:
1. Click Change in Geometry.
2. Click Pen Width in Change.
3. Enter a value (for example, 0.5).
4. Select one element of the polyline.
Note that the complete shape changes--not just the selected element.
Similarly, you can modify the shape of the polyline:
1. Switch off Keep in Modify.
2. Click Stretch in Modify.
3. Click a Stretch option (such as Horizontal).
4. Click a vertex (or enclose it in a box).
5. Specify the new position of the vertex.