Deleting Parts
Consider the CYLINDER ASSEMBLY hierarchy with PISTON ASSEMBLY active. The following figure shows three examples of the deletion mechanism. The star shows the active part; the D shows that an element in the part was identified for deletion.
Deleting Parts
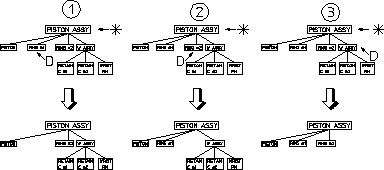
Note that in the third case:
• The entire WRIST ASSEMBLY would be deleted if any element of RETAIN CLIP 1, RETAIN CLIP 2, or WRIST PIN were identified.
• If WRIST ASSEMBLY was made active and an element in RETAIN CLIP # 1 identified for deletion, only RETAIN CLIP # 1 would be deleted.
You cannot delete the current active part or the Top part. A link is always maintained to the Top part. |
To delete parts:
1. Press PARTS 1.
2. Pick Part in EDIT.
3. Identify the appropriate part in your hierarchy you wish to set as active. Note that selection of the active part will control what is actually deleted.
4. Press DELETE.
5. Identify the part(s) you wish to delete.