Introduction
The Copilot functionality lets you view an element's attributes (angles and dimensions) before you fix the position. This dynamic feedback lets you create designs quickly and minimizes the need for construction geometry.
The Copilot functionality can be toggled on or off via the SETUP 1 menu. When copilot functionality is active, you can set the snapping distances and angles.
An additional feature of copilot functionality is being able to offset elements. This is done with the OFFSET option which can be found the CREATE 1 menu (only when the COPILOT command is switched on). See Offsetting Elements later in this chapter for examples about offsetting elements.
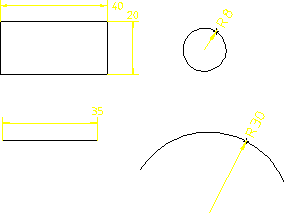
The following figure shows the on-screen feedback that you get when creating geometry.
Copilot Functionality: Typical Feedback
You can also enter values using the keyboard as usual if you need greater precision over size and positioning.
These features apply to the CREATE and MODIFY menus, and to construction geometry.
The magenta box over the cursor indicates that you are in copilot-mode and about to pick a start-point. Depending on the type of geometry, the line color changes:
Green | Cursor position is coincident with construction geometry |
Blue | Cursor position is coincident with existing elements. |
When creating a drawing, Creo Elements/Direct Drafting gives you feedback on the status line.
Geometry Feedback on the Status Line

The meaning of the feedback text is as follows:
Align | Cursor position is aligned with intersecting geometry. |
Angle | Indicates an angle between the existing line and the new line. |
Center | Cursor position is at the center of an element. The center of the line is its midpoint. |
Flip | Indicates when the direction of an angle reverses. For example, when creating an arc using Cen R Angs, the center, radius, and one end of the arc are defined. Picking the same end point flips the arc in the opposite direction. |
Grid | Indicates that the new element is caught to a grid point. |
Int | Cursor position is at an intersection point of construction geometry. |
Length | Indicates the length of a line is used. For example, when defining a perpendicular line, Length may be used once the slope is known. |
Offset | Indicates that an offset from two elements will be used. |
On | Indicates that the cursor will be caught to an element. |
Perpend | Indicates the geometry is perpendicular. |
Pick | Indicates that a simple pick will occur (cursor is not intersecting with other geometry). |
Rel HV | Indicates that relative horizontal vertical distances will be used. For example, the second point of a rectangle can be defined with horizontal and vertical distances relative to the first point. |
Slope | Indicates that you are about to define a slope. |
Tangent | Indicates that the cursor will be caught to a circular element. |
Vertex | Indicates that the cursor will be caught to a vertex. |