Single Dimensioning
This section describes how to dimension single linear geometry features.
Creo Elements/Direct Drafting allows you to define the orientation of the single dimension relative to a geometry feature using the buttons of the Orient gallery.
All buttons enable you to apply dimensioning to a single linear drawing element or to a group of elements depending on your selection. You can:
• Click any two dimension points. The line between the two points is dimensioned.
• Click a single linear drawing element. The starting point of the selected element becomes the first dimension point. Select a second dimension point on this or any other linear drawing element to complete the dimension.
• Select multiple linear drawing elements with  Select or by enclosing them in a box. The end points of each selected element become dimension points, and each element is dimensioned.
Select or by enclosing them in a box. The end points of each selected element become dimension points, and each element is dimensioned.If you clicked the Automatic check box (automatic dimension displacement) in the Options settings of the Dimension Settings dialog box, Creo Elements/Direct Drafting positions the new dimensions automatically. Automatic placement only applies when you have selected multiple elements for dimensioning.
If you cleared the Automatic check box (automatic dimension displacement) in the Options settings of the Dimension Settings dialog box, position the dimensions on your drawing manually. A dimension trace appears when you select elements. Move the trace around your drawing until the dimension text is in the desired location. Click the desired text location and Creo Elements/Direct Drafting draws the dimension or dimesions. When multiple elements are selected, the trace shows the proposed dimensions for all of them at the same time.
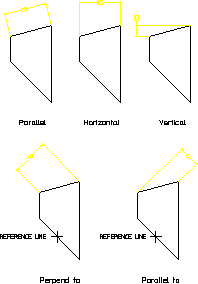
The following figure shows the result of using each single dimensioning option.
Single Dimensioning – Options
To dimension single linear geometry features:
1. Click Drafting and then, in the Annotate group, click the arrow next to  Linear.
Linear.2. Click Single and then, click the required Orient button in the gallery and perform the associated procedure:
Single and then, click the required Orient button in the gallery and perform the associated procedure:Orient Button | Purpose | Procedure |
|---|---|---|
 Parallel Parallel | Draw a dimension parallel to a line drawn between two dimension points (along an inclined plane). | a. Click the dimension points or elements to be dimensioned. b. Specify the location of the dimension. c. If you have cleared the Automatic check box (automatic dimension placement) in the Options settings of the Dimension Settings dialog box, position the dimension on your drawing manually. d. Click  OK. OK. |
 Horizontal Horizontal | Draw a dimension in the horizontal plane. | a. Click the dimension points or elements to be dimensioned. b. Specify the location of the dimension. c. If you have cleared the Automatic check box (automatic dimension placement) in the Options settings of the Dimension Settings dialog box, position the dimension on your drawing manually. d. Click OK. |
 Vertical Vertical | Draw a dimension in the vertical plane. | a. Click the dimension points or elements to be dimensioned. b. Specify the location of the dimension. c. If you have cleared the Automatic check box (automatic dimension placement) in the Options settings of the Dimension Settings dialog box, position the dimension on your drawing manually. d. Click OK. |
 Perpendicular to Line Perpendicular to Line | Draw a dimension perpendicular to a reference line. | a. Click a reference line. b. Click the dimension points or elements to be dimensioned. c. Specify the location of the dimension. d. If you have cleared the Automatic check box (automatic dimension placement) in the Options settings of the Dimension Settings dialog box, position the dimension on your drawing manually. e. Click OK. |
 Parallel to Line Parallel to Line | Draw a dimension parallel to a reference line. | a. Click a reference line. b. Click the dimension points or elements to be dimensioned. c. Specify the location of the dimension. d. If you have cleared the Automatic check box (automatic dimension placement) in the Options settings of the Dimension Settings dialog box, position the dimension on your drawing manually. e. Click OK. |