Drawing Using Layers
Creo Elements/Direct Drafting allows you to split up your drawing into a number of layers using the buttons in the following groups on the Structure tab:
• Info
• Layer
• URL
The advantage of working this way is mainly in visualization. By switching layers on and off you can simplify what you see on the screen.
Suppose you wish to create an assembly drawing of a cap bearing consisting of four components. Each component was stored as a drawing, and you must load each one to create a four part drawing.
The following figure shows the parts structure.
Cap Bearing Parts Structure

Irrespective of the parts structure, you want to be able to see the assembly in three different ways:
• Each of the components individually.
• With the cap removed.
• Fully assembled.
To do this we can use the three layer commands and place the various elements into layers; some elements would be contained in more than one layer.
Finally, via the Layer tab in the Show dialog box, you can switch the various layers on and off to produce the required views. The layers would be as follows:
• Layer: 1
Contains all the HOUSING elements.
Figure 203. Layer 1 — Housing Elements
• Layer: 2
Contains all the BEARING elements.
Figure 204. Layer 2 — Bearing Elements

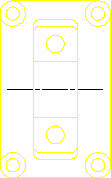
• Layer: 3
Contains all the SHAFT elements.
Figure 205. Layer 3 — Shaft Elements
• Layer: 4
Contains all the CAP elements.
Figure 206. Layer 4 — CAP Elements

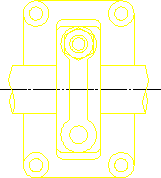
• Layer: 5
Contains most of the HOUSING elements, all the BEARING elements and some of the SHAFT elements.
Figure 207. Layer 5 — Housing, Bearing and Shaft Elements
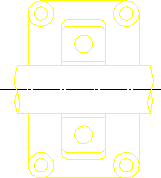
• Layer: 6
Contains some of the HOUSING and SHAFT elements, plus all the CAP ones.
Figure 208. Layer 6 — Housing, Shaft and CAP Elements