Solve for Variations
With the parameters defined, you can now use the Solve group buttons on the Parametric tab for variations:
• Click Parametric and then, in the Solve group, click  No Keep.
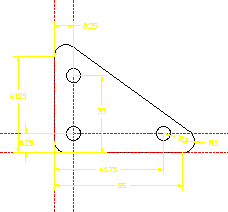
No Keep.All the parameterized dimensions are now adjusted according to the expressions you entered in the parameter definition table, see the following figure. The height is now .75 of the base, the "Dim1" and "Dim3" dimensions are equal, and both are .2 of the base dimension.
Figure 261. Variation of Demopart01
• Since all the linear dimensions are related to the base dimension, you only need to modify this dimension to make the entire part adjust. Try assigning several different values to the base dimension, solving after each change. You can change this dimension one of three ways:
◦ Using the Generate Constraints dialog box:
a. Click Parametric and then, in the Create group, click  Constraints.
Constraints.The Generate Constraints dialog box opens.
b. In the Action area, click Assign.
c. In the Type box, select Dimension.
d. Click Apply.
e. Click the dimension label.
f. Type the new value in the user input line and press ENTER.
◦ Using the Current Constraints dialog box:
a. Click Parametric and then, in the Show group, click Current.
Current.The Current Constraints dialog box opens.
b. Select the dimension that you want to change.
c. Type a new value.
d. Click Apply.
◦ By using the parameter value table:
a. Click Parametric and then, in the Show group, click Current.
Current.The Current Constraints dialog box opens.
b. Click Advanced.
The Advanced dialog box opens. It contains the parameter value table.
c. Click the value you want to change in the New Value or Expression column.
d. Type the new value and click Apply.