Installing MySQL Database on Windows
Installing MySQL Database on Windows
For details about MySQL installation not covered in this guide you can refer to the official documentation on dev.mysql.com
Supported MySQL Versions
MySQL 5.5.x and 5.6.x are supported. Codebeamer-7.9.0 and higher support also MySQL 5.7.x. For more information please refer to the appropriate Codebeamer Release Notes.
|
|
For Codebeamer-8.1.x or higher installations MySQL 5.7.x is recommended.
|
Software dependency for MySQL installer
The installation of the following software is prerequisite of MySQL installation
• .NET Framework 4.0 http://go.microsoft.com/fwlink/?LinkId=181012
Cleanup possible old MySql installations
If MySQL was previously installed on the system it should be ensured that all MySQL related directories and files are removed (to avoid for example that the root password gets inherited from the old installation).
The directories below should not exist. The directory names might be different depending on the Windows and MySql versions:
• C:\Program Files\MySQL
• C:\Documents and Settings\All Users\Application Data\MySQL\MySQL Server
• C:\Program Files (x86)\MySQL
• any Users' AppData folders. Example: C:\Users\abc\AppData\Roaming\MySQL
Fast Installation
This section is about installing MySQL 5.x with guided wizard installer (examples are provided for specific version 5.7).
Downloading MySQL
Download MySQL installer package from MySQL download site.
If you cannot see the version you wish to download click on Looking for previous GA versions?.
It is not necessary to sign up if offered, there is a No thanks, just start my download link for bypassing that.
Installing MySQL
• Double click on the downloaded file (for example, mysql-installer-community-5.7.28.0.msi).
• Click Yes on all warnings from the OS.
• On the upcoming install UI, click on Developer Default.
• On the next page, there are products that are not necessary for Codebeamer
Click Execute on the page, it will install some of the products.
• Click on Accept/Yes/Install in the next install pages (license agreements, warnings).
• Click on Next.
• There is a question Some of the products are not installed, do you want to continue?, click Yes.
• On the next page there is the list of software items to install, the installation is called Execute.
• Click on Execute.
• The next page is about configuration, click on Next.
• The next page is about High Availability, click on Next.
• The next page is about port configuration, unchanged it is OK, click Next.
• The next page is about passwords, enter the root password, and write it down somewhere since it will be important later.
• The next page is about MySQL as service, unchanged it is OK, click Next.
• The next page is a config summary page, click Execute.
• The next page is configuration, click Next.
• The Finish button appears, click Finish to finish the installation.
• After Finish you get back to the Configuration start page, click on Cancel.
• In the Start menu click on All Programs/MySQL/MySQL Server 5.7 Command Line Client.
• That will start the command line client.
• Enter the root password.
• The command line client is up and running, you can start queries like show databases, drop database abc.
Network configuration page:

Service configuration page:

MySQL server is installed and you can carry on with Codebeamer installation.
Advanced Installation
This section is about installing MySQL 5.x from ZIP archive package (examples are provided for specific version 5.7).
For details about MySQL ZIP archive not covered in this guide you can refer to the official documentation on dev.mysql.com
Download and Install 2013 C++ Redistributable
Download and install the followings:
2013 C++ x86:
2013 C++ x64:
Download MySQL
Download MySQL Community Server ZIP Archive for Windows (x86, 64bit).
Go to MySQL download site.
If you cannot see the version you wish to download click on Looking for previous GA versions?.
It is not necessary to sign up if offered, there is a No thanks, just start my download link for bypassing that.

Extract the archives
Extract the content of the .zip file into an arbitrary directory (in this example C:\MySQL5.7).

Move data location
In enterprise environment it is common to store the data on different storage/partition than the executable program files. (This step is optional. The data folder can stay in its original place.)
Copy the data folder (C:\MySQL\data\) to an arbitrary location. In this example it is the D drive (D:\data\).
Create MySQL configuration file
Create and edit my.ini configuration file in the base installation folder (C:\MySQL5.7). Save the file with the content like below, and adjust the directory paths accordingly (basedir, datadir):
[mysqld]
sql_mode=NO_ENGINE_SUBSTITUTION,STRICT_TRANS_TABLES
#--------------------------------------------------
basedir = "C:/MySQL5.7"
datadir = "D:/data"
port = 3306
max_allowed_packet=256M
thread_stack=256K
sql_mode=NO_ENGINE_SUBSTITUTION,STRICT_TRANS_TABLES
#--------------------------------------------------
basedir = "C:/MySQL5.7"
datadir = "D:/data"
port = 3306
max_allowed_packet=256M
thread_stack=256K
Secure the installation
Open up a command prompt window, go to the "bin" folder of the installation, and start MySQL server:
C:\MySQL5.7\bin> mysqld --console
Open up a different command prompt window and start the client connecting to server with superuser root account (do it also from bin folder):
C:\MySQL5.7\bin>mysql -u root
When connected to the server the prompt changes to mysql>
Set the root password.
mysql> SET PASSWORD FOR 'root'@'localhost' = PASSWORD('your_new_root_password');
Disconnect the client from the server with exit command:
mysql> exit
From now on the client needs to be started with a -p switch and password has to be provided to connect.
C:\MySQL5.7\bin>mysql -u root -p
Enter password:
Enter password:
Stop the server running in console press: Ctrl-C
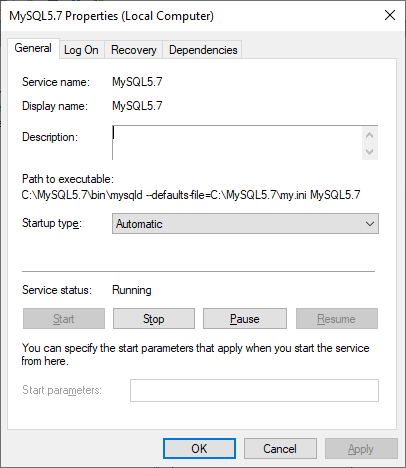
Install Windows service
Install Windows service with specifying service name (MySQL5.7) and configuration file (my.ini)
C:\MySQL5.7\bin>mysqld --install MySQL5.7 --defaults-file=C:\MySQL5.7\my.ini
A new service should appear in Service Manager (configure it if necessary, for example, startup type, or logon account).
Start the new MySQL Windows service.

It might happen an error like below is displayed when trying to start the service.

If so, do the following:
• Verify if paths are correctly defined in the Windows service:
• Go to the "bin" folder, and if exists, delete the file mysqld with size 0 bytes (not mysqld executable).
To remove an already existing incorrectly defined service the
sc delete <service_name>
command can be used (be cautious running this command).For example,
C:>sc delete MySQL5.7
After the service successfully started for diagnostic purposes you can connect with client again, and run a few commands to verify the installation. E.g.
mysql> show databases;
MySQL server is installed and you can carry on with Codebeamer installation.
Set up Codebeamer with MySQL database
At step #3 in Codebeamer setup wizard select MySQL for backend database and provide connection parameters.
Before continuing to the next step test the connection.
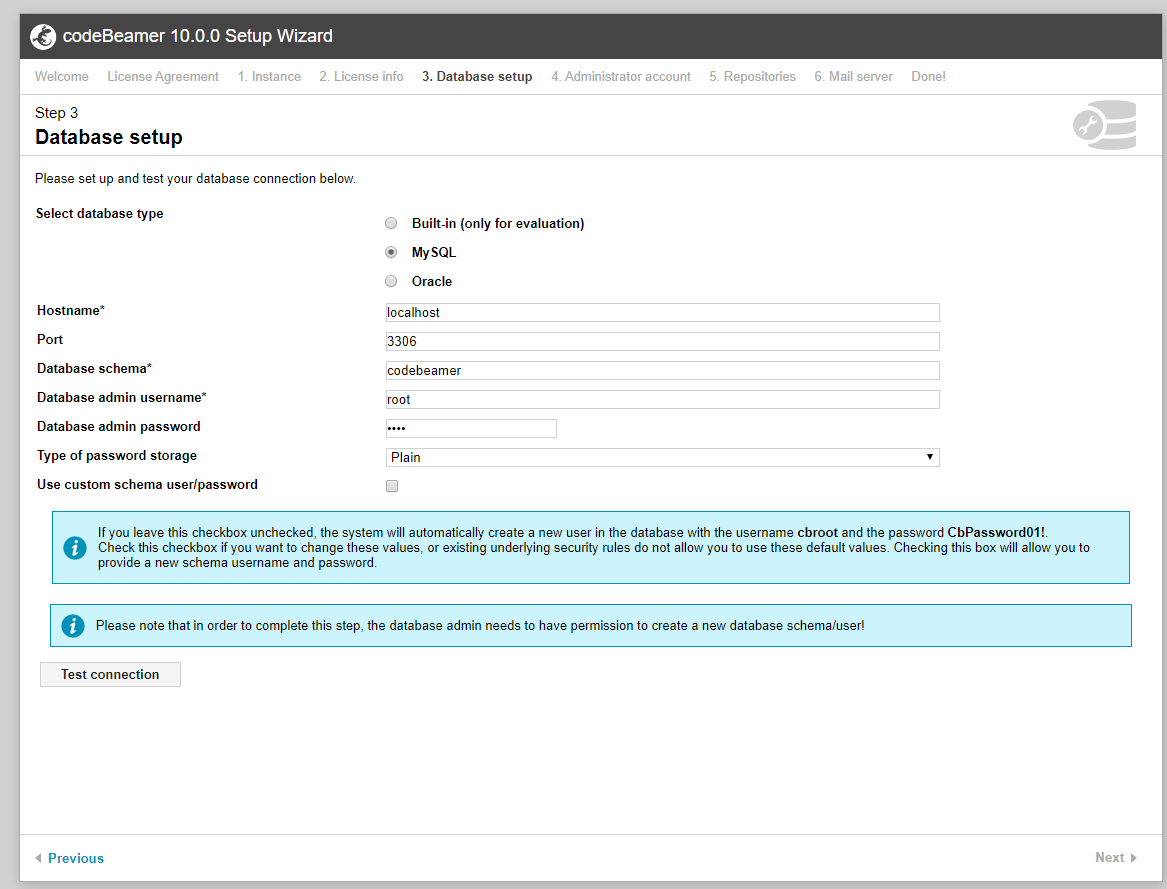
Successful connection is confirmed with a message like the following, and the rest of the setup process can be completed.
