Adding New Elements to Your Stylesheet
Arbortext Styler lets you add declared, undeclared, namespaced, and User Formatting Elements (UFE) to your stylesheet. You can add new elements individually or by document, DTD, or schema.
|
|
As a default, Arbortext Styler only displays in the Elements list those elements that have been used in the document. To view all available elements in your stylesheet, deselect the > menu option.
|
To Add a Single Element to Your Stylesheet
1. In the
Elements list

in
Arbortext Styler, choose the > menu option. A new unstyled element named
NewElement is created in the list.
| If you choose this menu option when any of the other list views are active, you will be taken to the Elements list and the element will be created as described. |
2. Rename the element as required, and press ENTER. The element is moved to its correct position in the alphabetic list. You can now apply a style and properties to the new element.
If you want to add a User Formatting Element (UFE) to your stylesheet, preface the name of the new element with the _ufe: namespace prefix and Arbortext Styler will recognize the new element as a UFE.
If you want to add a namespaced element to your stylesheet, include the namespace prefix when you are entering the element name. If Arbortext Styler does not recognize the prefix you will see the Add Namespace Declaration dialog box. Complete the namespace declaration in this dialog box for the element to be valid.
If you need to rename the element, highlight the element and then either select the > menu choice, press the F2 key, or right-click on the element and select the menu choice.
Example: Adding Multiple Elements to Your Stylesheet from Your DTD, Schema, or Document
This example describes how to add to a stylesheet all the remaining elements in a DTD, schema or document that have not already been included in the stylesheet.
1. In Arbortext Editor, open the transport.xml document located at Arbortext-path/samples/styler.
2. Choose > to open the associated stylesheet for edit. This is a read only stylesheet so you will need to save a local copy if you want to make amendments.
3. In the Elements list in Arbortext Styler, select the abstract element.
4. Delete the element from the stylesheet by choosing the > menu option or pressing the DELETE key. You will see a message advising you that all references to the element will also be deleted - click Yes to continue with the deletion.
5. Sort the Elements list by style by clicking on the Style column - you will see that there are currently no unstyled elements in the stylesheet. This step serves as a baseline with which you can compare the same list later in the procedure, when new elements have been added.
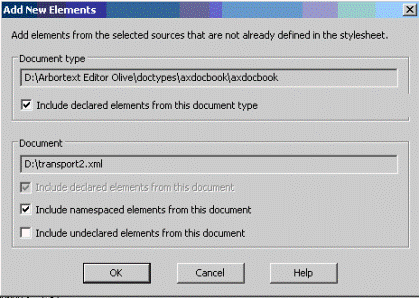
6. Choose the > menu option. The Add New Elements dialog box opens.
7. Select the Include declared elements from this document type and Include namespaced elements from this document options.
| If Include declared elements from this document type is selected, the Include declared elements from this document is selected by default. |
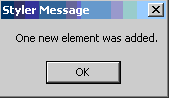
8. Click OK. A message displays indicating how many new elements were added, if any. The message indicates if there were no new elements to add.
To locate the elements that were added, sort the Elements list by style again, and look for elements that have the Unstyled style (ensure that the menu option > is deselected). You will see that the abstract element has been reintroduced to the stylesheet.