Explicit Settings
You can add text to elements that will be automatically generated when the document is composed or displayed in Arbortext Editor, for example the word Chapter and a chapter number before the content of chapter titles.
|
|
Arbortext Styler allows you to automatically generate numbers for title and listitem elements.
|
Example: Adding Generated Text Before and After an Element
The procedure below describes how to add generated square brackets around a piece of text, and a hyphen when the element includes a specified attribute.
1. In Arbortext Editor, open the transport.xml document located at Arbortext-path/samples/styler.
2. Choose the menu option > to open the associated stylesheet for edit. This is a read only stylesheet so you will need to save a local copy if you want to make amendments.
3. In Arbortext Editor, add a para element after the Introduction chapter title.
4. Click inside the para element and add a cmdsynopsis element.
5. Click inside the cmdsynopsis element and add an arg element.
6. Type argument inside the arg element.
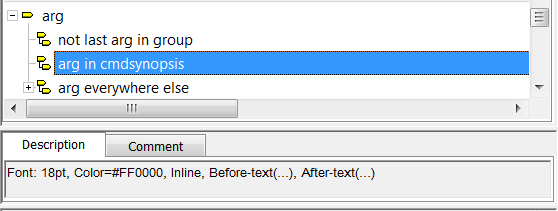
7. With the arg in cmdsynopsis context selected in the Elements list in Arbortext Styler, click on the Generated text category.
8. Click Edit next to the Before-text field.
The Generated Text Editor opens.
9. In the Generated Text Editor window, type a left square bracket ([).
10. Choose > to save the generated text and exit the editor. The left bracket will now appear in the Before-text field.
11. Click Edit next to the After-text field.
12. In the Generated Text Editor window, type a right square bracket (]).
13. Choose > to save the generated text and exit the editor. The right bracket will now appear in the After-text: field.
14. With the arg in cmdsynopsis context still selected in the Elements list, click on the Text category. Set Text size to 18 and Text color to Red. This will make the word “argument” more visible in the output.
Note that the Description field for the context contains a full description of the font and generated text settings you have specified:
15. Choose > .
In the Print Preview window, note that the word “argument” in the first paragraph of the document is now preceded and followed by square brackets.
16. In Arbortext Editor, click in the arg element, and elect to modify the element's attributes.
17. Set the attribute choice="opt" then click OK to exit the Modify Attributes dialog box.
18. In Arbortext Styler, select the arg in cmdsynopsis context in the Elements list.
19. Select the > menu option to create a new condition for the context.
20. Click New Attribute Test in the Condition dialog box to open the Attribute Test dialog box.
21. Select choice from the Attribute Name list, then select the Includes whole word option.
22. Type opt in the field to the right of the Includes whole word option. Click OK to save the test and exit the Attribute Test dialog box.
23. Click OK to save the new condition and exit the Condition dialog box.
The context arg in cmdsynopsis now includes the condition If attribute “choice” includes the whole word “opt”.
24. In the Elements list, select the condition you just created, and go to the Generated text category.
25. Choose the Edit button for Before-text.
26. In the Generated Text Editor window, type a hyphen ( - ) to the right of the left square bracket.
27. Choose > to save the changes to generated text and exit the editor.
28. Choose > .
In the Print Preview window, note that the word “argument” is now preceded by a square bracket and a hyphen.
![This is an image of a document fragment, showing a chapter heading “Introduction” in bold blue text, the text “[-argument] in red text on the next line, then the section heading “Welcome” in bold blue text on the next line](../../styler/styler/images/gentext5.gif)