Adding Change Bars
You can use generated text to indicate when change bars should be applied to your document in print and PDF output. Your document type determines how you should configure support for change bars: some document types contain an element that determines when change bars begin and end. Other document types use an attribute to indicate revised elements in a document. Change bars can be generated based on the presence or values of these elements or attributes.
Example: Adding Change Bars Based on an Element
The procedure details below describes how to set the <simpara> element so that its content is displayed with change bars in your final document.
1. In Arbortext Editor, open the transport.xml document located at Arbortext-path/samples/styler
2. Choose > to open the stylesheet currently associated with the document for edit. This is a read only stylesheet so you will need to save a local copy if you want to make amendments.
3. In the Elements list, select the simpara everywhere else context.
4. Go to the Generated text category.
5. Click the Edit button next to the Before-text field. The Generated Text Editor opens.
6. Select > . The ChangeBarBegin element is inserted.
7. Select > to save the change and exit the editor.
8. Select the Edit button next to the After-text field. The Generated Text Editor opens.
9. Select > . The ChangeBarEnd element is inserted.
10. Select > to save the change and exit the editor.
11. The Generated text property area now displays details of the change bar settings you have made:
12. In Arbortext Editor, insert the <simpara> element and add some arbitrary content into the element.
13. Back in Arbortext Styler, select > .
In the Print Preview window, note that the content of the simpara element is flagged with a change bar.
You may set the placement of change bars in the pages formatted by a page set in the Other category for the Page Sets list.
Example: Adding Change Bars Based on an Attribute Value
The procedure below describes how to set the para element so that its content is displayed with change bars in your final document when it contains the attribute role=”comment”. This is achieved by setting a condition for the element.
1. In Arbortext Editor, open the transport.xml document located at Arbortext-path/samples/styler.
2. Choose > to open the stylesheet currently associated with the document for edit. This is a read only stylesheet so you will need to save a local copy if you want to make amendments.
3. In the Elements list, select the context para everywhere else.
4. Add a condition to the context by selecting the > menu option. The New Condition dialog box appears.
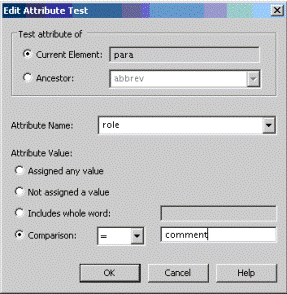
5. Click the New Attribute Test button. The New Attribute Test dialog box appears. Ensure that para is listed in the Current element field.
6. In the Attribute Name field, select role from the list. In the Attribute value field, select the Comparison and = operators, then enter comment into the text field.
7. Click OK button to save the test and exit the dialog box. The New Condition dialog box shows the new test in the Tests field.
8. Click OK to save the condition and exit the dialog box.
9. Highlight the new condition in the Elements list.
10. Go to the Generated text category.
11. Click the Edit button next to the Before-text field. The Generated Text Editor opens.
12. Select > . The ChangeBarBegin element is inserted.
13. Select > to save the change and exit the editor.
14. Click the Edit button next to the After-text field. The Generated Text Editor opens.
15. Select > . The ChangeBarEnd element is inserted.
16. Select > to save the change and exit the editor.
17. The Generated text area now displays details of the change bar settings you have made:
Note the default settings for the appearance of the change bars: if you wish to change these settings, use the instructions contained in Modifying the appearance of change bars below.
18. In Arbortext Editor, insert a para element and give it the role=”comment” attribute. Add some arbitrary content into the element.
19. Back in Arbortext Styler, select > .
In the Print Preview window, note that the content of the para element that includes the role=”comment” attribute is flagged with a change bar.
You may set the placement of change bars in the pages formatted by a page set in the Other category for the Page Sets list.
Modifying the Appearance of Change Bars
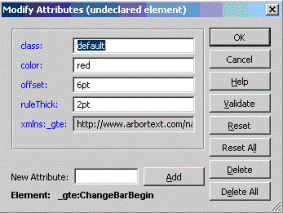
You must modify the attributes of the ChangeBarBegin and ChangeBarEnd elements in the Generated Text Editor to modify the appearance of change bars. The ChangeBarBegin element has the following default attributes:
• class – the type of change bar. If you want to maintain more than one type of change bar, for example if you wish each one to appear differently, you must set a different class for each type.
• offset – how far the change bar is offset from the text it flags.
• ruleThick – the thickness of the change bar.
Modify these attributes to give them the values you require by selecting them in the Generated Text Editor and selecting the > menu option. You may also add non-default attributes, such as color, by adding the attribute's name in the New Attribute field and clicking Add. You may then set a value for that attribute as usual (see the color=”red” attribute in the graphic below):
The ChangeBarEnd element only has the class attribute. If you want to maintain more than one type of change bar you must change the value of this attribute to match that of the associated ChangeBarBegin element.
Changing the Location of Change Bars
By default, change bars are set to appear to the left of each column of flagged text. For other placements, use the Change bar placement field in the Other category for the Page Sets list for a particular page set.
For example, the procedure below describes how to place change bars in the sample document transport.xml to the right of any flagged text, instead of the default left hand side. The change will be apparent for change bars that have been set up to appear in a chapter, whereas the rest of the book will continue with the default placement.
The change bars will be displayed when a para element with a role=”comment” attribute is included in the document, as set up in To add change bars based on an attribute value above. Carry out the tasks included in that procedure if you have not already done so - there is no need if you have already configured the display of change bars based on attributes for an element in your stylesheet.
1. If you have not already done so, open the transport.xml document located at Arbortext-path/samples/styler
2. Choose > to open the stylesheet currently associated with the document for edit. This is a read only stylesheet so you will need to save a local copy if you want to make amendments.
3. In the Elements list, select the chapter element.
4. Go to the Breaks category. You will see in the Name field of the Page set group that the mainbody-page page set is used to format the chapter elements in your document.
5. Go to the
Page Sets list

, and select the
mainbody-page page set.
6. Navigate to the Other category.
7. Select Right in the Change bar placement field.
8. In Arbortext Editor, insert a para element in two locations in your document: one within a chapter and the other in the book itself, before the first chapter. Set the attributes of both of these paragraphs to role=”comment” and include some arbitrary content in both.
9. Back in Arbortext Styler, choose > .
In the Print Preview window, note that the change bar for the paragraph inserted into a chapter is placed on the right of the flagged text, while the bar for the paragraph in the book is still placed on the left.


 , and select the mainbody-page page set.