Labeling and Numbering Formal Blocks
You can use Arbortext Styler to automatically number and label elements styled as formal blocks, such as figures and tables, in your documents using generated text. Note that Arbortext Styler can only generate numbers for title elements of formal block elements. So, for example, you can configure numbers for a title in table context but not for a table in chapter context.
Example: Labeling and Numbering Formal Blocks
1. In Arbortext Editor, open the transport.xml document located at Arbortext-path/samples/styler.
2. Choose > to open the stylesheet currently associated with the document for edit. This is a read only stylesheet so you will need to save a local copy if you want to make amendments.
3. Specify a number and label for the
title in chapter context, if one does not already exist. Refer to
Labeling and Numbering Divisions for detailed instructions.
4. Select the title element in the Elements list.
5. Elect to create a new context for title by choosing the > menu option. The Context dialog box opens.
6. Click the New parent button and select table from the drop down list.
7. Click on the New ancestor button and select chapter from the drop down list. The context field at the top of the table now reads title in table anywhere in chapter.
8. Click OK to save the new context and close the dialog box.
9. In the Elements list, select the title in table anywhere in chapter context then go to the Generated text category.
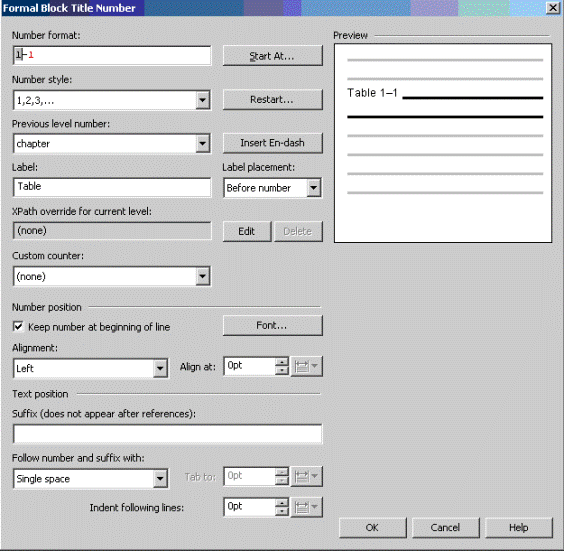
10. Select the Number option then click the Details button in the Numbers and Bullets field. The Formal Block Title Number dialog box opens.
11. In the Previous level number field, select chapter from the drop down menu. This steps specifies that the number applied to your table will be prefixed with the number of the chapter in which it appears.
12. Click the Insert En-dash button to insert a “–” character between the chapter and table numbers. The Number format field now reads 1–1. Note that if you want a different character to be used as a separator you can instead type that character between the two numbers in the Number format field.
13. Type Table followed by a space in the Label field. The Preview window now reads Table 1–1.
14. Click OK to save the numbering settings and exit the dialog box. The Before-text field in the Generated text category now reads Table 1–1, a preview of your table numbering setting.
15. Choose > .
In the Print Preview window, note that the table title in chapter 2 is preceded by the word “Table” along with the number 2–1, meaning “table 1 in chapter 2”.
Example: Generating Output-Specific Labels and Numbers for Formal Blocks
Here we will use a title context with standard numbering as defined in Labeling and numbering formal blocks above, but will change its number setting to appear differently when the source document is published to HTML.
1. Highlight the title in table anywhere in chapter context in the Elements list then go to the Generated text category.
2. Select HTML File from the Outputs to edit list.
3. With the Number option selected, click on the Details button in the Numbers and Bullets field. The Formal Block Title Number dialog box opens.
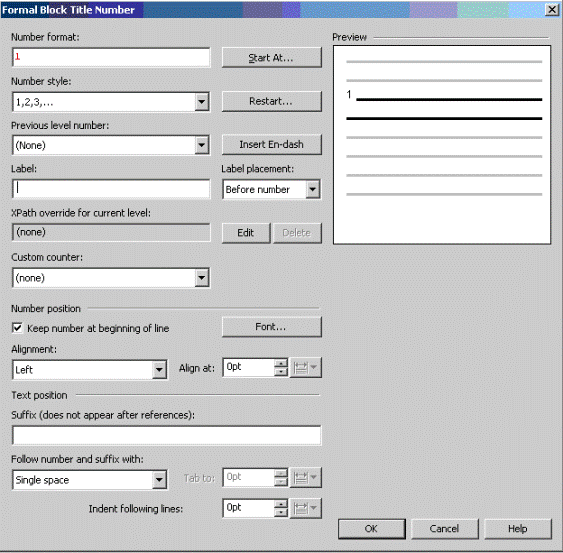
4. In the Previous level number field, select (None) from the drop down list. Delete both the em-dash from the Number format field and the text Table from the Label field. Note that the Number Format field and the Preview window show that no additional numbering or text is to be applied to the table number.
5. Click OK to save the numbering setting and exit the dialog box. Note that the Before-text field reads 1.
6. Choose > .
In the Print Preview window, note that the table title in chapter 2 is still preceded by the number Table 2–1.
7. Choose > .
In the browser, note that the same table title in chapter 2 is simply numbered 1.