Creating a Symptom Set
Follow these steps to create a Symptom Set:
1. Choose > .
The New Document dialog box opens.
|
|
It is useful to be working in a connected Arbortext Editor session as you need to upload the completed Symptom Set to Windchill to be able to use it in Windchill Service Information Manager.
|
2. In the New Document dialog box, select Other in the Category list and Symptom Set in the Type list and then click OK.
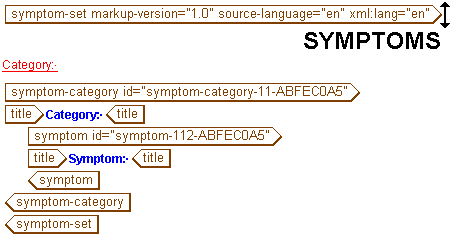
A DITA Symptom Set template is loaded into the Arbortext Editor window:
3. Note that an id attribute has been added to the symptom-category tag. You can change the value if required but ensure that it remains unique across the whole symptom set.
| An id attribute is added to symptom-set, symptom-category, symptom, and symptom-value when the element is entered. These attributes are required and must be unique across the whole symptom set. |
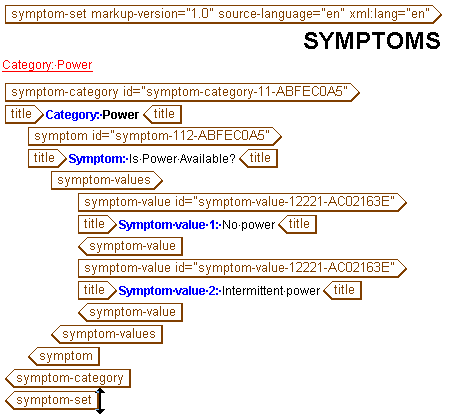
4. Enter a title in the title tag in symptom-category, for example Power
5. Enter a title in the title tag in symptom, for example Is Power Available?
6. Add a symptom-values tag to symptom
The symptom-values tag is added. The tag contains a child symptom-value tag.
You can also add audio, video, and thumbnail elements as required, to include audio visual or graphic information to describe the symptom.
7. Ensure that the id attribute for the symptom-value is unique in the symptom set.
8. Enter a title in the title tag in symptom-value, for example No power
9. Add a second symptom-value tag to symptom-values. Give it the title Intermittent Power and ensure its id attribute is unique in the symptom set.
10. Save the Symptom Set.
Your completed Symptom Set should look like this:
11. Continue to add symptoms until your set is complete.
12. You can define applicability for the symptoms in the Symptom Set. Select the required element (symptom-category, symptom, or symptom-value) and choose the > menu option.
The Assign Symptom Applicability dialog box opens, displaying the product hierarchies from the current Windchill server.
For the information about product hierarchies, see the topic Understanding Product Hierarchy in the Windchill Help Center.
If you are not connected to the Windchill repository, you cannot retrieve product information. Use the > menu option to connect to your Windchill Service Information Manager repository.
13. Make the required applicability settings for the element, then click OK to exit the dialog box.
The applicability settings are added to the effectivity attribute for the element. Multiple settings are joined by an AND operator.
| The effectivity attribute is hidden by default. You can use the Modify Attributes option to view its value. |
14. When you have completed working with the Symptom Set, save it and use the > option to upload it to the Windchill repository.
It can then be referenced by service content topics using Windchill Service Information Manager.
| You must modify the burst configuration files for the PTC Server connection so that the Symptom Set will be saved to the correct Windchill type. Change this line in symptom-set.bcf, replacing com.acme with the correct domain for your PTC Server: <typerule elementname="symptom-set" targettype="wt.epm.EPMDocument|com.acme.DynamicDocument|com.acme.KD_SymptomTree"/> Make the change before you upload the burst configuration file to the PTC Server, or put it in the location where your burst configuration files are stored. You must also configure your burst configuration files so that any referenced multimedia files are saved to the Windchill repository |