Adding Bullets to List Items
You can use generated text to automatically number add bullets to list items. The procedure described below demonstrates how to bullet the entries in an itemizedlist element.
Example: Adding Bullets to List Items
1. In Arbortext Editor, open the transport.xml document located at Arbortext-path/samples/styler
2. Choose > to open the stylesheet currently associated with the document for edit. This is a read only stylesheet so you will need to save a local copy if you want to make amendments.
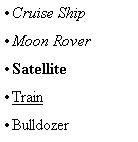
3. In Arbortext Editor, click within the para element within the first listitem element in the first chapter (item “Cruise Ship”).
4. In Arbortext Styler, with the para element selected in the Elements list, choose > to create a new context for the element. The New Context dialog box opens.
5. Click New Parent and select listitem from the drop down list. Click OK to save the new context and exit the Context dialog box.
6. With the para in listitem context selected in the Elements list, go to the Breaks category.
7. Set Structure type to Inline.
8. Select the listitem in itemizedlist context in the Elements list.
9. In the Generated text category, select the Bullet option.
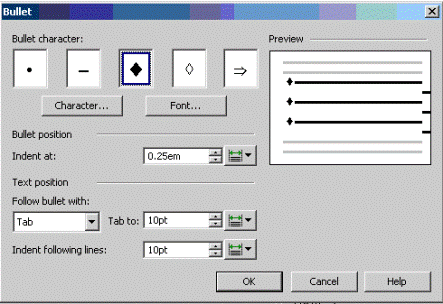
10. Click the Details button to open the Bullet dialog box.
11. Click the required bullet style to select it, for example the black diamond.
12. Enter .25em into the Indent at field.
13. To left align the content of a list item when the content wraps lines, choose Tab in the Follow bullet with field, and specify the same value (for example, 10pt) in both the Tab to and Indent following lines fields.
14. Click OK to save the bullet settings and exit the dialog box.
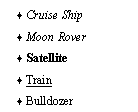
15. Choose > .
In the Print Preview window, note that list items are now preceded by the black diamond bullet.
You can also specify output-specific bullets for list items.
Example: Changing the Bullet Character for List Items
The procedure detailed below describes how to replace one character in the default list with a new one, and use that new bullet style in an existing bulleted list setting.
1. In the Elements list, select the listitem in itemizedlist context for which you set bulleting in the previous section.
2. Select Base (All Outputs) from the Outputs to edit drop down list.
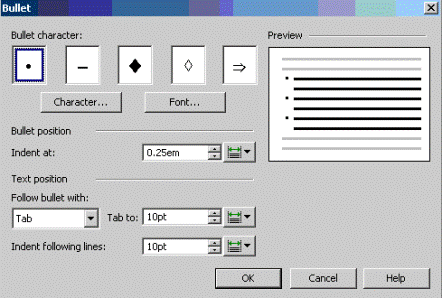
3. Go to the Generated text category, and then click Details next to the Bullet option. The black diamond bullet is set as the default character for the list item context.
4. Click the Character... button. The Insert Symbol dialog box opens.
5. In the Insert Symbol dialog box, select the symbol you want to see in the default list - for example the asterisk operator character (character code 2217).
6. Click OK to save the new selection and exit the dialog box. The asterisk character now appears in the Bullet dialog box, where the black diamond was previously displayed.
7. Leave the asterisk selected and click OK to exit the Bullet dialog box.
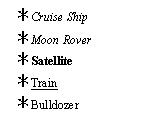
8. Choose > .
In the Print Preview window, note that list items are now preceded by an asterisk.
| You can change all five of the default bullet characters in this way if you wish. Note that any bullets in your document that were set to use the original characters will have their bullets changed to the new styles automatically once the changes to the Bullet dialog box have been saved. |
You can change the default font characteristics of bullets, thus giving you the option to apply very specific bullets to match any specific document styling requirements.
Example: Changing the Font Characteristics of Bullets
The procedure detailed below describes how to change the font of a particular bullet character in the default list, and use that new bullet style in an existing bulleted list setting.
1. In the Elements list, select the listitem in itemizedlist context for which you defined an asterisk bullet character in the previous section.
2. Select Base (All Outputs) from the Outputs to edit drop down list.
3. Go to the Generated text category, and then click Details next to the Bullet option. The asterisk bullet is set as the default character for the list item context.
4. Make sure the asterisk character is selected, then click the Font button. The Modify Font dialog box opens. Note that the asterisk bullet is currently set to inherit its font name and size from its parent element.
5. In the Modify Font dialog box, select Arial from the Font menu and 24 from the Size menu, plus any other settings you require.
6. Click OK to save the font setting and exit the dialog box.
7. Click OK again to exit the Bullet dialog box.
8. Choose > .
In the Print Preview window, note that the asterisk that precedes a list item is now much larger than the list item text.
Example: Defining Output-Specific Bullets for List Items
Here we will use a standard bulleted list as defined in Adding bullets to list items above, but will change its bullet setting to round bullets when the source document is published to HTML.
1. In Arbortext Styler, select the listitem in itemizedlist context in the Elements list.
2. Select HTML File from the Outputs to edit list.
3. Go to the Generated text category, and then click Details next to the Bullet option.
4. Select the small, filled, round bullet style.
5. Leave all other settings as were configured for the bullets for all other outputs.
6. Click OK.
7. Choose > .
In the Print Preview window, note that list items are still preceded by the black diamond bullets.
8. Choose > .
In the browser, note that list items are now preceded by small, round, filled bullets.
You can change the default bullet characters for list items. The bullet dialog displays 5 default bullet characters, but you have the option to change the displayed characters by selecting others from the symbols list and using the new characters in your list.