Inserting Element and Attribute Content in Generated Text
You can use the content of elements or attribute values as generated text - the following sections contain examples and instructions on how to accomplish this.
Example: Inserting Element Content in Generated Text
This example describes how to output the title of the parent chapter before a table in your document.
1. In Arbortext Editor, open the transport.xml document located at Arbortext-path/samples/styler.
2. Choose the menu option > to open the associated stylesheet for edit. This is a read only stylesheet so you will need to save a local copy if you want to make amendments.
3. In Arbortext Styler, select the informal table everywhere context under the informaltable element. Go to the Generated text category.
4. Click Edit next to Before-text.
5. In the Generated Text Editor window, choose > . The Insert Element Content dialog box opens.
6. Select title from the Of list, to specify that this is the element whose content should be inserted as generated text.
7. Choose Specific occurrence of, and then choose 1st from the Occurrence list and chapter from the Within list. Here you have defined that the generated text for the informaltable element should be anything that appears in the first title in a chapter.
8. Click OK to save the setting and close the dialog box. You will see that the generated text editor contains a single ElementContent element.
9. Choose > to save the generated text setting and exit the editor. You will see that the Generated text area contains details of your generated text setting in the Before-text field:
10. Choose > .
In the Print Preview window, note that the first table in the document is now preceded by the text “Water - The Cruise Ship”, which is the title of the chapter in which the table appears.
| Be aware that if the element you select has a setting of Hidden in the Text category, its content cannot be output in generated text. |
Example: Inserting Attribute Content in Generated Text
This example describes how to output the value of the id attribute of the first title in a chapter as the title of the first chapter in the document.
1. In Arbortext Editor, select the title element in the first chapter and apply the attribute id="INTRO".
2. Delete the text in the first title element in the first chapter. Note that the number of the chapter remains in the title, since this is generated text configured for the title element.
3. In Arbortext Styler, select the title element, and then choose > to create a new context for the element. The Context dialog box appears.
4. In the Context dialog box, click New parent, and select chapter as the parent element of the title element.
5. With chapter still selected, choose first from the Position list.
6. Click OK to save the context and exit the dialog box. The context title in first chapter is now displayed in the Elements list.
7. Select the title in first chapter context you just created, and go to the Generated text category.
8. Click Edit next to Before-text.
9. In the Generated Text Editor window, choose > . The Insert Attribute Content dialog box opens.
10. Select title from the Element list and id from the Attribute to insert list.
11. Choose Specific occurrence, and then choose 1st from the Occurrence list and chapter from the Within list. Here you have defined that the generated text for the title in first chapter context should be the value of the id attribute of the first title in a chapter.
12. Click OK to save the setting and close the dialog box. You will see that the generated text editor contains a single AttributeContent element.
13. Choose > to save the generated text setting and exit the editor. You will see that the Generated text area contains details of your generated text setting in the Before-text field:
14. With the title in first chapter context still selected, go to the Text category. Set Italic to Yes to request that the title of the first chapter be written in italic text.
15. Choose > .
In the Print Preview window, note that the title of the first chapter now says “INTRO” in italic text, i.e. the value of its id attribute.
Example: Setting an Attribute Value in Gentext to the Value of a Different Attribute from the Source Document
When creating generated text for an element in your document, it is possible to assign a value to an attribute of an element in the generated text by extracting the value from another element in the document. Using the > > menu option in the Generated Text Editor you can elect to extract the value of any attribute on any element in the source document, and use it as the value of the selected attribute on the element in your generated text. Note that the value you use does not need to be the value of the same attribute in another element: you can elect to use the value of any attribute. For example, you could use the value of a fileref attribute as the value of the id attribute on your chosen gentext element. The process will give you the opportunity to create dynamic documents whose display changes based on its content.
For example, this process can be used to extract the value for a pathname attribute for a graphic in generated text - in the procedure below we will extract the value of the fileref attribute of a graphic in a chapter and use that value as the value of the pathname attribute for a graphic in the same chapter's title, where the title graphic is to be produced via generated text. In this way the title of the chapter is set to always show the same graphic as is contained in the chapter itself, without the author having to specifically code the graphic for every chapter.
1. In Arbortext Editor, open the transport.xml document located at Arbortext-path/samples/styler.
2. Choose the menu option > to open the associated stylesheet for edit. This is a read only stylesheet so you will need to save a local copy if you want to make amendments.
3. In the Elements list, highlight (or create) the element or context for which the generated text should apply: in this instance, the title in last chapter context.
4. In the Generated text category for the context, click Edit to add generated text before the element content. The Generated Text Editor opens.
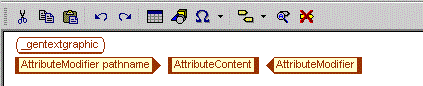
5. Using the > menu option, insert a graphic element. You will be asked to select the filename of the graphic that is to be inserted - for the purposes of demonstration, select an arbitrary graphic from your filesystem. Once you have done this the graphic will be inserted into the Generated Text Editor, wrapped in a _gentextgraphic tag.
6. Check the Modify Attributes dialog box for the _gentextgraphic element. You will see that the filename has been inserted into the pathname attribute for the _gentextgraphic element, rather than the fileref attribute as it appears in the original graphic element. Since your are simply using this graphic as an example, delete this attribute value, then click OK to exit the dialog box.
The Generated Text Editor now contains a singleton _gentextgraphic element and no graphic:
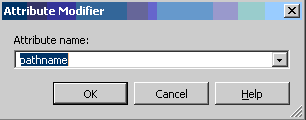
7. In the Generated Text Editor window, place your cursor to the right of the _gentextgraphic element and select the > > menu option. The Attribute Modifier dialog box opens.
| The menu item is only enabled if the first tag to the left of the cursor is an element (an element from the user’s document type, an undeclared element, a SFE or a UFE) or a _gentextgraphic. |
8. In the dialog box, select pathname from the Attribute Name drop down list, to specify that the attribute you extract from the graphic in the source document should be used as the value of the pathname attribute in the gentext graphic.
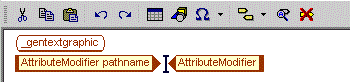
9. Click OK to save the change and exit the dialog box. Arbortext Styler inserts an AttributeModifier element into the generated text, with the attribute pathname included but not given a value. You will set the value of the attribute in the next steps, by using the value of a different attribute from an alternative element in the source document.
10. Place your cursor in the AttributeModifier element and select > . The Insert Attribute Content dialog box opens.
11. Select By XPath to confirm that you will use an XPath expression to find the attribute that contains the value you require.
12. In the Expression field, type the XPath expression that will resolve to the element that contains the attribute whose value you need. The example below specifies that Arbortext Styler should find the graphic in the first para in the chapter parent of the current element (title in chapter):
parent::chapter/para[1]/graphic
13. In the Attribute to insert field, type fileref. Here you have confirmed that the value of the fileref attribute on the element defined in the XPath expression should be used as the value of the pathname attribute of the graphic in the chapter title.
Note that you will not be able to select the attribute name from the drop down list in the Attribute to insert field. The XPath expression is not resolved at this stage and as such Arbortext Styler cannot determine a list of attributes for the target element.
14. Click OK to save the XPath expression and close the dialog box. The Generated Text Editor window now contains three objects: the _gentextgraphic object, the Attribute Modifier object, and the AttributeContent object that contains the XPath expression.
15. Click > to save the generated text and exit the Generated Text Editor. The Before-text field in the Generated text category now contains details of the generated text setting.
16. Click > - the graphic that appears in the last chapter of the document now also appears in the title of that last chapter.
| If the XPath expression you entered in the attribute content generator fails, or would be false if evaluated as a boolean expression, the target attribute's value will not be changed. |
For purposes of speed, it is useful to test your XPath expression in Arbortext Editor before you use it in the Generated Text Editor. Use the following steps:
1. In Arbortext Editor, place the cursor to the right of the element that forms the starting point of the XPath expression that you wish to test.
2. On the Arbortext Editor command line, type: eval oid_xpath_string(oid_caret(), "EXPR") replacing EXPR with the expression you wish to use. For example, to confirm that your XPath expression will extract the value of the fileref attribute on the graphic in the first para in the chapter parent of a chapter title, place the cursor in the chapter title element and enter the following in the command line:
eval oid_xpath_string(oid_caret(), "parent::chapter/para[1]/graphic@fileref")
3. The value of the graphic tag’s fileref attribute will be displayed in the Arbortext Styler Eval Output window if the original XPath expression was correct.


![This is an image of the Insert Attribute Content dialog box, with the By XPath option selected, the expression parent::chapter/para[1]/graphic in the Expression field and fileref selected in the Attribute to insert field](../../styler/styler/images/gentext49.gif)