Creating and Modifying an Inline Model Footnote
Some document types use a single element to both generate the footnote reference mark and contain the body text of the footnote. This Footnote Content and Reference element generates both the reference mark and the footnote on the page in which the element appears in the document.
You can use a Footnote Cross Reference element to reference the same footnote. This element would generate the same reference mark as the Footnote Content and Reference element, but would not generate a footnote. For this variation to work, the Footnote Content and Reference element must have an ID equivalent attribute and the Footnote Cross Reference element must have an IDREF, IDREFS, or CDATA attribute.
You can also use a Footnote Reference element to reference the same footnote. This element would generate both a different reference mark and a copy of the footnote at the location the element appears in the document. For this variation to work, the Footnote Content and Reference element must have an ID equivalent attribute and the Footnote Reference element must have an IDREF, IDREFS, or CDATA attribute.
The examples shown in the section are based on the axdocbook doctype, for example the Arbortext Styler sample document transport.xml, located at Arbortext-path/samples/styler.
Example: Creating an Inline Model Footnote
1. In Arbortext Editor, open your document and use the Styler menu to open a new stylesheet.
2. In Arbortext Styler, select the footnote element in the Elements list.
3. Assign the Footnote style to that element via the > menu option.
4. In the Footnote category, note that the option Generates reference mark and footnote is checked by default. Leave this option checked to specify that the footnote defines both content and reference mark. Note also that, with the inclusion of this parameter, a new context with the (Footnote Area Properties) suffix has been created for the footnote element - this is where you can add formatting properties specific to the footnote.
Note also that a new context for the para element, para (first in its parent) anywhere in footnote has also been created, with a Structure Type of Inline (see the Breaks category). This special context is added so that Arbortext Styler can make sure that the first paragraph (i.e. that which contains the footnote content) in a footnote element is marked as inline and will appear on the same line as the footnote number in the footnote area. If you set formatting for this context, its properties will be reflected in the footnote content.
5. Select the regular context of the footnote element.
6. Refer to the Description tab of your Arbortext Styler interface - you can see that the footnote element is described as Inline, Footnote (content and reference).
7. Refer to the Generated text category for the footnote element. Note that it is set to generate a number in the Before-text field.
8. In Arbortext Editor, add a footnote element to the place in the document where you wish the footnote reference to appear. In the footnote tag, add the text that should appear as the body of the footnote.
9. Back in Arbortext Styler, choose > . In the print preview window, note that the number 1 has been placed as a footnote reference in the place in the document where you inserted the original footnote element. At the bottom of the page that contains the footnote reference, note that the footnote appears.
Modifying an Inline Model Footnote
1. To set general formatting options for the footnotes in your document, select > in Arbortext Styler to open the Footnotes dialog box.
2. Use the options on the Footnotes dialog box to determine the width, style, and scope of your footnotes. You can also specify the amount of space to leave above footnotes and whether there should be a separator rule between the footnotes and the document body text.
You may use this dialog box to elect to have footnote numbering restart within the scope of specified contexts. When Arbortext Styler encounters one of the contexts you have listed in the Contexts that restart footnote numbering field it will restart footnote numbering at 1, with numbering continuing consecutively until it reaches either another listed context or the end of the document.
|
|
If you elect to have footnote numbering start at a particular level of nested element, numbering will be restarted at all contexts of that element at the same level. For example, if you specify that numbering should restart at the section in section context, it will also restart when Arbortext Styler encounters any similar contexts at the same level, for example:
• section in section
• first section in section
• not first section in section
• section in section in preface
|
3. Click OK to save your changes and exit the Footnotes dialog box.
4. Select the regular context for the footnote element in the Elements list.
5. Assign the desired formatting properties for the footnote reference mark. You can assign different properties to different types of output by selecting options from the Outputs to edit list.
6. Select the special (Footnote Area Properties) context for the footnote element in the Elements list.
7. Assign the desired formatting properties for the footnote body. You can assign different properties to different types of output by selecting options from the Outputs to edit list.
Example: Creating a Cross Reference to an Inline Model Footnote
1. In Arbortext Styler, select the footnoteref element in the Elements list.
2. Assign the Footnote style to that element via the > menu option.
3. Note that a new context with the (Footnote Area Properties) suffix has been created for the footnoteref element. Note also that, in the Footnote category for the regular footnoteref context, the option Generates reference mark and footnote is checked by default. These are default settings that you will change in the next steps.
4. Select the regular context for the footnoteref element in the Elements list.
5. In the Footnote category, select the Element references footnote and generates reference mark option. Here you are specifying that the cross reference is pointing to a footnote and will generate a reference mark.
6. Select the linkend attribute from the Reference attribute drop down menu. Here you are specifying the particular IDREF, IDREFS, or CDATA attribute on the target footnote element to which the cross reference should point.
7. Uncheck the Generates footnote option. Here you are advising Arbortext Styler that the cross reference will not produce any footnote text of its own. You use this setting since the cross reference links to an existing footnote created elsewhere. Note that the special (Footnote Area Properties) context for the footnoteref element is removed from the Elements list since this element defines only the footnote reference and not a footnote body.
Note also that a new context for the para element, para (first in its parent) anywhere in footnoteref, with a Structure Type of Inline (see the Breaks category), has also been created. This special context is added so that Arbortext Styler can make sure that the first paragraph in the footnoteref is marked as inline and hence will appear on the same line as the footnote number in the footnote area.
8. Refer to the Description tab for the footnoteref element - you can see that the element is described as Inline, Footnote (cross reference).
9. Select the regular context for the footnoteref element in the Elements list and assign the desired formatting properties for the reference mark.
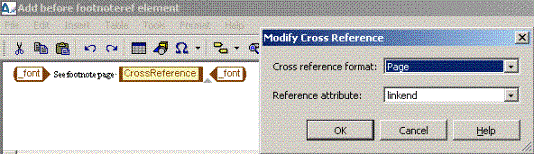
10. With the context still selected, navigate to the Generated text category. Note that the Before element content field contains details of the cross reference you have created, plus a note of the cross reference format you are using. Click the Edit button next to the field to open the Generated Text Editor.
11. Place your cursor before the CrossReference element and enter the text See footnote page followed by a space.
12. Select the CrossReference element and choose > . The Modify Cross Reference dialog box appears.
13. In the Cross reference format field, select the name of the cross reference format object that defines the type of cross reference you wish to generate (note that you can also create a new cross reference format object if a suitable one does not already exist). For this example, select Page. Here you have specified that the cross reference will generate the page number upon which the footnote appears.
14. Click > to save the changes and exit the Generated Text Editor.
15. In Arbortext Editor, create a footnote in the document as described in the section Creating an Inline Model footnote above, preferably on a page other than the first one. Give its id attribute the value footnote1.
16. Locate the first paragraph in the abstract element at the beginning of the document and insert a footnoteref element in the place in the text at which you wish the cross reference to appear. In the Modify Attributes dialog box that appears when you insert the element, give the element the target attribute linkend=”footnote1”.
17. In Arbortext Styler, choose > . In the print preview window, you will see that the generated text See footnote page x has been inserted in superscript in the place in the document where you inserted the footnoteref element. If you click the page number shown in the link you will be taken to the page in the document that contains the original footnote.
Example: Creating a New Footnote Using the Content of an Existing Inline Model Footnote
1. In Arbortext Styler, select the footnoteref element in the Elements list.
2. Assign the Footnote style to that element via the > menu option.
3. In the Footnote category, note that the option Generates reference mark and footnote is checked by default - this is a default setting that you will change in the next steps. Note also that, with the inclusion of this parameter, a new context with the (Footnote Area Properties) suffix has been created for the footnoteref element - this is where you can add formatting properties specific to the footnote body text.
Note also that a new context for the para element, para (first in its parent) anywhere in footnoteref has also been created, with a Structure Type of Inline (see the Breaks category). This special context is added so that Arbortext Styler can make sure that the first paragraph (i.e. that which contains the footnote content) in a footnote element is marked as inline and hence will appear on the same line as the footnote number in the footnote area. If you set formatting for this context, its properties will be reflected in the footnote content.
4. Select the regular context for the footnoteref element in the Elements list.
5. In the Footnote category, select the Element references footnote and generates reference mark option. Leave the Generates footnote option selected. Here you are specifying that the cross reference is pointing to a footnote and will generate a reference mark. You are also confirming that the footnote reference will generate some footnote content as well, and you will give details of the existing footnote that will provide this content in later steps of this procedure.
6. Select linkend in the Reference attribute drop down menu. Here you are specifying the particular IDREF, IDREFS, or CDATA attribute on the target footnote element that will generate the content of this footnote reference.
7. Refer to the Description tab for the regular context of the footnoteref element - you can see that the context is described as Inline, Footnote (reference).
8. Select the regular context for the footnoteref element in the Elements list and assign the desired formatting properties for the reference mark.
9. Select the special (Footnote Area Properties) context for the footnoteref element in the Elements list and assign the desired formatting properties for the footnote body.
10. With the regular context selected, navigate to the Generated text category. Note that it is set to generate a number in the Before-text field.
11. In Arbortext Editor, create a footnote in the document as described in the section Creating an Inline Model footnote above, preferably on a page other than the first one. Give its id attribute the value footnote1.
12. Locate the first paragraph in the abstract element at the beginning of the document and insert a footnoteref element in the place in the text at which you wish the footnote reference mark to appear. In the Modify Attributes dialog box that appears when you insert the element, give the element the target attribute linkend=”footnote1”.
13. In Arbortext Styler, choose > . In the print preview window, you will see that the first paragraph of the abstract element in the document contains a footnote reference numbered 1, with a footnote at the bottom of the page. Navigate to the page upon which you created the original footnote and you will see that the same footnote still appears, but now with the number 2. You can see that the footnote on the first page has extracted and output the content of the original footnote.