Inserting Tables in Generated Text
You can insert tables in generated text. It is useful to use tables as a layout tool, to align text and graphics side by side in a title, for example.
Example: Inserting a Table in Generated Text
The procedure below describes how to include a graphic and some inline text in the title of the note elements in your document.
1. In Arbortext Editor, open the transport.xml document located at Arbortext-path/samples/styler.
2. Choose > to open the stylesheet currently associated with the document for edit. This is a read only stylesheet so you will need to save a local copy if you want to make amendments.
3. Click on the title in note context in the Elements list.
4. Go to the Generated text category.
5. Click Edit next to the Before-text field. The Generated Text Editor opens.
6. Choose > . The Insert Table dialog box opens.
7. Select table in the Wrapper Tags field.
8. In the Table Size field, set Rows to 1 and Columns to 2 .
9. Click OK to exit the dialog box. The Generated Text Editor now displays a two column table.
10. Place your cursor in the first cell of the table, and choose the > > menu option to select the entire table.
11. Choose the > menu option. The Modify Borders dialog box opens.
12. Change the selection in the Apply To option to Table.
13. Click the None button in the Presets section.
14. Click OK to exit the Modify Borders dialog box. The Generated Text Editor now contains a table without borders.
15. Place your cursor in the first cell of the table, choose > , and select the Column tab in the Table Properties dialog box.
16. In the Width field, select the Fixed option and enter 100.00pt in the Fixed Width field.
17. Click the Cell tab in the Table Properties dialog box. In the Justification field, set the Horizontal field to Center and the Vertical field to Top.
18. Click OK to exit the Table Properties dialog box.
19. Place your cursor in the second cell of the table, choose > , and select the Cell tab in the Table Properties dialog box.
20. In the Justification field, set the Horizontal field to Left and the Vertical field to Centered.
21. Click OK to exit the Table Properties dialog box.
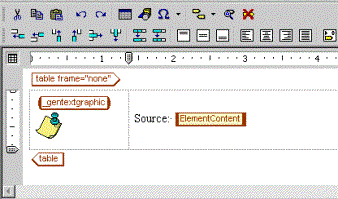
22. Place your cursor in the first cell then choose > . The Locate Graphic File to Reference dialog box opens.
23. Browse to the graphic that you want to be displayed in the first cell of the table, for example the graphic cmt.gif from the Arbortext-path/graphics directory.
24. Place your cursor in the second cell and enter the text Source: followed by a space.
25. After the text, choose the > menu option. The Insert Element Content dialog box opens.
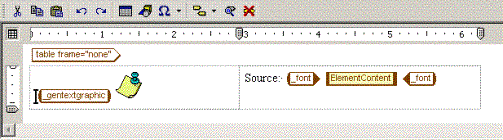
26. Select corpauthor from the Of list and ensure that the Element content option is selected.
27. Choose first from the Occurrence list and (Whole Document) from the Within list. These two steps will advise Arbortext Styler that the contents of the corpauthor element should be output in the second cell of the table, after the specified text.
28. Click OK to exit the dialog box. The Generated Text Editor now shows an ElementContent object in the second cell, after the text.
29. Select the ElementContent tag in the second cell, and choose the > menu option. The Modify Font dialog box opens.
30. Set Color to Red. Note that this font color will apply only to the text generated by the ElementContent object, the rest of the generated text in the title will inherit its formatting properties from the note element.
31. Click OK. The Generated Text Editor will show the table as it has been configured, with the ElementContent object surrounded by a _font wrapper:
32. Choose > to save the gentext setting and exit the editor.
33. Choose > .
Note that the title of the first note in the document contains the selected graphic on the left, and the content of the corpauthor element on the right.