Page Regions - Other Category
Use the properties in the Other category for page regions to specify the background color for a page region. You can also configure preferences for avoiding other regions or clipping the region at the edge of a page (available for PTC ALD only).
• Background color - select a background color from the color palette. The default value for this field is None.
• Opacity (PDF only) - set the transparency/opacity at which the graphic will be displayed, as a percentage.
|
|
PDF graphics (and EPS and CGM graphics) use the opacity values of the objects in the PDF graphic. A setting in this field for these graphic types will be ignored.
|
• Clip region at page edge - select this option to terminate the region at the page edge if it is going to overrun. Note that content in the region will also be cut off at the page edge. It will not wrap.
Do not select this option if you are creating a region that should overflow the page edge, for example a bleed tab.
This option is not available if your stylesheet is set to generate print/PDF output with the FOSI or XSL-FO engines.
• Avoid - use the controls in this field to specify that the text content of preceding regions should flow around this region, if it is laid over preceding regions. You can increase the area to be avoided by applying Top margin, Bottom margin, Left margin, and Right margin measures in addition to this region’s size.
The order in which regions are drawn onto a page is defined in the Page types category for a page set.
◦ Underlaid regions avoid this region: select this option to specify that the content of underlaid regions should avoid this one
This option is not available if your stylesheet is set to generate print/PDF output with the FOSI or XSL-FO engines.
The
Top margin,
Bottom margin,
Left margin, and
Right margin fields allow you to either type an arbitrary size in the field or choose a defined size by selecting from the list of Size objects configured for your stylesheet. For the latter option, click the
Select Size button

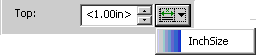
next to the field for which you wish to set the measurement and select the name of the required Size object from the resulting list. Once you have selected a Size object the measurement it defines will be displayed wrapped in angle brackets (< > characters) in the relevant field. For example, the Size object
InchSize defines a measurement of 1.00in:
Refer to
Defining Page Regions for examples and further information to assist you in configuring the page layout settings for a page set.