Inserting Tags Using Quick Tags
Quick Tags are a method of inserting elements into your document without having to access a dialog box or the toolbar.
Quick Tags are a list of elements that appear in a popup at the location of your cursor. The length of the Quick Tags popup and the list of elements it contains varies according to where your cursor is in your document when you press ENTER.
To insert elements using Quick Tags:
1. Click at the location where you want to insert an element.
2. Press the ENTER key. The Quick Tags popup appears.
3. Select an element from the list. If tag display is on, the tag will appear in your document.
If tag display is off, the Tag Prompt appears (a gray box with the name of the element inside it). If it is valid to enter text within the element you inserted, you can begin typing and the box will disappear. If you cannot enter text within this element, the cursor will have arrowheads on its top and bottom. You must insert another element within the one you inserted before you can add text. Press ENTER again and make another selection from the Quick Tags popup.
If another action is mapped to the ENTER key, you can use the ENTER key on the numeric key pad for Quick Tags. For example, if you are using the Arbortext XML DocBook document type, the Smart Insert feature may be mapped to the enter key.
|
|
If you have applied an alias map to your document, the Quick Tags popup will display aliases for elements, attributes, and attribute values that have been assigned aliases. |
When the list of elements is longer than the Quick Tags popup, a scroll bar is added to the Quick Tags popup.
The contents of the Quick Tags popup can appear in two different ways:
• Divided into two sections by a horizontal line
• As a single, undivided list
Divided Quick Tags Popup List
When the Quick Tags popup is divided by a horizontal line, the section below the line contains a list of the child elements that are valid to insert within the element in which your cursor is located.
Above the line are other valid elements that you might want to insert at the cursor. This list contains parent elements that correspond to the series of uninterrupted end tags in the Document Map at this location.
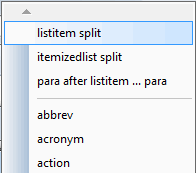
For example, this graphic of a portion of the Document Map shows the cursor at the end of content in a para element. The para element is inside a listitem element, which is inside an itemizedlist element.
You can press ENTER with the cursor at this location to get the following Quick Tags popup menu.
Notice there are three choices above the horizontal line.
• listitem split — Inserts another listitem element right after the listitem where the cursor is located. Let's say you are creating a bulleted list. This choice adds a list item after the one you are currently working with.
• itemizedlist split — Inserts another itemizedlist element right after the itemizedlist where the cursor is located.
• para after listitem ... para — Inserts another para element after the one in which the cursor is located in the same listitem element.
Below the horizontal line that divides the Quick Tags popup is a list of all the elements which are valid within the para element where the cursor is located. In our graphic this list is abbreviated to save space. In actuality, this list might be much longer, and you would be able to scroll through it to make your selection.
Undivided Quick Tags Popup List
When there is no horizontal dividing line in the Quick Tags popup menu, the list contains only child elements of the tag for the cursor location; for example, your cursor location is not at an end tag when you press ENTER. The list of elements is the same list you would get when by choosing > .
Changing Tags in the List
If you do not see the tag name you want to insert, you may need to move your cursor for that element to be in context. Make sure your cursor is at the proper location for inserting the desired element. If necessary, move the cursor and press ENTER again.
Quick Tags are available according to cursor placement as follows:
• When the cursor is just inside an end tag (at the end of text) when you press ENTER, the available Quick Tags are:
◦ The element in which the cursor is located (for example, if in a para, add another para)
◦ Elements which are valid within the element where the cursor is located (“child” elements)
◦ Elements whose end tags are immediately adjacent to the element in which the cursor is located
• When the cursor is in the middle of element content, the available elements on the Quick Tags popup menu are:
◦ The element in which the cursor is located (for example, if in a para, add another para)
◦ Elements which are valid within the element where the cursor is located (child elements)
• When the cursor is between elements and you press ENTER, the available Quick Tags are:
◦ Elements which are valid at that point according to the DTD
Quick Tags Not Available
Your stylesheet definition might have an element declaration for an “as-is” or “verbatim” tag. This is an element in which you can use carriage returns and spaces as you would in a unstructured document. The normal rules for what should happen if you press ENTER are turned off. If your cursor is within an element of this type, Quick Tags is not available.