Debugger Stored Object Manager
Stored Objects
Many of Layout Developer’s formatting objects do not have a tag representation and often many instances of the same object are created time and again when formatting a document. This is because the traditional way of working executes some code for each element and that code would typically create fStyle, fParagraph etc objects before applying them. The idea of stored objects was introduced in an earlier release and provides a means to store many of these transient objects within the template file to allow them to be created once and reused many times. The stored object tag (a type .jo tag) is the container for such stored objects and there are methods to create them (fContent.createStoredObject()) and to use them. The stored object tag can be used to store either a single object (for example, a single fBlock object) or can be used to store a library of objects (a set of fBlock objects as properties of a JavaScript Object, for example). By creating and using stored objects when developing templates, it is possible to minimise the volume of code Layout Developer must process which leads to more simple templates which perform better.
Editing Stored Objects in the Debugger
Prior to Version 12, the debugger hid stored object tags from the user. This is because they are not editable by users as they’re specially constructed JSON. However, they can be manipulated using JavaScript by changing the objects which they contain. Writing code to do this is not always practical, so a user interface has been provided in the debugger to simplify this process. From this release, .jo stored object tags are listed in the Resources panel and can be selected.
|
|
To create stored object tags, users still need to use the fContent.createStoredObject() method. fContent.createTag() does not work for .jo tags. This can be easily done from the command line in the debugger. For example, using content.createStoredObject(“myBlock”, new fBlock());
|
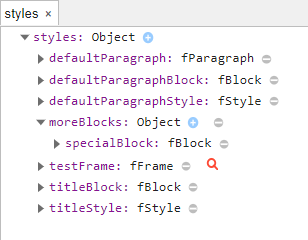
Clicking on a .jo tag in the Resources panel to open it, opens the tag in an ‘Object’ view. The ‘Object’ view gives this type of interface:
In this image, we can see a number of things which are important:
• The root of the tree is the root object represented by the stored object tag. In this case, it is a generic JavaScript object. The name of the root node is the same as the name of the stored object tag. The type of the object is displayed next to the name.
• As this interface is presented as a tree, the nodes of the tree can be opened and closed by clicking on the triangle icon to the left of the object name.
• In this case, the root contains seven other objects which are a mixture of fParagraph, fBlock, fStyle, fFrame and JavaScript objects.
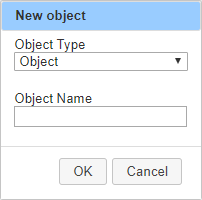
• A new child can be added to nodes which are JavaScript objects by clicking on the light blue circled ‘+’ icon. Doing so raises a dialog in the debugger to allow the user to set the object name and type:
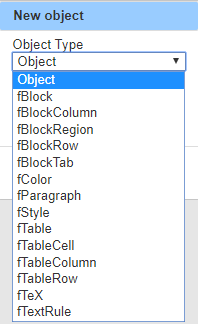
The object types can be selected using the combo box under ‘Object Type’:
The types are limited to those FOM objects which have both a readResolve() and a writeReplace() method. A simple JavaScript object can also be added using the ‘Object’ type. The ‘Object Name’ field allows the user to set the object’s name.
• The object can be deleted by clicking on the grey circled ‘-’ icon.
• Objects which are represented by a tag (such as the testFrame fFrame object in the image above) can be opened for editing by clicking on the red magnifier icon.
• Object properties can be edited as in the Inspector panel and the object property list can be minimised to exclude undefined or null properties by clicking on the ellipsis icon. Changes made to the objects and properties are written back into the stored object and are saved when the template is saved.