Defining Inserts
Introduction
Insert markup definitions specify the parameters of the insert function. The fInsertMarkupItem object provides the means to define the behaviour, and these are stored as an array on the fApplication object as fApplication.insertMarkupDefaults or on the fTemplate object as fTemplate.insertMarkupDefinitions.
The fInsertMarkupItem object tells ALD how to behave when the insert command is used. It is possible to simply insert some content (markup) or it can be used to request input from the user to select (or provide) a value to include in the inserted content.
Creating a Definition
When creating a definition, one can use either a generic JavaScript object or use an fInsertMarkupItem object. The latter being preferred. This object has a constructor, so use something like this to create your new definition:
var myDef = new fInsertMarkupItem();
The fInsertMarkupItem has a number of properties which define the item’s behaviour when called. As a minimum, specify the following:
• fInsertMarkupItem.markupStart — this property is a string value which specifies what to output at the start cursor position in the text
• fInsertMarkupItem.markupEnd — this property is a string value which specifies what to output at the end cursor position in the text. Note that if no text is selected, the start and end positions are the same
• fInsertMarkupItem.type — this property specifies the type of input expected, the allowed values of which are specified on the fInsertMarkupItem.MarkupTypes constant and are:
◦ fInsertMarkupItem.TYPE_NONE — no dialog will be created for this type so use it when you do not need input from the user — for example, when adding bold or italic markup
◦ fInsertMarkupItem.TYPE_TAG — when the dialog is created, the user will be given a tag picker to select a tag. When using this type, the developer can specify an fInsertMarkupItem.values property value which contains the letter codes for the tag types to be listed (these can be found in the dialog box documentation)
◦ fInsertMarkupItem.TYPE_COLOR — when the dialog is created, the user will get to choose a colour using the default colour picker. If fInsertMarkupItem.values is specified, these values will be ignored for this type
◦ fInsertMarkupItem.TYPE_FONT — the user will be able to select a font using the default font picker. If fInsertMarkupItem.values is specified, these values will be ignored for this type
◦ fInsertMarkupItem.TYPE_LENGTH — the input that the user provides will be validated to ensure it is a valid length. The fInsertMarkupItem.values property can be used to provide a drop-down of pre-defined values
◦ fInsertMarkupItem.TYPE_STRING — the user-input is a string. If fInsertMarkupItem.values is specified, these values will be ignored for this type
◦ fInsertMarkupItem.TYPE_PATH — when the dialog is created, the user will get a file picker to select a file for input. If fInsertMarkupItem.values is specified, these values will be ignored for this type. To set the file type, use the fInsertMarkupItem.default property
◦ fInsertMarkupItem.TYPE_BOOLEAN — the user input is either ‘on’ or ‘off’. If fInsertMarkupItem.values is specified, these values will be ignored for this type
◦ fInsertMarkupItem.TYPE_NUMBER — the user input will be validated to ensure that it is a valid number. If fInsertMarkupItem.values is specified, these values will be ignored for this type
◦ fInsertMarkupItem.TYPE_NAME — the user input will be validated to ensure that the value is a valid ‘name’. If fInsertMarkupItem.values is specified, these values will be ignored for this type
◦ fInsertMarkupItem.TYPE_LIST — the user will be able to select from a list of allowed values specified by the fInsertMarkupItem.values property value
So, to create a simple definition for a bold insert, use something like this:
var def = new fInsertMarkupItem();
def.markupStart = "<b>";
def.markupEnd = "</b>";
def.type = fInsertMarkupItem.TYPE_NONE;
To use the value specified by the user in the dialog, the fInsertMarkupItem.markupStart and fInsertMarkupItem.markupEnd properties can use ‘$1’ to show where to insert the input value. As an example, this could be used to create a definition for inserting a graphic:
var def = new fInsertMarkupItem();
def.type = fInsertMarkupItem.TYPE_PATH;
def.markupStart = "<graphic href='$1'/>";
Notice how the quotes around the attribute value are singles. If you want double quotes or any other special character, use JavaScript escaping to insert these characters (for example, \” will insert a double quote, \n will insert a line break, \t will insert a tab and \xA9 will insert a copyright symbol using the hex value). It is also worth noticing that only fInsertMarkupItem.markupStart has been used as the element inserted is empty.
The ‘$1’ insert value can be used in either the start or end markup, or both, and as many times as you like.
When requesting user input, a dialog is automatically generated and a picker is added based on the type being used. Some properties can be set for the dialog:
• fInsertMarkupItem.title — this value specifies the title bar text of the dialog
• fInsertMarkupItem.values — as described above, values can be used to assist the user in the dialog. When using the list type, the allowed values are provided as a comma separated list such as
fInsertMarkupItem.values = “value1, value2, value3, value4”
For the tag type, the values property should carry the tag type selector values (eg “yt” will list XML and text tags)
• fInsertMarkupItem.default — this property allows the dialog to have already selected a default value (which would typically be one of the listed values or could be used to limit the file picker to certain file types).
• fInsertMarkupItem.verify — this property accepts the standard dialog box verify strings (those within the parentheses for V() in dialog box fields) in order to allow users to verify the user input
The fInsertMarkupItem.function property adds a level of complexity to the feature, but allows the user to extend or change the markupStart and markupEnd property values once the user has provided their input. To start at the beginning, the fInsertMarkupItem.function value can take any JavaScript function. It could be a JavaScript function tag or another declared function in the script which is being run to create the fInsertMarkupItem. The function will be attached to the item — it will not refer to the function tag, so if you change the function you will need to declare the fInsertMarkupItem again. The function itself is run after the dialog is accepted but before the markup is output. Therefore, it is possible to change the markupStart and markupEnd property values on the current item definition within the function so that what gets output has been changed according to the function. To help, two arguments are passed to the function — the user input value and the definition. An example will help to clarify.
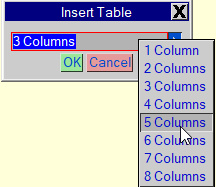
var def = new fInsertMarkupItem;
def.title = "Insert Table";
def.markupStart = "";
def.markupEnd = "";
def.type = fInsertMarkupItem.TYPE_LIST;
def.values = "1 Column, 2 Columns, 3 Columns,
4 Columns, 5 Columns, 6 Columns,
7 Columns, 8 Columns";
def.function = content.functions.insertTable;
def.default = "3 Columns";
Within the template is a JavaScript function tag called ‘insertTable’ which contains:
var value = arguments[0];
var def = arguments[1];
var start = "<table><row><cell>";
var end = "</cell>";
switch (value) {
case "1 Column":
end += "</row></table>";
break;
case "2 Column":
end += "<cell></cell></row></table>";
break;
...
def.markupStart = start;
def.markupEnd = end;
For the sake of brevity, the other case statements have been omitted.
In this example, the function will use the value selected by the user to build up a string to start and end the table which will be inserted where the cursor is. If text is selected, that text will appear in the first cell. The function rewrites the defined markupStart and markupEnd values before they’re used by the feature to ensure the correct markup is included. Using tinsertmarkup “table” will present the user with this dialog:
Using an Object Rather Than fInsertMarkupItem
Definitions can be specified using a generic object too. This provides something of a shortcut to creating definitions. You can use something like this:
var defList = template.insertMarkupDefinitions;
defList.bold = {
markupStart: "<b>",
markupEnd: "</b>",
type: "none"};
defList.textHeight = {
title: "Select text height",
type: "length",
markupStart: "<tweak property=\"textHeight\" value=\"$1\">",
markupEnd: "</tweak>",
values: "10pt, 12pt, 14pt, 18pt, 24pt",
default: "12pt"};
Adding Definitions to the Lists of Definitions
There are two places where insert markup definitions can be specified for Layout Developer and Layout Editor:
• fTemplate.insertMarkupDefinitions — a template-level set of definitions
• fApplication.insertMarkupDefaults — a set of insert markup definitions which provide defaults and can be overridden by template-level definitions
To add a definition to one of these lists, use something like the following:
var defList = template.insertMarkupDefinitions;
var boldDef = new fInsertMarkupItem();
boldDef.markupStart = "<b>";
boldDef.markupEnd = "</b>";
boldDef.type = fInsertMarkupItem.TYPE_NONE;
defList.bold = boldDef;
The name given to the element in the list (in this case ‘bold’) is what would be used as tinsertmarkup “bold” or fStream.insertMarkup(“bold”). More on this in the next section.
For template-level definitions, it makes sense to create and define these when the template starts up in the ‘autoexec’ script. They can also be applied via a library menu, but the result should be the same. Template-level definitions are not saved with the template, so should be created each time the template is opened.
Application-level defaults can be created when ALD or ALE starts. The ideal place to do this is in a startup.js file in the application folder. Some defaults are provided.
If a definition of the same name exists at both template and application level, the template definition will take priority.