Advance Configurations
Persisting Manual Configuration
Arbortext Content Delivery provides some default SSO specific configurations that are managed through the Configurator and every restart of the application server re-configures the application. To stop the Configurator from overriding the content, you must set the Configurator_DisableSSOConfiguration=true property in the setup.properties file located at $INS_INSTALL/InS_SW/SW/
Customizing SSO Configuration Files
You might want to make changes to SSO configuration to suit your applications. You can customize these configurations by updating the following configuration files:
|
Customization Actions
|
Files to be Updated
|
|---|---|
|
• Change client secret in encrypted format
• Change certificate details such as jks name, keys, and so on.
• Change the path and filename of the IdP metadata
|
securityContext.properties
|
|
• Rename existing file
• Update IdP metadata configuration
|
openam-idp.xml
|
|
• Update the client id/secret in encrypted format
• Update scopes
|
resourceServers.xml
|
 |
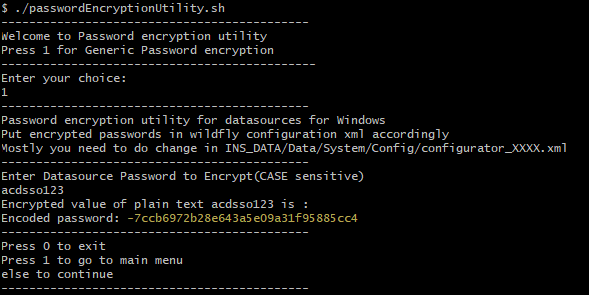
To change client secret in encrypted format, perform the following steps for password encryption:
1. Open the command line and execute PasswordEncryptionUtility available at the location: InS_SW\SW\ PasswordEncryptionUtility.
2. Press 1 and then enter the password string that you want to encrypt, as shown in the following image:
 |
Allowing Other Clients to Access APIs
To allow access to other clients,
1. Create a client for a third-Party application in PingFederate.
2. Get the authentication token to access the SP by sharing the client ID, secret, scope, and so on.
3. Pass the same authentication token as a bearer token while fetching rest resources
REST API Access under SSO for Third-Party Clients
|
|
• The third-party client must be able to generate OAuth 2.0 access tokens.
• The third-party client must be able to make HTTP requests.
|
To access the REST APIs under SSO by third-party clients, complete the following steps:
1. Generate an OAuth 2.0 access token—To generate an OAuth 2.0 access token follow the instructions provided by the identity provider (idp).
2. Add the access token in the authorization header of the HTTP request—Add the access token in the authorization header of the HTTP request to the REST API. The following is the authorization header:Authorization: Bearer <access_token>. Here the <access_token> is the value of the access token that was generated in step 1.
3. Make the HTTP request to the REST API—The HTTP method and parameters that are used will vary depending on the specific REST API.
If the third-party client does not follow the above steps correctly. The REST APIs may show the following error codes:
• 401 Unauthorized: The access token is invalid.
• 403 Forbidden: The user does not have permission to access the resource.
• 500 Internal Server Error: An error occurred on the server.
Troubleshooting
If the third-party client encounters any error while accessing the REST APIs, see the troubleshooting options:
• Ensure that the third-party client is able to generate OAuth 2.0 access tokens.
• Ensure that the access token is valid.
• Ensure to use the correct URL for the HTTP request.
• Ensure that the HTTP request is using the correct HTTP method.
• Ensure to add the required parameters in the HTTP request.
Contact the PTC Technical Support Team for further help.
Using Alias or Reverse Proxy Server for Arbortext Content Delivery
To configure SSO for Arbortext Content Delivery using alias or reverse proxy instead of using actual hostnames, update the entityBaseURL for Publisher and Viewer server.
The Publisher and Viewer server need to be updated using alias or reverse proxy with the help of the steps mentioned below:
1. Add the org.springframework.security.saml.metadata.MetadataGenerator.entityBaseURL1=https\://Alias_Name\:Port/ACD property with the alias or reverse proxy hostname in the SecurityContext.properties file of the respective WAR files of Publisher and Viewer server.
2. In the securityContext.xml file, replace the two occurrence org.springframework.security.saml.metadata.MetadataGenerator.entityBaseURL
with org.springframework.security.saml.metadata.MetadataGenerator.entityBaseURL1 and save the file.
3. Restart the Publisher and Viewer server