Configuration Tasks
These Task Manager tasks enable you to configure the data and related assets in your system. Following are the most commonly used configuration tasks.
Add Category To a Non Product Collection
You use this task to add a new category to a collection that does not contain product data. For example:

The task has the following input parameters:
• Collection Title – Specifies the title of the non-product collection to which you want to add a category.
• Site Group – Specifies the site name on the Viewer server.
This is usually either Preview or Runtime, depending on your configuration.
• CategoryID – Specifies the identifier for the category.
Click the Add Category option beside this parameter to open the Create Category window where you can add the identifier.
Add Collection
You use this task to add a new collection. Note that the system must have a collection named PARTS or PARTDOCUMENTS in a segment named SHARED. However, whenever you add a new collection, Task Manager checks to see if the PARTS (or PARTDOCUMENTS) collection exists and automatically creates it if it does not. PARTDOCUMENTS are documents related to a part, such as marketing documents. The PARTDOCUMENTS collection is created to capture all the documents content related to the PARTS.
For example:

The task has the following input parameters:
• Collection ID – Specifies the name of the collection (can contain ‘ -, [ , ] ’).
Note that the ID for the collection should not be any of the following values:
◦ IS
◦ PA
◦ PARTSLIST
◦ PH
◦ PI
◦ PL
◦ PS
• Collection Title – Specifies the title of the collection (can contain any special characters).
• Content Type – Specifies whether the content of the collection is product or non-product data.
• Include Collection in Segment – Specifies the segment where data should be loaded.
If the required segment is not in the list, use the Create New Segment option to open a window where you can create a new segment.
• Assets Folder Path – Specifies the path to the folder containing the collection assets.
This path is usually HOME\SW\SW\System\Assets.
• Deploy – Determines whether to deploy the collection to sites after creating the collection.
Checking the Deploy Collection to Sites box starts the Deploy Collection task after the collection is added. You can also do this operation separately.
• Available Sites – Intended for deploying the collection to sites. Select the required site or sites from the list.
• Context ID – Specifies the contexts to which the collection should be associated.
To add a context click the Add Context to open the Create Context window.
• Data Types – Specifies data types for the collection.
The list of data types is automatically added to the task. You can click the  option beside a data type to remove it. To add a data type, click the Add Data Type option to open the Add Data Type to Collection window.
option beside a data type to remove it. To add a data type, click the Add Data Type option to open the Add Data Type to Collection window.Add Context To a Collection
You use this task to add a new context to a collection. For example:

The task has the following input parameters:
• Collection Title – Specifies the title of the collection to which you want to add a context.
• Site Groups – Specifies the site name on the Viewer server.
This is usually either Preview or Runtime, depending on your configuration.
• Context ID – Specifies the identifier for the context.
Click the Add Context option beside this parameter to open the Create Context window where you can add the identifier.
Add Data Type
You use this task to add a new data type to an existing collection. For example, assume you have already deployed a collection with the data types PH, IS, and PARTSLIST but are missing the data type IEXML. Use this task to update a collection with the additional data type.
For example:
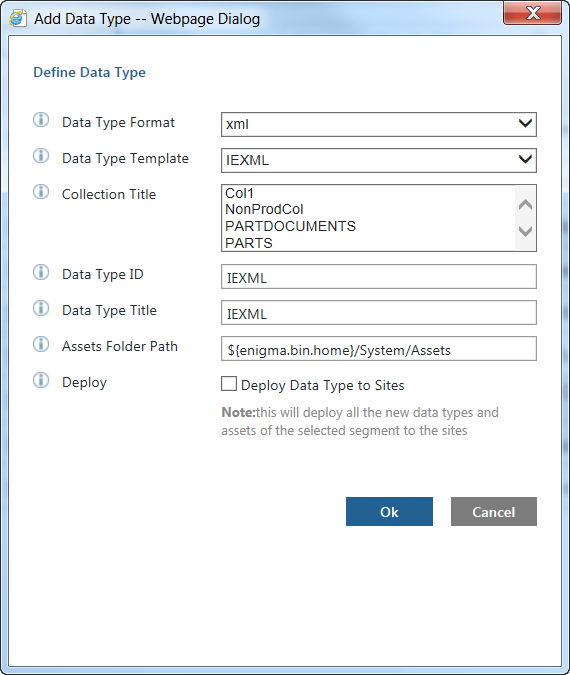
The task has the following input parameters:
• Data Type Format – Specifies the format of the data type.
The format can be either xml or pdf.
• Data Type Template – Specifies the template for the data type.
• Collection Title – Specifies the title of the collection to which you want to add the data type.
• Data Type ID – Specifies the unique identifier for the data type.
• Data Type Title – Specifies the title of the data type.
• Assets Folder Path – Specifies the path to the folder containing the collection assets.
This path is usually HOME\SW\SW\System\Assets.
• Deploy – Determines whether to deploy the collection to sites after adding the data type.
Checking the Deploy Collection to Sites box starts the Deploy Collection task after the data type is added. You can also do this operation separately.
Create Offline Packet
You use this task to create a data packet for use in PTC Arbortext Content Delivery Offline. For example:

The task has the following input parameters:
• Segment Name – Specifies the name of the segment for which you want to create an offline packet.
• Site Group – Specifies the site name on the Viewer server.
This is usually either Preview or Runtime, depending on your configuration.
Deploy Assets
You use this task to deploy your data’s assets. The task triggers the Deploy Collection task for each segment with the segment level profile. The Deploy Collection task deploys any new assets to your sites and automatically re-indexes any changed types.
For example:

The task has the following input parameters:
• Site Groups – Specifies the name of the site group to which you want to deploy the assets.
• Deploy all Sites in one Task – Specifies whether to deploy assets to all sites using a single task.
The default setting for this parameter is false.
• Force Re-Index – Specifies whether to re-index all types when deploying the assets.
The default setting for this parameter is false. Change the setting to true to force all types to be re-indexed, whether they have changed or not.
It is recommended that you do not change the setting. The task automatically re-indexes any asset types that were changed, so you should not need to force a re-index of all types.
• Pause before updating the Sites – Specifies whether to pause the task before updating any sites.
The default setting for this parameter is false. Set this to true if you want to examine the updating assets before updating the sites.
Deploy Collection
You use this task to deploy a collection to the sites. The Add Collection task calls this task if you select the option to deploy the new collection to the sites.
For example:

The task has the following input parameters:
• Collection Name – Specifies the name of the collection you want to deploy.
• Profile – Specifies the name of the content profile for the collection.
The content profile is an XML file containing the rule and conditions for the content to be extracted and deployed.
Use Collection profile while creating the collection and use Segment profile while re-indexing the segment. |
• Site Group – Specifies the site name on the Viewer server to which you want to deploy the collection.
This is usually either Preview or Runtime, depending on your configuration.
• Reset Index – Specifies whether to re-index all asset types when deploying the collection.
Check this box when you need to update the assets and have already loaded the bundles. This will update the index without need to TAL again.
Update Assets in Publication Manager
You use this task to deploys the updates of any asset type, such as style sheets, into Publication Manager.
For example:

The task has the following input parameters:
• Assets Folder Path – Specifies the path to the folder containing the assets.
This path is usually HOME\SW\SW\System\Assets.
• Deploy Assets – Determines whether to deploy the assets to sites after updating them in the Publication Manager.
Upgrade Data
You use this task to upgrade your data after upgrading your system to a new PTC Arbortext Content Delivery release. For example:

The task has the following input parameters:
• Site Group – Specifies the site name on the Viewer server for which you want to upgrade the data.
This is usually either Preview or Runtime, depending on your configuration.
• Assets Folder Path – Specifies the path to the folder containing the assets.
This path is usually HOME\SW\SW\System\Assets.
• Reset Index – Specifies whether to re-index all asset types after upgrading the data.