Customizing UI Layout and Attribute Templates
Much of the PTC Arbortext Content Delivery UI has been broken down into smaller HTML templates that get brought together to make up the overall pages. These templates allow customizers to copy and override the default UI pages with their own customizations.
Identifying Template Files
The first step is to identify the template file that needs to be updated. This can be done by looking at the HTML of the page. Embedded in the HTML are comments that contain the name of the various templates used to generate the page. Each section generated by a template has a “begin” and “end” comment in the following format:
<!--begin data-ptc-template-source: <template name> -->
<!--end data-ptc-template-source: <template name> -->
<!--end data-ptc-template-source: <template name> -->
Everything between these two comments is generated by the specified template. Identify the template that needs to be customized by performing the following steps:
1. Navigate to the PTC Arbortext Content Delivery page in question and open up the browser’s Developer Tools window (usually by pressing F12).
2. Using the Developer Tools “Select Element” feature, click the UI element you are interested in. This highlights the HTML DOM element in the Developer Tools window.
3. From that point, look for the nearest enclosing element that has a comment beginning with “begin data-ptc-template-source”. This comment has the name of the template that your element is defined in. For example:
<!-- begin data-ptc-template-source: templates/partsListItem.tmpl.html -->
Updating Template Files
Once the file is identified, creating a custom template can be done as follows:
1. Find the template in question under the <WT_HOME>/codebase.war/delivery/templates directory and copy it to the same directory structure under <WT_HOME>/codebase.war/delivery/custom/
2. Make any necessary changes to the custom template html.
3. From a Windchill shell run the following command: java com.ptc.sc.util.TemplateMapGenerator <WT_HOME>/codebase.war/delivery/templateMap.js <WT_HOME>/codebase.war/delivery/custom
|
|
JAVA_HOME must be set to the location of the Java executable.
|
4. Rebuild the client artifacts by running the following command from a Windchill shell: <ANT_HOME>/bin/ant -f <WT_HOME>/codebase.war/delivery/minimize.xml
|
|
The <WT_HOME>/codebase.war/delivery/templateMap.js file is used to add redirect mappings for files that have been customized. For example, ‘return {“templates/search/advancedSearch.tmpl.html”: “custom/”};’ tells the client to look for codebase.war/delivery/custom/templates/search/advancedSearch.tmpl.html instead of codebase.war/delivery/templates/search/advancedSearch.tmpl.html.
This means that “custom/” in this example is simply a prefix that is used to indicate the base folder containing the custom files and folders. There is no fallback mechanism. All mappings must have a corresponding customized template file. Since the template files are html files, any html or AngularJS syntax can be used, and is rendered by the client.
|
Adding Custom Attributes
See Attributes for more information about using the Attributes utility.
Customizing Attributes Example
Try to update an Create Generic Notes Attribute from NotesResource.js, and try to send an attribute value of null.
1. Create an Attribute of Real Number Type.
2. Create a Note with attribute value null.
For example testAttribute with a value of null.
{
"breadcrumbPath": "Generic-Note", //$translate.instant('GENERIC_NOTE')
"testAttribute": null
}
"breadcrumbPath": "Generic-Note", //$translate.instant('GENERIC_NOTE')
"testAttribute": null
}
Example: Customizing Column Width for Parts List
Consider an example where you want to customize the column width for parts list by modifying the partListItem template. The current partListItem template is designed by taking adaptive layout into consideration. To adjust the column width on the parts list display page, modify the following templates:
• codebase.war\delivery\templates\partsListItem.tmpl.html
• codebase.war\delivery\app\views\partsList\details\partsListDescribingPart.html
|
|
Before modifying the HTML file and creating a new CSS class to adjust the column width, you must ensure that the parts list user interface is not breaking on different screen devices.
|
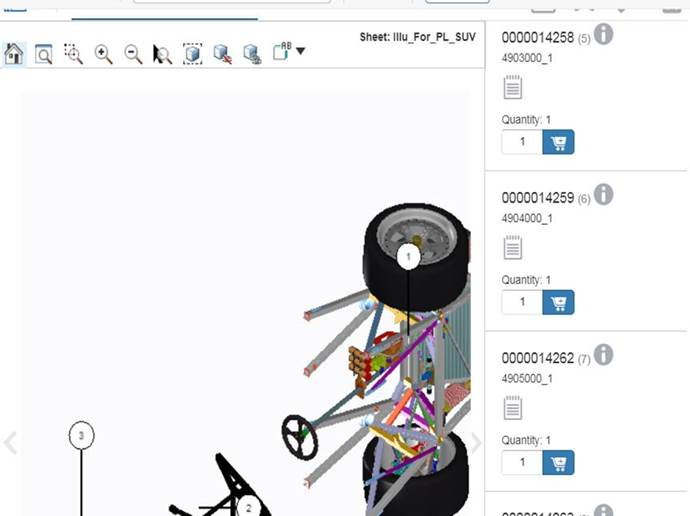
The default optimum width is assigned to columns by considering the behavior of the component width in different device types and viewport sizes. The percentage width assigned to each column changes based on the device screen width. For example, the following screenshot displays the width of each column that is distributed in default application for desktop browsers in the full screen mode:

The following screenshot displays the single-column layout on an iPad device:
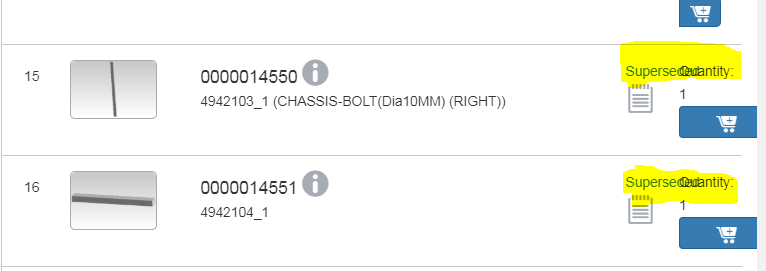
The following screenshot depicts how the screen will display if you change the PartListItem column widths on your local environment:

If you reduce the column width of the Notes and Add to Cart icons, the component breaks to the next line or overlaps with the other column (as displayed in the following screenshot). Also, you must consider the length of the UI label strings, such as Superseded (present above the Notes icon) and Quantity in other locales, as the translated strings may be longer.