Displaying Custom Attributes on Parts List and Part Information Pages
You can display custom attributes (without any spaces or special characters) on the parts list and part information pages by loading them as:
• Comma-separated values (CSV) data
• Windchill Service Information Manager (SIM) data
Loading Custom Attributes as CSV Data
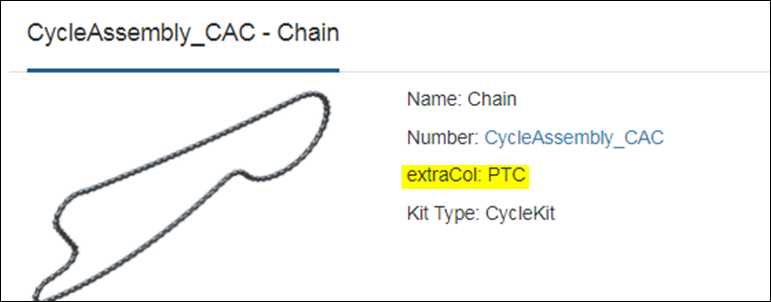
Follow these steps to display a custom attribute extraCol on the part information and parts list pages by using the CSV data load method:
1. Open the part.csv file from the CSV bundle and include the custom attribute as a column header in the format: additional_detail_<custom_attribute_name>. For example, for the custom attribute extraCol, you must add the column header additional_detail_extraCol in the part.csv file.
2. Reload the CSV bundle. The custom attribute is added to the customMetadata element in the JSON resource bundle as follows:

3. Follow these steps to display the custom attribute on the part information page:
a. Open the partsDetails.html file located in the directory <HOME>/SW/SW/Applications/Windchill.ear/codebase.war/delivery/app/views/parts/details, where <HOME> is the path to the installation directory for PTC Arbortext Content Delivery.
b. Add the following code after the <div class="partAttr detailsSection"> element in the partsDetails.html file:
<div class="attributeMargin">
<label data-ng-bind = "context.currentNode.customMetadata.extraCol.key">
</label>
<span>:</span>
<p data-ng-bind="context.currentNode.customMetadata.extraCol.value"></p>
</div>
<label data-ng-bind = "context.currentNode.customMetadata.extraCol.key">
</label>
<span>:</span>
<p data-ng-bind="context.currentNode.customMetadata.extraCol.value"></p>
</div>
c. Clear the cache and refresh the application user interface. The custom attribute is displayed on the part information page.
4. Follow these steps to display the custom attribute on the parts list page:
a. Open the partsListItem.tmpl.html file located in the directory <HOME>/SW/SW/Applications/Windchill.ear/codebase.war/delivery/templates.
b. Add the following code after the span data-ng-bind="::'REMARKS' element in the partsListItem.tmpl.html file:
<div>
<span data-ng-bind = "item.objects.associatedPart.customMetadata.extraCol.key"></span>
<span>:</span>
<span data-ng-bind="item.objects.associatedPart.customMetadata.extraCol.value"></span>
</div>
<span data-ng-bind = "item.objects.associatedPart.customMetadata.extraCol.key"></span>
<span>:</span>
<span data-ng-bind="item.objects.associatedPart.customMetadata.extraCol.value"></span>
</div>
c. Clear the cache and refresh the application user interface. The custom attribute is displayed on the parts list page.

Loading Custom Attributes as SIM Data
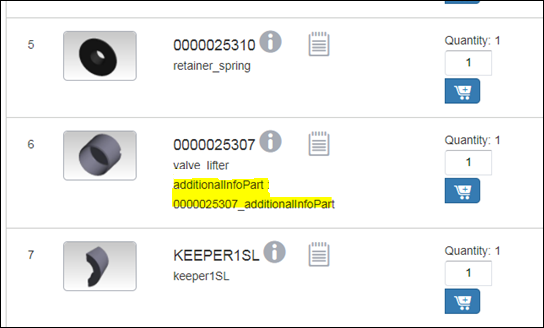
Follow these steps to display a custom attribute additionalInfoPart on the part information and parts list pages by using the SIM data load method:
1. Edit the SIM bundle to add the custom attribute. For example, for the custom attribute additionalInfoPart, add the following code to the bundle:
<Property token="additionalInfoPart">
<Value>0000000006_AdditionalPArt</Value>
</Property>
<Value>0000000006_AdditionalPArt</Value>
</Property>
2. Open the abstractCustomPart2Feed.xsl file located in the directory <HOME>/SW/Config/Applications/ContentManager/Config/Common/Templates/TransformationDriver/PARTS.
3. To add a custom attribute, edit the following code:
<xsl:variable name="CUSTOM_PARTS_SOFT_ATTRIBUTES">
</xsl:variable>
</xsl:variable>
as follows:
<xsl:variable name="CUSTOM_PARTS_SOFT_ATTRIBUTES" select="',additionalInfoPart,'">
</xsl:variable>
</xsl:variable>
4. Run the TAL process again.
5. Open the abstractCustomProcessItem.xsl file located in the directory <HOME>/SW/SW/System/Assets/StyleSheets/PARTS/
6. Edit the abstractCustomProcessItem.xsl file to add the custom attribute value in the file as follows:
7. Run the Update Assets in Publication Manager task from the Task Manager.
8. Run the Deploy Assets task from the Task Manager. The custom attribute is added to the customMetadata element in the JSON resource bundle:

9. Follow these steps to display the custom attribute on the part information page:
a. Open the partsListItemDetails.html file located in the directory <HOME>/SW/SW/Applications/Windchill.ear/codebase.war/delivery/app/views/parts/details.
b. Add the following code after the <div class="partAttr detailsSection> element in the partsListItemDetails.html file:
<div>
<label data-ng-bind="context.currentNode.objects.associatedPart.customMetadata.additionalInfoPart.key"> </label>
<span>:</span>
<p data-ng-bind="context.currentNode.objects.associatedPart.customMetadata.additionalInfoPart.value"></p>
</div>
<label data-ng-bind="context.currentNode.objects.associatedPart.customMetadata.additionalInfoPart.key"> </label>
<span>:</span>
<p data-ng-bind="context.currentNode.objects.associatedPart.customMetadata.additionalInfoPart.value"></p>
</div>
c. Clear the cache and refresh the application user interface. The custom attribute is displayed on the part information page.

10. Follow these steps to display the custom attribute on the parts list page:
a. Open the partsListItem.tmpl.html file located in the directory <HOME>/SW/SW/Applications/Windchill.ear/codebase.war/delivery/templates.
b. Add the following code after the span data-ng-bind="::'REMARKS' element in the partsListItemDetails.html file:
<div data-ng-if="item.objects.associatedPart.customMetadata.additionalInfoPart">
<span data-ng-bind = "item.objects.associatedPart.customMetadata.additionalInfoPart.key"></span>
<span>:</span>
<span data-ng-bind="item.objects.associatedPart.customMetadata.additionalInfoPart.value"></span>
</div>
<span data-ng-bind = "item.objects.associatedPart.customMetadata.additionalInfoPart.key"></span>
<span>:</span>
<span data-ng-bind="item.objects.associatedPart.customMetadata.additionalInfoPart.value"></span>
</div>
c. Clear the cache and refresh the application user interface. The custom attribute is displayed on the parts list page.
11. In Windchill shell, run the following command: ant -f <WT_HOME>/codebase.war/delivery/minimize.xml
Displaying a Custom Attribute Defined in PartsList Items
To display a custom attribute that is defined in a PartsList,
1. Edit InS_SW\Config\Applications\ContentManager\Config\Common\Templates\TransformationDriver\PARTSLIST\abstractCustomPartsList2Feed.xsl to update the CUSTOM_PARTSLIST_ITEMS_ITEM_PARTLISTITEM_SOFT_ATTRIBUTES section as follows:
<xsl:variable name="CUSTOM_PARTSLIST_ITEMS_ITEM_PARTLISTITEM_SOFT_ATTRIBUTES" select="',additionalInfoPartListItem,'">
</xsl:variable>
</xsl:variable>
2. Re-TAL the bundle.
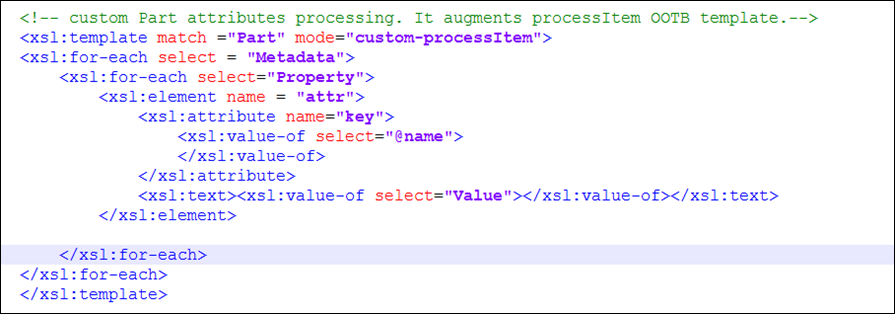
3. Edit the InS_SW\SW\System\Assets\StyleSheets\PARTSLIST\abstractCustomProcessItem.xsl file as follows:
<xsl:template match ="Part" mode="custom-processItem">
<xsl:for-each select="Metadata">
<xsl:for-each select="Property">
<xsl:element name="attr">
<xsl:attribute name="key">
<xsl:value-of select="@name">
</xsl:value-of>
</xsl:attribute>
<xsl:text>
<xsl:value-of select="Value">
</xsl:value-of>
</xsl:text>
</xsl:element>
</xsl:for-each>
</xsl:for-each>
</xsl:template>
4. Run the Deploy Assets task.
5. Edit the InS_SW\SW\Applications\Windchill.ear\codebase.war\delivery\app\views\parts\details\partsDetailsPreview.html file and after the section
<div data-ng-if="::isDescPart"
class="ptc-details-add-to-cart hidden-print ng-scope"
data-add-to-cart="context.currentNode.objects.associatedPart"
data-add-to-cart-quantity="context.currentNode.attributes.quantity"
data-add-to-cart-item-parent-id="context.currentNode.id"
data-add-to-cart-in-cart-quantity="context.currentNode.attributes.inCartQuantity"
data-add-to-cart-quantity="context.currentNode.attributes.quantity"
data-add-to-cart-show-select-part="true">
</div>
add the following:
<div class="where-used-button col-md-12 col-xs-12" data-ng-if="::item. customMetadata.additionalInfoPartListItem.key === 'additionalInfoPartListItem'">
<label>additionalInfoPartListItem: </label>
<p data-ng-bind="::item.customMetadata. additionalInfoPartListItem.value"> </p>
</div>
<label>additionalInfoPartListItem: </label>
<p data-ng-bind="::item.customMetadata. additionalInfoPartListItem.value"> </p>
</div>
6. Open Windchill shell and navigate to <InS_HOME>/InS_SW/SW/Applications/Windchill.ear/codebase.war/delivery
7. Run the command: ant -f minimize.xml
8. Restart the jboss service.