Creating a Generic Symbol
Procedure
- To create a symbol, select Create from the DETAIL
pull down menu, Symbol, Definition, Define, and enter the name of the new
symbol. This will open up the SYM_EDIT sub window in which the symbol will
be created.
- Sketch the symbol as seen in Figure 1. The symbol
can be sketched by selecting Detail, Sketch from the SYMBOL EDIT menu or by
using Copy Drawing and selecting existing entities in the drawing window.
The notes "\Note #\" and "\text\" were created using Detail, Create, Note
from the SYMBOL EDIT menu. Because both notes are surrounded by backslashes
"\", the text for these notes will be variable. Variable text allows for preset
values to be defined as symbol attributes and selected when placing symbols
on the drawing. Preset values may be used for each of these notes. If the
text in a note is to remain constant, do not use any "\" before and after
the text.

Figure 1
- When all of the entities have been sketched, groups
can be made so that several instances of one generic symbol can be made. Groups
are useful because each instance of the symbol will be saved with the generic,
rather than a separate symbol file for each instance. To create a group, select
Groups, Create from the SYMBOL EDIT menu and enter in the name of a group:
"triangle", for example. Select the entities seen in Figure 2 to be in the
group, "triangle". If an entity is mistakenly omitted or one is chosen that
does not belong to that group, Edit, Triangle, Add or Remove from the SYM
GROUPS menu can be used to edit the group definition. Create another group
called "text" and select the notes "\Note #\" and "\text\". Add the last group
called "wings", which includes the two arcs on the top of the triangle.

Figure 2
- Sub-groups need to be created in the top level group
"triangle". To create a sub-group under "triangle", select Groups, Change
Level, Triangle (this is the group under which the sub-group will be created),
and This Level. Now, two groups called "point" and "bottom" need to be created.
In the "point" group, the two slanted lines were selected, as seen in Figure
3. The horizontal line was included in the "bottom" group, which is omitted
from Figure 3.

Figure 3
- When placing an instance of the symbol, it is possible
to exclusively include either the "point" or the "bottom" sub levels, without
having both in the symbol at the same time. To select one of these groups,
change the level to the "triangle" group using Groups, Change Level, Triangle,
This Level. Then select Groups, Group Attr, Exclusive. Note that for this
example, there were NOT any exclusive groups created.
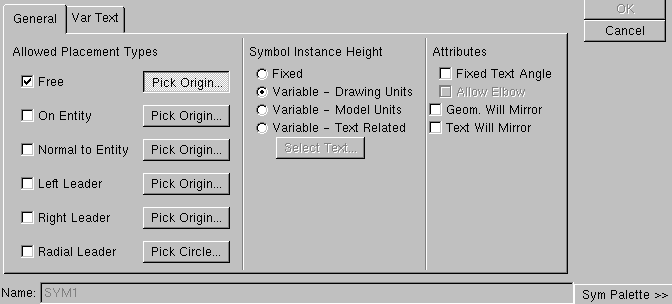
- Choose the attributes for the symbol by selecting
Attributes from the SYMBOL EDIT menu. See Figure 4 for the Attributes dialog
box. For this symbol, Free placement is being selected to allow the symbol
to be placed anywhere on the drawing. The origin of the symbol is defined
using the Pick Origin... button. Variable - Drawing Units is selected to allow
for variable heights of the symbol when placing an instance utilizing the
drawing units. The Var Text tab may be use to specify preset values for the
variable texts from the notes. Select the OK button to finish the symbol definition.

Figure 4
- As with the Attributes dialog box, there is a dialog
box for defining an instance of a symbol to be placed on the drawing. Select
Instance from the SYMBOL TYPE menu to define the instance. For the example
in Figure 5, "SYM1" is retrieved, and a copy of the symbol is defined with
"xyz" as the new name. The variable height has been changed to "3".

Figure 5
- The grouping of the symbol instance is controlled
through a tree representation of the group levels and sub levels as seen in
Figure 6. The window to the right allows for the preview of the symbol before
it is actually placed. As shown in the dialog box, the sub level group "BOTTOM"
(which contains the horizontally sketched line) is not selected in the tree,
and consequently not seen in the preview of the instance.

Figure 6
- The last step in defining the instance is to give
values for the variable text. In Figure 7, the value of "1" was given for
"Note #", and the value of "PTC" was given to the "text" variable text.

Figure 7
- Once the Grouping and Var Text have been defined,
the instance can be placed by selecting Place Inst... from the Placement tab
(see Figure 5) and selecting a location on the drawing.
- The symbol can be written to disk so that it can be
used on other drawings by selecting Definition, and then Write from the DWG
SYMBOL menu.
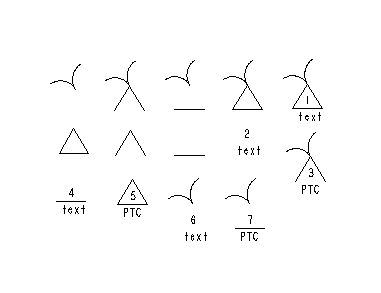
- All of the 14 instances shown in Figure 8 can be created
from the generic symbol by selecting various combinations of the groups.

Figure 8


