Use Case 2: Propagate Specific Updated Changes in Upstream to Downstream
After the creation of the split assemblies, the changes in plant attributes and department attributes are tracked using Engineering Change Notice (ECN). You are required to create a change notice and collect the plant attributes and department attributes. In the ECN, the Affected Objects section has the previous iteration or revision information. The Resulting Objects section has the latest information. In case of an update in plant attributes and department attributes, you are required to enter the engineering change notice number in the Set Configuration Specification dialog box before detecting the discrepancies.
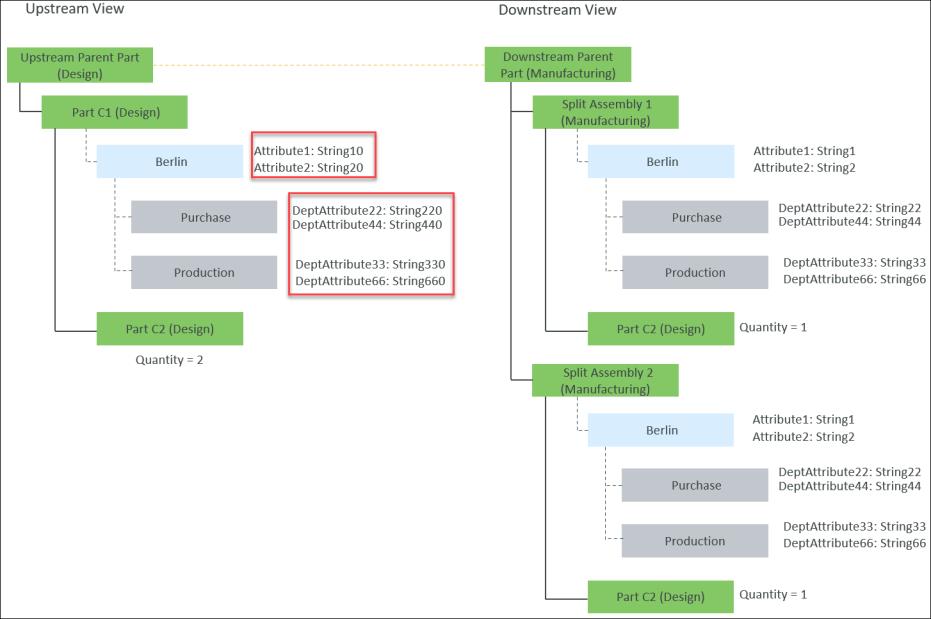
Consider that Split Assembly 1(Manufacturing) and Split Assembly 2(Manufacturing) are created in the downstream view. The plants, plant attribute values, departments, and department attribute values are copied in the downstream view because of the copy properties. For more information, see Use Cases: Copying Entities from Upstream to Downstream after Creating Split Assemblies:

• An equivalent link exists between the Upstream Parent Part (Design) and Downstream Parent Part (Manufacturing).
An equivalent link of type split exists between Part C1 (Design) and Split Assembly 1(Manufacturing).
An equivalent link of type split exists between Part C1 (Design) and Split Assembly 2(Manufacturing).
1. Access the mpmlink.properties.xconf file located at Windchill/codebase/com/ptc/windchill/mpml/xconfs.
2. Set the following configuration:
◦ Locate the following property:
<Property name="com.ptc.windchill.mpml.copyOver.update.com.ptc.windchill.enterprise.data.EnterpriseData.com.ptc.windchill.enterprise.data.enterpriseData.PlantSpecificEnterpriseData" multivalued="," default=""/>
This property enables the update of plants and plant attribute values. If this property does not have a value, the plants and plant attribute values are not updated. |
Add the following property under this property:
<AddToProperty name="com.ptc.windchill.mpml.copyOver.update.com.ptc.windchill.enterprise.data.EnterpriseData.com.ptc.windchill.enterprise.data.enterpriseData.PlantSpecificEnterpriseData"value="IdentityAttributes::view=Berlin@CopyAttributes::Attribute1"/>
This property ensures that all the changes in plant Berlin and the value of plant attribute Attribute1 of plant Berlin are copied. This property also ensures that all the updated plant attribute values of Attribute1 of plant Berlin are copied. |
◦ Locate the following property:
<Property name="com.ptc.windchill.mpml.copyOver.update.com.ptc.windchill.enterprise.data.Purchase" multivalued="," default=""/>. Add the following property under this property:
<AddToProperty name="com.ptc.windchill.mpml.copyOver.update.com.ptc.windchill.enterprise.data.Purchase"value="IdentityAttributes::view=Berlin@CopyAttributes::DeptAttribute22"/>
This property ensures that only specific updated department attribute values of department Purchase are copied. The term com.ptc.windchill.enterprise.data.Purchase and @CopyAttributes::DeptAttribute22 ensure this. com.ptc.windchill.enterprise.data.Purchase is the internal name of the department data Purchase. |
◦ Locate the following property:
<Property name="com.ptc.windchill.mpml.copyOver.update.com.ptc.windchill.enterprise.data.Production" multivalued="," default=""/>. Add the following property under this property:
<AddToProperty name="com.ptc.windchill.mpml.copyOver.update.com.ptc.windchill.enterprise.data.Production"value="IdentityAttributes::view=Berlin@CopyAttributes::DeptAttribute33"/>
This property ensures that only specific updated department attribute values of department Production are copied. The term com.ptc.windchill.enterprise.data.Production and @CopyAttributes::DeptAttribute33 ensures this. com.ptc.windchill.enterprise.data.Production is the internal name of the department data Production. |
3. Make changes in the plant attributes and department attributes in the upstream view.
4. Click  Set Configuration Specification action available in the middle pane toolbar. The Set Configuration Specification dialog box opens. Specify the change notice number in the Change Number field.
Set Configuration Specification action available in the middle pane toolbar. The Set Configuration Specification dialog box opens. Specify the change notice number in the Change Number field.By specifying the change number, you are setting the context for reconciliation. In other words, you are doing the groundwork for using the  Detect Discrepancies action.
Detect Discrepancies action.5. Click OK to close the Set Configuration Specification dialog box.
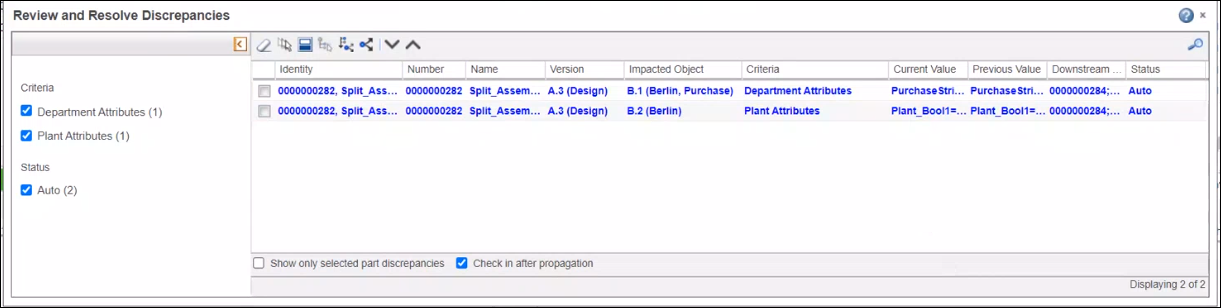
6. Click Detect Discrepancies. The Review and Resolve Discrepancies dialog box opens. It displays the discrepancies for the highlighted parts in the upstream view of BOM Transformer.
Detect Discrepancies. The Review and Resolve Discrepancies dialog box opens. It displays the discrepancies for the highlighted parts in the upstream view of BOM Transformer.Use the Impacted Object column in the Review and Resolve Discrepancies dialog box to view the plant and department data information related to the plant data attributes and department data attributes discrepancies This column is not available by default. Use the table views option to display the Impacted Object column.
The Status depends on whether the plant or department are available in the downstream view.
7. Select the checkboxes for the discrepancies that you want to review, resolve or both.
8. Click  to propagate changes.
to propagate changes.You can detect and resolve the changes in plant attributes and department attributes in the upstream view. However, if you add a new plant in the upstream view, you cannot add the new plant information in the downstream view. |
9. The updated changes appear in the split downstream assemblies.
