Configuring File Synchronization for Theorem Worker
With file synchronization configured, your CAD data is synchronized with Windchill Workgroup Manager during the publishing process to reflect any pending changes from Windchill. For example, the values for PTC_REVISION or PTC_WM_LIFECYCLE_STATE. The resulting viewable reflects the implied updates to the file and is then stored as a representation in Windchill.
Before beginning the worker file synchronization configuration process, ensure you have gathered the necessary information for the following variables:
|
Variable
|
Description
|
|---|---|
|
(General)
|
You have downloaded and installed the Theorem adapter for CATIA 3DEXPERIENCE and have configured it on the client side.
|
|
Worker Location
|
Specify whether the worker is on the same machine as the Windchill server, or a different Windows machine.
|
|
Worker Execution Command
|
Specify the command (with the path local to the host) which starts the worker executable as well as a time-out command.
|
|
Worker Daemon Port
|
If you use a remote worker on a different Windows machine, the default port number the worker daemon running on the host listens to is 601.
|
|
Common File System
|
Specify the common file system with a network file system, such as Microsoft Windows Networking, NFS, or UNC path. The Windchill machine path, the one indicating that from the Windchill server, the access to the common file system is accomplished with the FTP command (pview directory), must be the same path as worker machine’s path in the common file system.
|
|
|
Before proceeding with the following worker file synchronization configuration procedure, your Theorem Worker, Windchill server, and client must already be configured to properly support file synchronization as described in the following topics.
If you want to run file synchronization as a service, you must already have completed the steps in the Configuring Theorem Worker to Run as a Service topic.
|
To configure file synchronization for the worker:
1. Log in to the Windchill server and stop the method server, Tomcat, and Apache.
2. Clear the Tomcat servlet cache and delete the contents of the C:\ptc\<build number>\tomcat\work\Catalina directory.
3. Create or place a file called auth.properties under C:\ptc\<build number>\Windchill.
|
|
This file must contain the line auth=username:password without any additional spaces or lines. The user credentials are used for Windchill publishing and must have read access for all the data.
|
4. Back up C:\ptc\<build number>\Windchill\site.xconf. You must turn off file synchronization for test cases.
|
|
To turn off file synchronization again later, restore the backed up site.xconf file and run xconfmanager-fp from the Windchill command line.
|
5. Add the lines below to the site.xconf file before the ending </Configuration>:
<Property name="publish.cadconvert.UG" overridable= "true"
targetFile="codebase/wvs.properties"
value="com.ptc.wvs.server.publish.CadConvertUG,assytype=topdown,
repiba=additional_reps,useworkerdownload=$(wt.home)$(wvs.dir.sep)
auth.properties"/>
targetFile="codebase/wvs.properties"
value="com.ptc.wvs.server.publish.CadConvertUG,assytype=topdown,
repiba=additional_reps,useworkerdownload=$(wt.home)$(wvs.dir.sep)
auth.properties"/>
<Property name="publish.cadconvert.SOLIDWORKS" overridable="true"
targetFile="codebase/wvs.properties"
value="com.ptc.wvs.server.publish.CadConvertSOLIDWORKS,useworkerdownload=
$(wt.home)$(wvs.dir.sep)auth.properties"/>
targetFile="codebase/wvs.properties"
value="com.ptc.wvs.server.publish.CadConvertSOLIDWORKS,useworkerdownload=
$(wt.home)$(wvs.dir.sep)auth.properties"/>
<Property name="publish.cadconvert.INVENTOR" overridable="true"
targetFile="codebase/wvs.properties"
value="com.ptc.wvs.server.publish.CadConvertINVENTOR,useworkerdownload=
$(wt.home)$(wvs.dir.sep)auth.properties"/>
targetFile="codebase/wvs.properties"
value="com.ptc.wvs.server.publish.CadConvertINVENTOR,useworkerdownload=
$(wt.home)$(wvs.dir.sep)auth.properties"/>
<Property name="publish.cadconvert.CATIA" overridable="true"
targetFile="codebase/wvs.properties"
value="com.ptc.wvs.server.publish.CadConvertCATIA,
useworkerdownload=$(wt.home)$(wvs.dir.sep)auth.properties"/>
targetFile="codebase/wvs.properties"
value="com.ptc.wvs.server.publish.CadConvertCATIA,
useworkerdownload=$(wt.home)$(wvs.dir.sep)auth.properties"/>
<Property name="publish.cadconvert.CATIAV5" overridable="true"
targetFile="codebase/wvs.properties"
value="com.ptc.wvs.server.publish.CadConvertCATIAV5,useworkerdownload=
$(wt.home)$(wvs.dir.sep)auth.properties"/>
targetFile="codebase/wvs.properties"
value="com.ptc.wvs.server.publish.CadConvertCATIAV5,useworkerdownload=
$(wt.home)$(wvs.dir.sep)auth.properties"/>
<Property name="publish.cadconvert.CATIAV6" overridable="true"
targetFile="codebase/wvs.properties"
value="com.ptc.wvs.server.publish.CadConvertCATIAV6,
useworkerdownload=$(wt.home)$(wvs.dir.sep)auth.properties"/>
targetFile="codebase/wvs.properties"
value="com.ptc.wvs.server.publish.CadConvertCATIAV6,
useworkerdownload=$(wt.home)$(wvs.dir.sep)auth.properties"/>
<Property name="publish.service.enabled" overridable="true"
targetFile="codebase/wvs.properties"
value="true"/>
targetFile="codebase/wvs.properties"
value="true"/>
<Property name="publish.usesPublishRules" overridable="true"
targetFile="codebase/wvs.properties"
value="PROE CADDS5 UG SOLIDWORKS CATIAV4 ARBORTEXT"/>
targetFile="codebase/wvs.properties"
value="PROE CADDS5 UG SOLIDWORKS CATIAV4 ARBORTEXT"/>
<Property name="worker.exe.allowlist.prefixes" overridable="true"
targetFile="codebase/wvs.properties"
value="D:\Theorem|C:\Theorem|E:\Theorem"/>
targetFile="codebase/wvs.properties"
value="D:\Theorem|C:\Theorem|E:\Theorem"/>
6. Save the site.xconf file and run xconfmanager-fp from the Windchill command line.
7. Start Apache, Tomcat, and the method server.
8. Install the Windchill Workgroup Manager client on the worker machine and register CATIA 3DEXPERIENCE Rxx.
9. If you are using a Windows system, run the following commands in the worker:
Start>Run>cmd
CD C:\Theorem\i486_nt\obj
WorkerDaemon.exe <port number>
CD C:\Theorem\i486_nt\obj
WorkerDaemon.exe <port number>
|
|
Kindly do not attempt to run the WorkerDaemon.exe manually if the service is also running.
|
10. Log on to the Windchill server as an administrator.
11. Navigate to > > and perform the following steps:
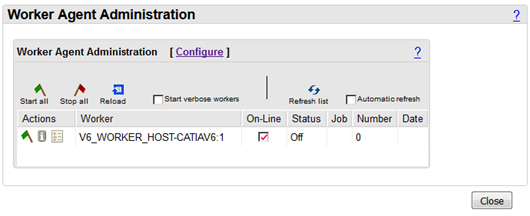
a. Select the Start verbose workers checkbox.
b. Click Start worker (the green flag icon) next to the CATIAV6 worker name. The flag turns red and the status reads Available when it is running.
12. Make sure that no errors appear in the command prompt on the worker machine.
The worker file synchronization configuration is now complete.