Windchill Adapter Examples
Using Windchill adapter webjects in Info*Engine tasks provides the framework for manipulating Windchill data in your application.
This section is intended to provide you with a working example of a set of Info*Engine tasks that contain Windchill adapter webjects.
|
|
The example requires that a Windchill solution has been installed and is usable.
|
Setting Up the Example
Before working through the Windchill adapter example tasks, you should be familiar with the following:
• Info*Engine task delegation and packages, as described in the section Info*Engine User’s Guide and Info*Engine Implementation.
The example files are installed as part of the Windchill installation and reside in the following subdirectory:
prog_examples/adapter/windchill
Installing the Example
To install the example, run the following Ant script from the prog_examples/adapter/windchill subdirectory:
ant install
Starting the Example
To use the example, you must log in as a Windchill user who can create parts and documents. Use the following URL to access the example:
http://<hostname>:<port>/<WindchillAppl>/infoengine
/jsp/examples/adapter/windchill/
/jsp/examples/adapter/windchill/
For example, assume you are using the default port and your host name is “MyCompany.com,” and the Windchill application name is “Windchill,” then the following URL starts the example:
http://MyCompany.com/Windchill/infoengine/jsp/examples/adapter/windchill/
Uninstalling the Example
After you have finished using the example, you can remove the example by running the following Ant script from the prog_examples/adapter/windchill subdirectory:
ant uninstall
Webjects Used in the Example
Most of the Windchill adapter webjects are used in one or more of the examples tasks. To locate a specific webject in the example set, use a search tool to search the contents of the <Windchill>/tasks/infoengine/examples/adapter/windchill directory and its subdirectories.
Understanding the Example Content
The example consists of a set of JSPs and a set of tasks:
• The JSPs provide the example user interface and are installed in <Windchill>/codebase/infoengine/jsp/examples/adapter/windchill.
• The tasks (and corresponding .delegateInfo property files) that are installed as a package in the <Windchill>/tasks/infoengine/examples/adapter/windchill directory and its subdirectories.
Each .delegateInfo property file specifies any default installation property values that should apply to the directory where it resides and all subdirectories. For additional information about the use of .delegateInfo property files and packages, see the section Info*Engine User’s Guide.
JSPs
The example JSPs serve as an active interface to the set of tasks and are written to minimize the amount of redundant code used to perform basic actions. There are only minimal comments in the JSPs as the real examples are in the tasks. In most cases, the code in the JSP does the following:
1. Creates the “input” group.
2. Invokes the following:
◦ Dispatch-Tasks webject with the input group
◦ The name of the command delegate to invoke
◦ Optionally, a set of parameters and groups with which to invoke the delegate.
For a more complete discussion of the Dispatch-Tasks webject, see the section Info*Engine User’s Guide.
Organization and Packaging of Tasks
Most tasks within this example set are designed to be invoked using Info*Engine task delegation. This is done primarily for the following reasons:
• It is an object-oriented approach to task invocation.
Task delegates can be defined at the highest common level within the type hierarchy to apply to all subtypes. Subtypes having special needs can then override delegates as necessary. For example, the persistable/Create.xml task implements very basic object creation for any type that is a subtype of wt.fc.Persistable.
Additionally, instances of wt.content.ContentHolder (for example, wt.doc.WTDocument or wt.part.WTPart) have special needs and so the contentHolder/Create.xml task delegate overrides the persistable/Create.xml task delegate to meet those needs (adding a ContentItem during creation).
• Applications written against this type of design are easily applied to a federated environment. That is, if the set of tasks were to be deployed against multiple systems, client applications could be used to interact with business objects from multiple systems.
All delegates registered in this package are given simple descriptive names that reflect the action they perform (for example, Create, Update, Delete, and so on).
To avoid possible conflicts with existing tasks, the command delegate entries registered for these tasks have been overridden manually placing the text “Example” before the action name (ExampleCreate, ExampleUpdate, ExampleDelete, and so on).
The highest level directory contains a .delegateInfo file that specifies the default installation action is to not create command delegates at install time. Each subdirectory contains a .delegateInfo file that can override this behavior. The .delegateInfo files in each subdirectory specify whether or not command delegates should be created at install time and, if so, what TypeIdentifier the tasks within that directory apply to.
Each task that represents a command delegate to install contains a comment section that specifies an optional comment and the command delegate name to be created for that task, for example the contentHolder/Create.xml task contains a comment like the following:
<!--com.infoengine.delegate.def
@comment This is an example delegate for creating a
ContentHolder object (part/document, etc.).
@delegateName ExampleCreate
-->
@comment This is an example delegate for creating a
ContentHolder object (part/document, etc.).
@delegateName ExampleCreate
-->
This tells the installation tools that instead of the default command delegate name of “Create” this task is to be installed with a command delegate name of “ExampleCreate”. The comment is optional and will simply be registered as the comment within the corresponding command delegate entry in LDAP.
|
|
The above comment section is optional. It is included in the example tasks to override the delegate name that is created for the corresponding task. The default delegate name is the same as the task, minus the .xml file extension.
|
Tasks within the util directory do not override the installDelegate property and so do no install command delegates. As a result, these tasks can only be invoked using direct task invocation.
Basic Task Delegation Information
Since the tasks in this example are designed to be called using Info*Engine task delegation, they receive, by default, the following information at invocation time:
• The name of one or more Windchill adapter instances that webjects should be invoked with.
The adapter names supplied through task delegation always arrive in the @FORM context group (along with other parameters to the task) in a special parameter named supporting-adapter. Info*Engine tasks designed to work with task delegation should always use this value when invoking adapter webjects.
In Info*Engine terms, the type of adapter is dependant on the architecture and type of application being developed. In this case, the adapter is always a Windchill adapter. For the purposes of load balancing, this parameter can be multi-valued. Because of this, INSTANCE parameter values should be carefully crafted to allow Info*Engine to perform load balancing/fail-over if necessary.
Aside from adapter webjects that are participating in a transaction, the INSTANCE parameters in these example tasks are defined as follows:
<ie:param name="INSTANCE" data="$(@FORM[]supporting-adapter[*])"
valueSeparator=";" delim=";" default="<%=NamingService.getVMName()%>"/>
valueSeparator=";" delim=";" default="<%=NamingService.getVMName()%>"/>
The '*' in the attribute index tells Info*Engine substitution to expect multiple values. The fact that this parameter overrides the valueSeparator and delim attribute values with the ';' character is significant.
This is because Info*Engine task delegation will supply this parameter value as a fully distinguished LDAP distinguished name (DN). The default separator character of ',' is a special character within an LDAP DN and its use here would result in a corrupted INSTANCE value to be used causing Info*Engine to not discover the desired service.
The example also overrides the default attribute value with “NamingService.getVMName()”. The NamingService class is imported into the task in the @page directive at the top of each task. This default is used to allow the task to be invoked outside of task delegation and to use the current virtual machine name as the webject processor. This is mainly done so that tasks can be developed easier and tested outside of the use of Dispatch-Tasks.
• Each task receives a group named “input” that contains the business object associated with the task invocation. In most cases, the associated JSPs simply supply the minimal requirements to allow task delegation to function. That is, the obid and class attributes.
The obid attribute contains the Unique Federation Identifier (UFID) of the object being acted upon.
The class specifies the Federated Type Identifier (FTI) of the object being acted upon. In cases where there is no object to act upon (for example, Query), the associated JSPs will build a minimal UFID that contains only the domain portion which is enough for Info*Engine task delegation to connect to the appropriate task and webject processor.
The input group can contain more information (for example, attributes for object create/update), but whether this is the case is dictated by the application. In this set of examples, most tasks need only the UFID of the object being acted upon.
• Each task can receive additional parameter values as necessary. The associated JSPs can provide these values on the Dispatch-Tasks webject parameter named PARAM. Optionally, an invocation of Dispatch-Tasks can simply reuse the current @FORM context group by specifying the USEFORM parameter with a value of true.
• Each task can receive additional Info*Engine groups. Additional group names to be passed to a task delegate are specified using the GROUP_VDB parameter on the Dispatch-Tasks webject.
Task Comments
Each task in the example contains a simple comment section that gives a basic description of the task and lists the parameters it accepts.
The comment section is not a requirement but is a common mechanism for documenting Info*Engine tasks.
Info*Engine task documentation can then be viewed on a running system by visiting:
http://<hostname>:<port>/<WindchillApp>/infoengine/jsp/tools/doc/index.jsp
The application is organized similar to normal Java documentation.
For more information on writing Info*Engine task comments visit:
http://<hostname>:<port>/<WindchillApp>/infoengine/jsp/tools/doc/howto.html
These comments are intended for use when generating WSDL (Web Services Definition Language) documents for Info*Engine SOAP clients.
Using SOAP Instead of JSPs
Each task that makes use of the input group explicitly defines an Info*Engine group parameter named 'input'. As a result, these tasks could be invoked from an Info*Engine SOAP client. Normal Info*Engine SOAP tasks are more analogous to static methods on Java objects, thus getting all information from parameter input and none from the object implicitly being acted upon. To use these example tasks, an Info*Engine SOAP client would construct the group named 'input' and pass it as a parameter during SOAP invocation. This is similar to the task use in JSPs.
Each task is written to return a single Info*Engine group. It is standard procedure for SOAP tasks that the output group be named using a parameter value named “group_out”. The default value for this parameter value is always “output”. As a result all tasks supplied here take an implicit parameter named “GROUP_OUT,” although they don't explicitly document this parameter in their comment sections. Several JSPs use this parameter to name the resulting group, particularly in cases where they may be invoking multiple tasks. This allows them to do so without having to rename groups to avoid collisions in their local VDB.
Some tasks, such as contentHolder/create.xml, would be exposed as methods requiring SOAP with attachments methods. However, SOAP with attachments is not the suggested method for upload and download of binary content to Info*Engine and is only suitable for small amounts of data. For other Info*Engine applications, this mechanism is suitable for upload as true streaming is supported. The suggested mechanism for SOAP clients is to use external HTTP upload and download handles to move binary data to and from Info*Engine.
Strongly typed parameters (other than string) are documented in the parameter list as such. The example JSPs, using Dispatch-Tasks, are simply providing these parameter values as Java Strings that could be coerced into the appropriate type. The tasks are not expecting the parameter to be strongly typed. SOAP clients would provide the data strongly typed.
To view a set of tasks that can be used through SOAP to interact with a Windchill system, see the default “Generic Web Services”. The API of the “Generic Web Services” is available from the task documentation URL specified in the “Task Comments” section. These tasks are registered under the TypeIdentifier named 'com.ptc.windchill.ws'. The underlying tasks are installed at:
<Windchill>/tasks/com/ptc/windchill/ws
Using the Example
The initial page displayed is created by the following JSPs and tasks:
• JSPs:
◦ document/index.jsp
◦ manage.jsp
◦ init.jspf
◦ table.jsp (Once for checked out objects and once for checked in objects)
• Tasks:
◦ util/LocalDomain.xml
◦ util/UserInfo.xml
When you log in to the example, three links appear at the top left of your screen:

• [Document Management]: This link initiates the Document Management page.
The JSPs and tasks involved in operation of the Document Management content are the following:
◦ JSPs:
▪ document/index.jsp
▪ manage.jsp
◦ Tasks:
▪ contentHolder/Query.xml
• [Part Management]: This link initiates the Parts Management page.
The JSPs and tasks involved in the operation of the Part Management content are the following:
◦ JSPs:
▪ manage.jsp
◦ Tasks:
▪ part/Query.xml
• [Source]: This link initiates the page that contains links to all of the JSPs and tasks that are involved in the entire demo. The operation of this link is not relevant to this example description.
Below those three links is a field with the heading My Documents with two more links off to the right:

• Delete: Deletes documents that already exist within the example.
◦ JSPs:
▪ action.jsp
◦ Tasks:
▪ persistable/Delete.xml
• Create: Creates a new document within the example.
◦ JSPs:
▪ document/create.jsp
◦ Tasks:
▪ contentHolder/create.xml
The first time you use this example, there are no existing documents.
Click the Create link to create a document. The Create Document window opens:

Field | Description |
|---|---|
Document Name | The name the document is listed under in the example. |
Content | The local file to be used as the primary content of the new document. |
Browse | Opens the window with which you can search for the file you wish to add to the example. |
Create Document | Creates the document within the example. |
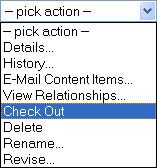
After you have created a document, you can perform actions on the document by selecting actions from the pick action drop-down menu. For example, to update the document you created, you have to check it out. To do this, select the Check Out action:

This adds the document to the Checked Out section. While a document is checked out, only the person who checked the document out will be able to access it until the document is checked back in or the check out is undone.
The JSPs and tasks involved in checking out a document are the following:
• JSPs:
◦ action.jsp
• Tasks:
◦ persistable/CheckOut.xml
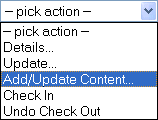
After you have checked a document out, you can update it. Locate the pick action drop-down menu that corresponds to the document you want to update under the heading “Checked Out.” Select the Add/Update Content action:

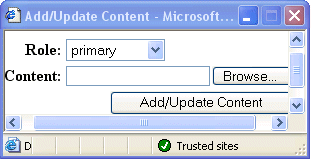
This opens the Add/Update Content window.

The Add/Update Content fields and buttons are described as follows:
Field | Description |
|---|---|
Role | Relates directly to the ROLE parameter on Add-ContentItems and describes the different “roles” that are supported for ContentItems. |
Content | The local file to be used as the primary content of the new document. |
Browse | Opens the window with which you can search for the file you wish to add or update content with. |
Add/Update Content | Adds new content or replaces existing content within the working copy of the document. |
After you have found the updated document you need, click Add/Update Content to add the new content or replace the existing content within the working copy of the document.
The JSPs and tasks involved in updating a document are the following:
• JSPs:
◦ addContent.jsp
• Tasks:
◦ contentHolder/AddContent.xml
After you have updated the document you need to check it back in. Select Check In from the drop-down menu that is in the same row as the document you wish to check in.
The JSPs and tasks involved in checking a document back in are the following:
• JSPs:
◦ action.jsp
• Tasks:
◦ persistable/CheckIn.xml