Selecting a Plant for Editing
You can use the Edit Plant Information window to edit the attributes of a plant data or department data object. You can also export the attributes into a Microsoft Excel file and edit them. However, you need to first specify the objects that you want to edit by setting the relevant criteria in the Manage Department Information window.
Perform the following procedure to select a plant for editing:
1. Select the objects for which you want to edit plant information, and launch the Manage Department Information action from any of the following locations. You can select a part, smart collection, or plant data, as available.
◦ Folder Contents table:
> on the Actions menu.
Manage Department Information on the right-click actions menu.
You can select only one smart collection to launch the action.
◦ Search Results table:
> on the Actions menu.
Manage Department Information on the right-click actions menu.
You can select only one smart collection to launch the action.
◦ Part structure browser:
> on the actions toolbar.
> on the right-click actions menu.
◦ BOM Transformer:
Manage Department Information on the right-click actions menu.
◦ Information page of a change task:
▪ In the Affected Objects section, click > .
▪ In the Resulting Objects section, click > .
Alternatively, you can right-click a part in the Affected Objects section and the Resulting Objects section and select Manage Department Information.
◦ Information page of a smart collection:
▪ On the
Content tab, select a cell for one or more parts and click

.
Select parts either from the upstream or downstream structure.
▪ From the Actions menu, select Manage Functional Information.
If the smart collection contains either upstream or downstream structure, all the parts in that structure are selected. However, if the smart collection contains both the structures, only downstream parts are selected, irrespective of your selection.
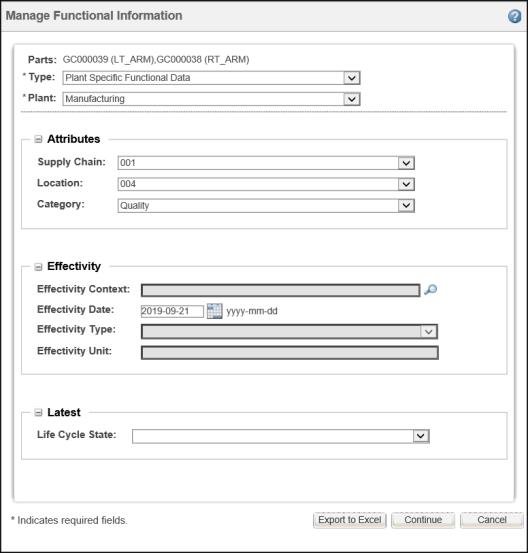
The Manage Department Information window opens. It displays the names of the selected parts or the parts associated with the selected plant data objects.
2. Specify the following criteria to filter the relevant objects:
◦ In the Type list, select the type of the object.
| The options displayed in the list are based on the values configured in the List of applicable department data types preference. If the preference is not set, the Type list displays all the types of department data defined in the Type and Attribute Management utility. For more information on the preference, see Preferences in MPMLink. |
◦ In the Plant list, select the plant that is associated with the object.
| The options displayed in the list are based on the values configured in List of Applicable Views and List of Plant-Specific Views preferences. The plants that are common between the preferences are displayed in the Plant list. If the preferences are not set, the Plant list displays all the plants. For more information on the preferences, see Preferences in MPMLink. |
◦ Select the supply chain, location, and category values of the object.
◦ Specify the effectivity details for context, date, type, and unit of the object.
| • The Effectivity Type and Effectivity Unit boxes are available only if the effectivity context is specified. • If both date and unit effectivities are specified, the date effectivity configuration specification is applied first and then the unit effectivity configuration specification. • The effectivity date is determined by the value specified in the Default Effectivity Date preference. It displays present date if the preference is set to Today. |
◦ In the Life Cycle State list, select one or more life cycle states for the department data and the associated plant data objects.
| If effectivity date and life cycle state are not specified, the department data and plant data objects are resolved to the latest version. |
3. Click Continue or Export to Excel.
Clicking
Continue opens the
Edit Plant Information window. This window displays the department data and plant data objects based on the attributes selected in the
Manage Department Information window. The attributes for each object are grouped together for each associated part. The
Export to Excel feature exports this information into a Microsoft Excel file. For more information, see
Editing Plant Information.
 .
. .
. .
.