Windchill MPMLink Post Installation Instructions
Perform the following steps to complete the Windchill MPMLink installation:
Enabling Control Characteristics
To enable control characteristics, see the procedures in following sections.
• Configuring Windchill Properties to Enable Control Characteristics
• Configuring Creo Parametric Options
• Updating the Object Adapter Recipe File for Creo Parametric
Configuring Windchill Properties to Enable Control Characteristics
Use the following procedures to configure Windchill properties that enable control characteristics.
To configure Windchill properties to propagate EPMDocs from the upstream to the downstream part:
1. Navigate to and open the mpmlink.properties.xconf file, available at the following location:
\Windchill\codebase\com\ptc\windchill\mpml\xconfs\mpmlink.properties.xconf
2. Locate properties that copies over EPMBuildRule. For example:
Property name="com.ptc.windchill.mpml.copyOver.create.wt.part.WTPart"
Property name="com.ptc.windchill.mpml.copyOver.update.wt.part.WTPart"
Property name="com.ptc.windchill.mpml.copyOver.mapsb.
newBranch.create.wt.part.WTPart"
Property name="com.ptc.windchill.mpml.copyOver.mapsb.
duplicate.create.wt.part.WTPart"
Property name="com.ptc.windchill.mpml.replaceEPMBuildRule.by"
|
|
Add the properties related with EPMBuildRule if they are not present in the mpmlink.properties.xconf file.
|
3. Add the following entries to the properties mentioned in step 2:
WCTYPE|wt.part.WTPart~MBA|describedBy@WCTYPE|wt.epm.structure.EPMDescribeLink
WCTYPE|wt.part.WTPart~MBA|buildSource@WCTYPE|wt.epm.build.EPMBuildRule
WCTYPE|wt.part.WTPart~MBA|describedBy@WCTYPE|com.ptc.windchill.
mpml.pmi.MPMWTPartToEPMDocumentLink
WCTYPE|wt.part.WTPart~MBA|references@WCTYPE|com.ptc.windchill.
mpml.pmi.AssociativeToSCCLink
|
|
The above entries are the associations that are copied over.
|
For example:
<Property name="com.ptc.windchill.mpml.copyOver.create.wt.part.WTPart"
default="WCTYPE|wt.part.WTPart~MBA|source,WCTYPE|wt.part.WTPart~MBA|
containerReference^WCTYPE|wt.inf.container.WTContainer,WCTYPE|
wt.part.WTPart~MBA|partType,WCTYPE|wt.part.WTPart~MBA|describedBy@WCTYPE|
wt.epm.structure.EPMDescribeLink,WCTYPE|wt.part.WTPart~MBA|
describedBy@WCTYPE|wt.part.WTPartDescribeLink,WCTYPE|
wt.part.WTPart~MBA|references@WCTYPE|wt.part.WTPartReferenceLink,WCTYPE|
wt.part.WTPart~SCA|ALL_CLASSIFICATION_IBAS,WCTYPE|wt.part.WTPart~MBA|
buildSource@WCTYPE|wt.epm.build.EPMBuildRule,WCTYPE|wt.part.WTPart~MBA|
describedBy@WCTYPE|com.ptc.windchill.mpml.pmi.MPMWTPartToEPMDocumentLink,WCTYPE|
wt.part.WTPart~MBA|characteristic@WCTYPE|com.ptc.windchill.mpml.pmi.MPMPartQualityLink"/>
<Property name="com.ptc.windchill.mpml.copyOver.update.wt.part.WTPart"
default="WCTYPE|wt.part.WTPart~MBA|source,WCTYPE|wt.part.WTPart~MBA|partType,WCTYPE|
wt.part.WTPart~MBA|describedBy@WCTYPE|wt.epm.structure.EPMDescribeLink,WCTYPE|
wt.part.WTPart~MBA|describedBy@WCTYPE|wt.part.WTPartDescribeLink,WCTYPE|wt.part.WTPart~MBA|
references@WCTYPE|wt.part.WTPartReferenceLink,WCTYPE|wt.part.WTPart~SCA|
ALL_CLASSIFICATION_IBAS,WCTYPE|wt.part.WTPart~MBA|choice@WCTYPE|
com.ptc.windchill.option.model.ChoiceMappableChoiceLink,WCTYPE|wt.part.WTPart~MBA|
describedBy@WCTYPE|com.ptc.windchill.mpml.pmi.MPMWTPartToEPMDocumentLink,WCTYPE|
wt.part.WTPart~MBA|buildSource@WCTYPE|wt.epm.build.EPMBuildRule,WCTYPE|
wt.part.WTPart~MBA|characteristic@WCTYPE|com.ptc.windchill.mpml.pmi.MPMPartQualityLink"/>
To convert buildrule links to Inherited links use the following procedure (the default is to convert to Content links):
1. Navigate to and open the mpmlink.properties.xconf file, found to the following location:
\Windchill\codebase\com\ptc\windchill\mpml\xconfs\mpmlink.properties.xconf
2. Locate the following file:
Property name="com.ptc.windchill.mpml.replaceEPMBuildRule.by"
3. Edit the property to read as follows:
<Property name="com.ptc.windchill.mpml.replaceEPMBuildRule.by" default="WCTYPE|wt.part.WTPart~MBA|describedBy@WCTYPE|com.ptc.windchill.mpml.pmi.MPMWTPartToEPMDocumentLink"/>
|
|
This property controls how EPMBuildRule links (Part-CAD Association type: Owner, Contributing Content, Contributing Image and Image) are copied from an upstream part to its downstream equivalent part when this link type is declared in the copy over framework properties. The default for this property is to convert an upstream EPMBuildRule to a downstream EPMDescribeLink (Part-CAD Association type: Content). It can instead be set to convert an upstream EPMBuildRule to a downstream MPMWTPartToEPMDocumentLink (Part-CAD Association type: Inherited).
|
To maintain the published representation when iterating parts without iterating the EPM Doc use the following procedure:
|
|
This procedure is optional. However, if the default (true) is maintained representations may not always appear after you checkout a part.
|
1. Navigate to and open the wvs.properties.xconf file, found in the following location:
\Windchill\codebase\WEB-INF\conf\wvs.properties.xconf
|
|
Beginning at Windchill 10.2, PTC has changed the location of the wvs.properties and wvs.properties.xconf files. These files have been moved from the $Windchill/codebase directory to the $Windchill/codebase/WEB-INF/conf directory. Be sure to make any necessary changes to your code to reflect this location change.
|
2. Edit the property to read as follows:
<Property value="false" name="publish.copyrepresentationsforward.restrict"/>
Configuring Creo Parametric Options
To configure Creo Parametric options so that system parameters of designated objects are also automatically designated, use the following procedure:
• Navigate to the following option and change the default to yes:
designate_model_item_params
|
|
The ask_designate_owners option if set to no, allows you to designate annotation elements without being prompted to also designate the parent annotation. The parent annotation will not be designated.
|
Updating the Object Adapter Recipe File For Creo Parametric
The publishing of annotations needs to be enabled in the recipe file for Creo Parametric. If not, model annotations will not appear.
For more information on how to do this refer to the Configuring the Creo View Adapter for Creo section of the Creo View MCAD Adapter Installation and Configuration Guide.
Installation and Setup for MPMLink - Creo Illustrate Integration
You can use Creo Illustrate with MPMLink to generate Illustrations for objects, such as process plan operations. To satisfy requirements, you must have Creo Illustrate pre-installed and operational on the client machine. For more information about the compatible versions of Creo Illustrate with the different versions of Windchill, see the “Technical Graphics Compendium” available on the PTC website by searching it on the
Reference Documents page.
MPMLink Setup
Preference
The Manage Illustrations with Creo Illustrate preference under > needs to be enabled within the Preference Management Utility on your Windchill MPMLink server. By default, the value for the preference is set to No. Set the value to Yes.
Publishing Rule File
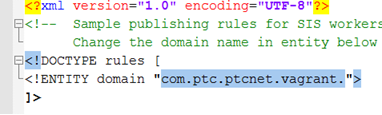
To properly manage WVS configurations on your Windchill MPMLink server, you need to add a publishing rule file for MPMLink objects that includes a domain value specific to your site. A sample publishing rule file can be found at: /opt/wnc/MpmLink/ProcessPlanBrowser/src_web/config/actions/MPMSamplePublishingRule.xml, and is shown in the following figure with a sample domain value highlighted.
| You must edit the sample publishing rule xml document, change the domain value to the specific domain value for your site, and then save the file to a different location (your desktop) for later use. |
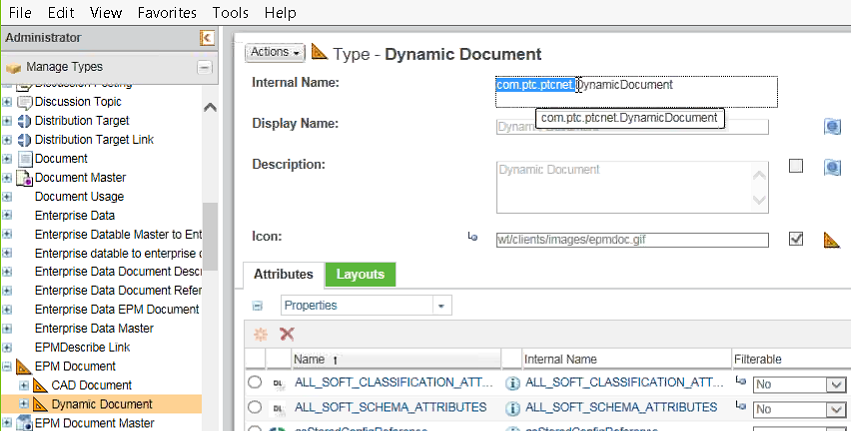
Your specific domain value can be referenced in the Type and Attribute Management utility on your server by selecting Dynamic Document in the Manage Types panel, as shown in the following figure (sample domain value highlighted in blue).
To add a publishing rule file for MPMLink objects:
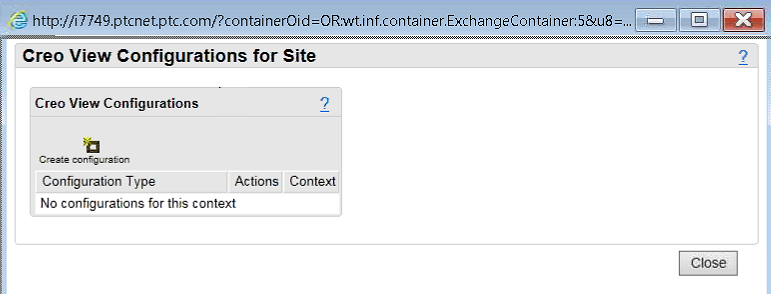
1. As an administrator on your Windchill MPMLink server, from the Navigator pane, select > > .
The Creo View Configurations for Site window opens.
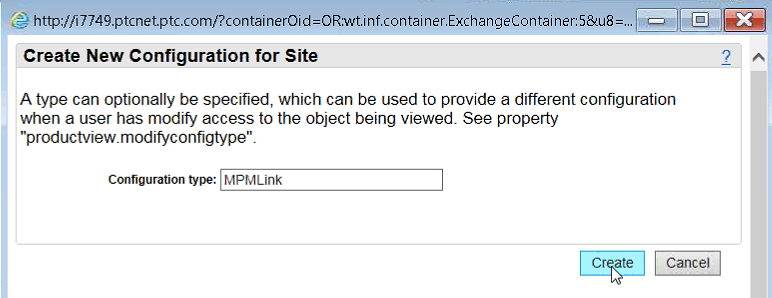
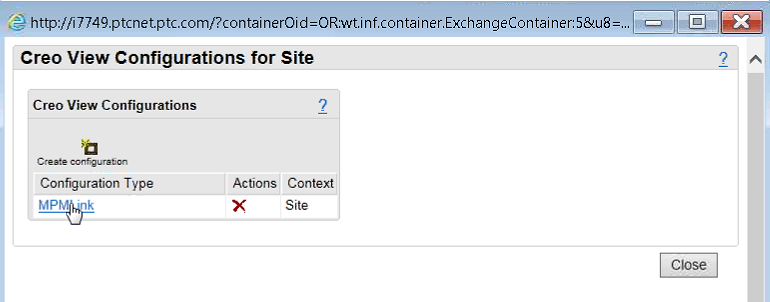
2. Click Create configuration.
The Create New Configuration for Site window opens.
3. In the Configuration type field enter MPMLink, then selectCreate.
A new “MPMLink” visualization configuration type is created in Windchill.
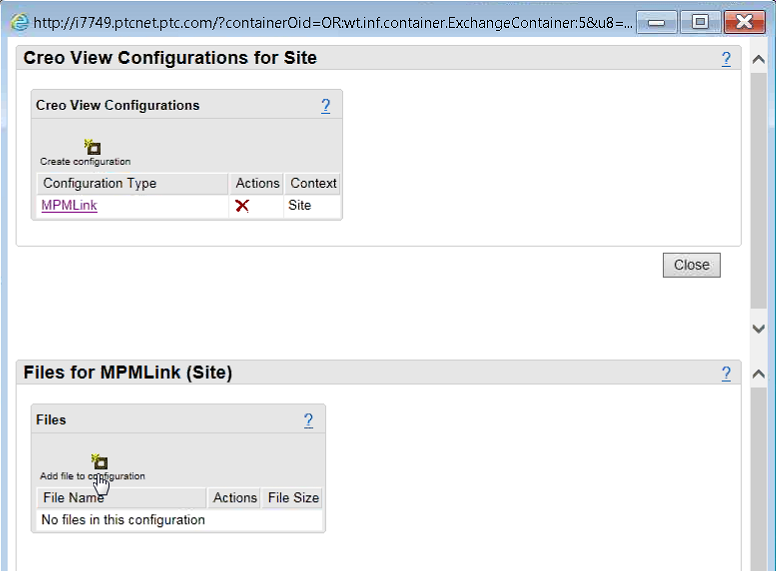
4. Click on the listed “MPMLink” configuration type to select it.
A “Files for MPMLink (Site)” section is added to the bottom of the window, as shown in the following figure.
5. In the “Files for MPMLink (Site)” section, click Add file to configuration.
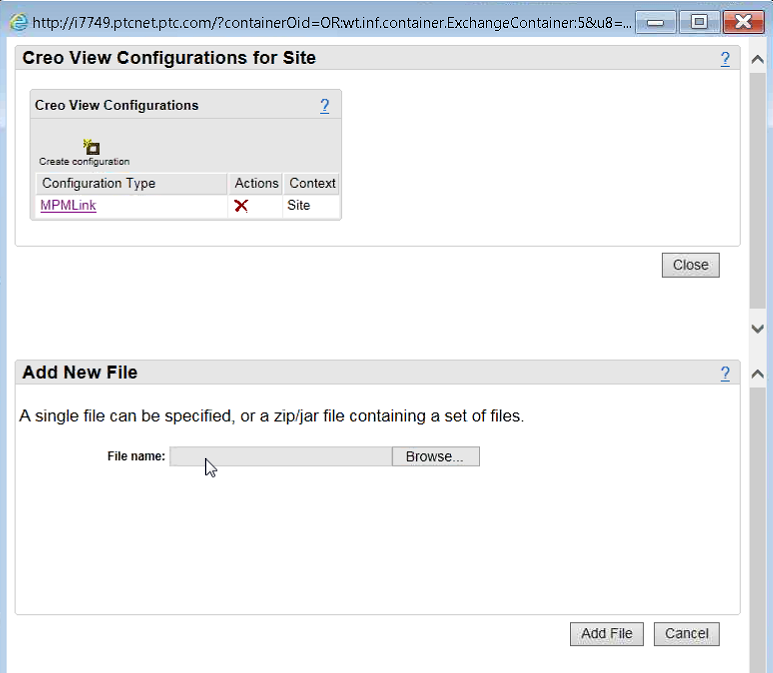
A new “Add New File” section is added to the bottom of the window, as shown in the following figure.
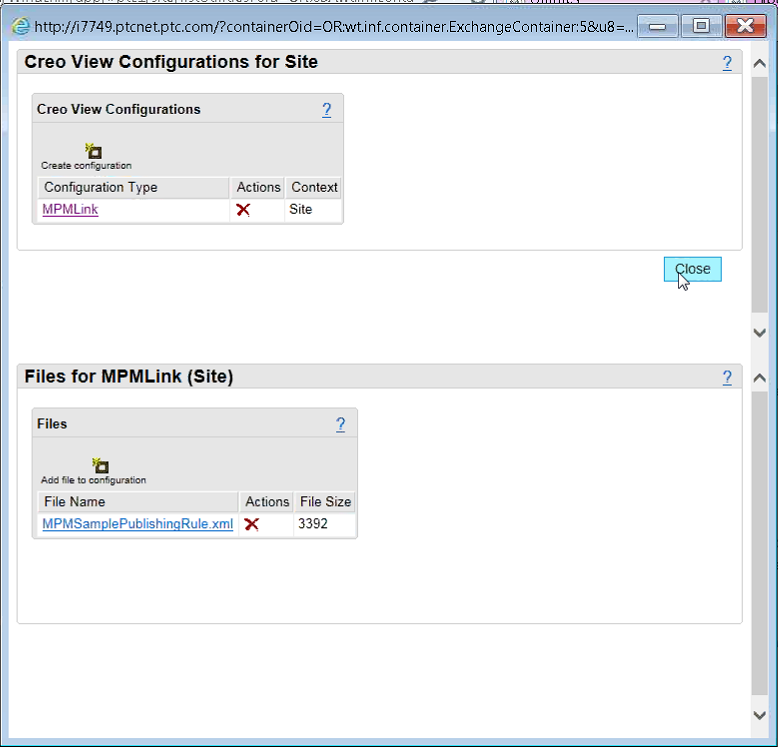
6. In the File name: field, browse for, or enter the absolute file path to your edited MPMLinkSamplePublishRule.xml file.
The filename appears in a new “Files for MPMLink (Site)” section at the bottom of the window, as shown in the following figure.
7. Select Close to dismiss the Creo View Configurations for Site window.
The MPMLink publication rule file is added to Windchill and the visualization configuration is complete.
Creo Illustrate Setup
You must add a publish option in Creo Illustrate to enable Windchill MPMLink objects to be published.
To add a publish option in Creo Illustrate:
1. On your client machine, launch Creo Illustrate.
2. In Creo Illustrate, select > .
The Creo Illustrate Options window opens.
3. At the top of the window next to Showing:, select Defaults.
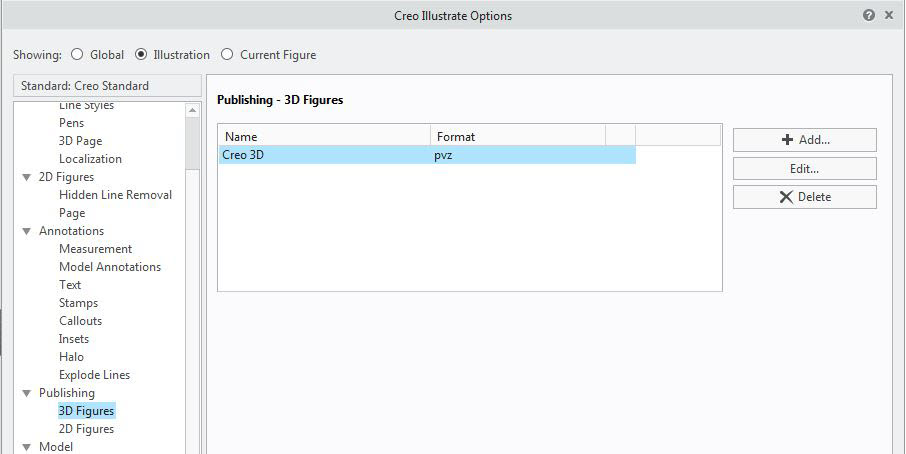
4. In the left pane, select > .
Publishing - 3D Figures options are displayed in the right pane, as shown in the following figure.
5. Select + Add to add a new publishing option for Windchill MPMLink.
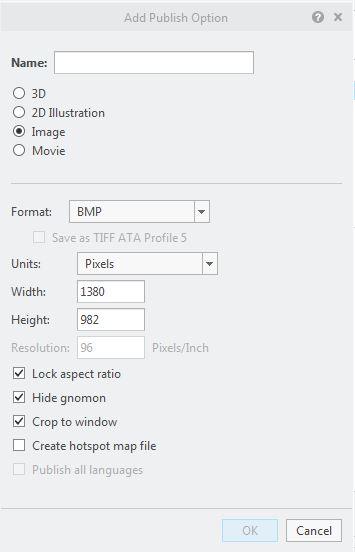
The Add Publish Option window opens as shown in the following figure.
6. In the Name: field of the Add Publish Option window, enter a descriptive name for the option (for example, “Work Instruction Image”) and choose Image for the type.
7. Click OK.
The MPMLink publishing option has been added and the Creo Illustrate setup is complete.
8. Export and import changes as per the instructions in the "Working with Standards" section in the Creo Illustrate Online Help. For more information on managing standards, see “To Manage Standards” in the Creo Illustrate Online Help.