Creating a Representation from a CAD Document
Use the following procedure to create a representation for a CAD document or its associated part.
• From the
Content tab of a CAD document or its associated part, locate the
Representations/Annotations section, and click
New Representation
. For other objects, you can select New Tab

, and from the
Customize drop-down list, navigate to > .
• From the
Structure tab of an assembly, locate the “New/Add to” pane

, and from the drop-down list, select
New Representation.
The New Representation wizard divides the creation of a representation into the following steps:
1. Define Representation Attributes
2. Set EPM Configuration Specification
3. Choose Structure Type
4. Confirm Choices
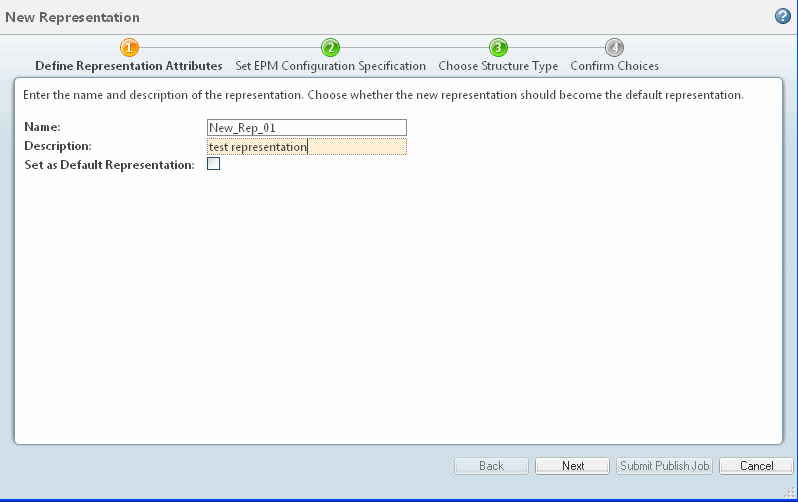
Define Representation Attributes
Enter the details in the following fields and check box, and then click Next.
Representation Details |
Field | Description |
Name | Enter a name for the representation. Enter up to 60 characters. If no name is entered, a default value is used. |
Description | Enter a brief description of the representation. You can enter up to 4,000 characters. This field is optional. |
Set as Default Representation | Select the Set as Default Representation check box to make this representation the default. |
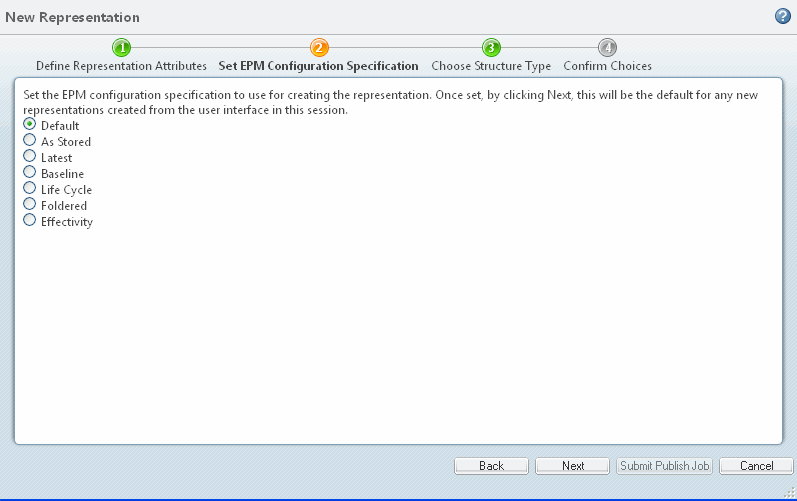
2. Set EPM Configuration Specification
Set the configuration specification by selecting one of the following configuration specification types. Each type is explained below.
EPM Configuration Specification |
Attribute | Description |
Default | Selects the default configuration specification for the CAD document. This initial default is either Latest or As Stored, depending on system settings. | • If a configuration specification other than default is selected for publishing, then the default configuration specification is changed to the selected one. Due to this the default configuration specification keeps on updating each time a specification other than default is selected. This continues for the remainder of the browser session with current user login. • If you click an object's thumbnail which does not currently possess a representation, it will use the last set default in the current user session, or if that does not exist, the WVS default. |
|
As Stored | Selects the As Stored configuration specification for the CAD document. If there is no As Stored configuration specification, then the Latest specification is used. |
Latest | Selects the latest configuration specification. |
Baseline | When selected, displays a drop-down list of the available baselines. |
Life Cycle | When selected, displays a drop-down list of live cycle states. |
Foldered | Displays the path to the cabinet and folder. |
Effectivity | Displays a type-in field and calendar option to specify the effectivity date. |
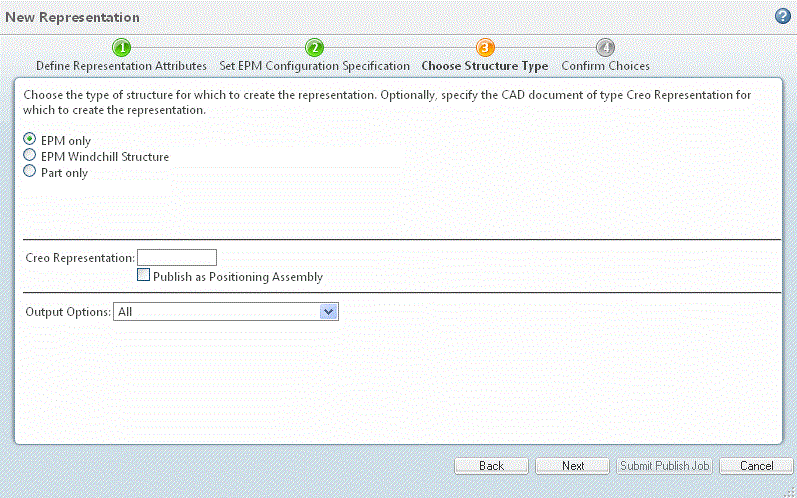
3. Choose Structure Type
Select the one of the following structure types described below.
Structure Type |
Type | Description |
EPM only | Creates the representation from only the CAD structure, as defined by either the CAD assembly file or the EPM structure, depending on which CAD system is used. The EPMDocConfigSpec controls the structure traversal and dependent file selection. |
EPM Windchill Structure | Creates the representation from the EPM structure, not the CAD assembly. For certain CAD system types, this would be the same as selecting EPM only. The EPMDocConfigSpec controls the structure traversal. | For the EPM Windchill Structure option, the Publish as Positioning Assembly check box is not available. |
|
Part only | Creates the representation from the part structure only. This is the same structure that can be viewed in Creo View from either Product Structure Browser or the HTML product structure page for a part. The default WTPartConfigSpec is used. The part structure can represent assemblies that have never been modeled in a CAD system (that is, data from multiple CAD systems) or a manufacturing view of the structure. When Part only is selected, the Filter drop-down list appears, containing a choice of navigation filters. These filters can either be Default, or a user-defined structure path for creating specific assemblies, enabling customization of the representation structure. | For a CAD document that does not have an actively-associated part, the Part only option is not available. |
|
Creo Representation | Defines the form as a Creo Parametricsimplified representation. |
Publish as Positioning Assembly | It is possible to publish Creo Parametric, Creo Elements/Direct Modeling, and CATIA V5 assemblies as positioning assemblies. Administrators configure the assemblies that are suitable for this. If you are an administrator of Products, Libraries, Projects, Organizations, or Site, you can select this check box to change this setting for this job only. |
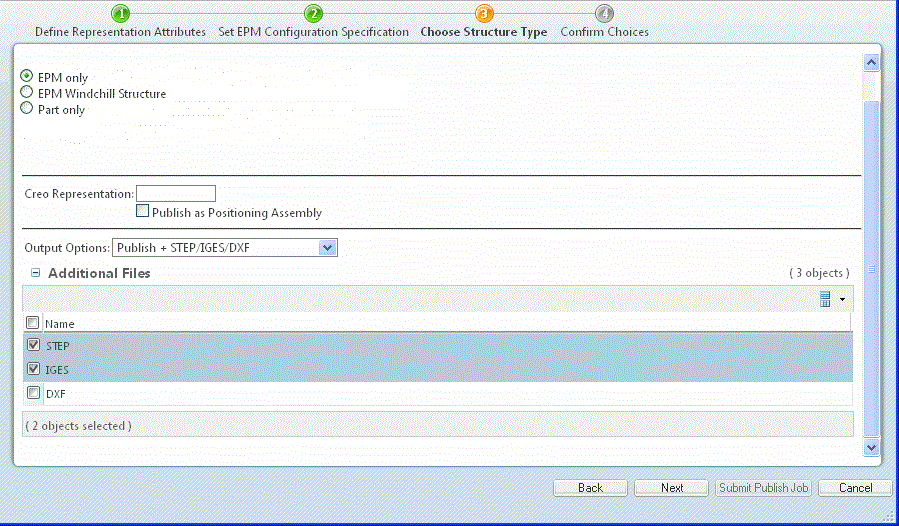
Output Options | Optional publish rules, added by a system administrator, define specific output types for the representation(s) being created. (See About Publish Rules for details.) These options appear in the drop-down list shown in the next figure. You configure these output types in an XML file using Visualization Configuration Administration on the Windchill Utilities page. (See About Visualization Configuration Administration for details.)Leaving the Output Options field set to All creates a representation for every option. In the example figures below, the administrator has configured several different output options for the new representation. Selecting one of the options presents a list of Additional Files, from which you can select the files to be created along with the representation. Files without a selection check box are set to be published. The default (preselected file types) is also specified in the XML file. |
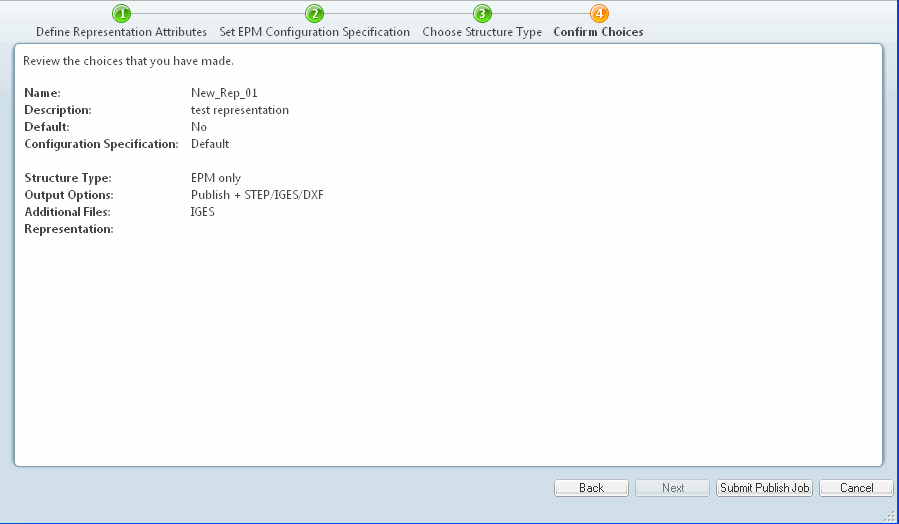
4. Confirm Choices
Review the information you entered.
If you are not satisfied with anything you entered, click Back to edit the information. If you are satisfied with the information, click Submit Publish Job.
You can monitor the progress of the publish job using the WVS Job Monitor.