Using the Middleware Installation and Configuration Utility
This section describes how to install and configure Windchill ESI using the Middleware Installation and Configuration Utility (MICU). It is divided into the following subsections:
• Using the Middleware Installation and Configuration Utility (MICU): Describes how to launch and use the MICU to install and configure Windchill ESI.
• Performing Post Installation Steps: Describes the steps that must be completed after executing the MICU.
Performing Pre-installation Steps
This section describes the steps that must be completed before you install Windchill ESI using the Middleware Installation and Configuration Utility.
To prepare your system for the installation of Windchill ESI use the following procedure:
1. Create a staging directory. For example on:
Windows: D:\MICUstage
UNIX: /opt/MICUstage
2. Copy the contents of the Windchill ESI Integration Suite for <platform> CD, and the Windchill ESI Adapter for ERP CD, to this staging directory, where <platform> represents the operating system you are using. (for example, Windows or Solaris) and ERP represents the ERP System (for example, SAP or Oracle) you are using.
Using the Middleware Installation and Configuration Utility (MICU)
This section describes how to launch and use the Middleware Installation and Configuration Utility (MICU) to install and configure Windchill ESI. Windchill ESI can be installed and configured all at once (Typical) or in separate components (Custom).
Installing and Configuring Windchill ESI for Oracle Applications
Use the following procedure to install and configure Windchill ESI:
1. Load the Windchill ESI Business Logic for <platform> Applications CD.
2. Launch the setup program from the CD.
|
|
This installer includes a virtual machine and does not require a Java Runtime Environment.
|
The setup programs are named as follows:
Windows: setup.vbs
UNIX: setup
3. On the PTC Language Selection window, use the drop-down menu to select the language to be used by Windchill ESI users. Click OK.
4. Review the Before You Begin window. This window provides information on additional prerequisites needed to complete the installation. Click Next.
|
|
Any previously installed TIBCO products will be detected by the MICU. These products are not re-installed or upgraded by the MICU.
|
5. On the Select Option window select Typical and click Next.
|
|
Selecting Custom allows you to install specific components, instead of installing all components at once. If components have already been installed they will not be available for selection.
|
6. In the Select Directory window, select the directory to install in and click Next.
The directory you select should be different from your operating system directory.
|
|
If you have selected a Custom installation method, and are installing specific components, or if you plan to deploy the EAR on multiple Application instances, take note of the directory you have selected to install in. Any components that you choose to install at a later date must be installed in this same directory.
|
7. In the Select MICU Staging Directory window, select the staging directory you created before beginning installation. Click Next.
8. In the Select TIBCO Home Directory window, select the directory in which TIBCO products are to be installed. Click Next.
9. In the ESI TIBCO Domain Properties window set the following properties.
◦ Domain Name: Choose the domain name. It is recommended that you use the same name as the host name where TIBCO is installed.
◦ Machine Name: The host name where TIBCO is installed.
◦ Domain Administrator Username: The TIBCO administrator user name. When installing TIBCO administrator software, you will be asked to enter this value.
◦ Domain Administrator Password: The TIBCO administrator password. When installing TIBCO administrator software, you will be asked to enter this value
Click Next.
10. In the ESI TIBCO Web Service Properties window set the following properties:
◦ ESI Web Service Port: Port number on which the Web Service providing the ESI ERP Part Information functionality is hosted.
Click Next.
11. In the ESI TIBCO Domain Tomcat Properties window set the following properties:
◦ HTTP Port: The recommended port number is 8426. Otherwise, enter any available port.
◦ AJP 1.3 Port: The recommended port number is 8427. Otherwise, enter any available port.
◦ Shutdown Port: The recommended port number is 8428. Otherwise, enter any available port.
◦ Apache Warp Connector Port: The recommended port number is 8429. Otherwise, enter any available port.
Click Next.
|
|
Ensure that these port numbers are not the same as those of the Windchill Tomcat server or any other servers running on this machine. To verify this run the following command:
• Windows:
netstat | find /I "<portnumber>"
• UNIX
netstat | grep <portnumber>
|
12. In the ESI Middleware Mail Notification Properties window set the following properties:
◦ Mail Server: The host name of the SMTP mail server.
◦ To Email Address: The e-mail address TIBCO and Windchill ESI are to send transaction information to.
◦ From Email Address: The e-mail address TIBCO and Windchill ESI use to send transaction information from.
Click Next.
13. In the Adapter Properties window enter the following properties:
◦ Oracle Mfg. Username: The default value is ESISYS.
◦ Oracle Mfg. Password: The default value is ESISYS.
◦ Oracle Mfg. Data Source DSN: The default value is blank.
Click Next.
14. In the Oracle Mfg. ERP Properties window set the following properties:
◦ ERP Hostname: The host name where the application server is installed and setup.
◦ ERP Port: The port number of the application server.
◦ ERP SID: The system ID of the application server.
◦ Master Organization: The master organization of the application server.
|
|
Contact your system Administrator if you do not have this information.
|
Click Next.
15. In the EMS Server Properties window set the following properties:
◦ EMS Server Host Name: The name of the machine where the EMS Server is installed. The default is the host name.
◦ Administrator Username:
The EMS server administrator’s user name. The default is admin.
◦ Administrator Password:
The EMS server administrator’s password. The default is admin.
Click Next.
16. In the ESI EMS Username and Password window set the following properties:
◦ ESI Middleware Queues Username: The username for the JMS queues used by TIBCO Middleware to communicate with ESI Services. The default is ESISYS.
◦ ESI Middleware Queues Password:
The password for the JMS queues used by TIBCO Middleware to communicate with Windchill ESI Services. The default is ESISYS.
◦ ESI Services Queues Username: The username for the JMS queues used by Windchill ESI Services to communicate with TIBCO Middleware. The default is WCESI. This entry must match the value specified for the Windchill ESI preferences Data Response Queue User Name and Result Queue User Name.
◦ ESI Services Queues Password: The password for the JMS queues used by Windchill ESI Services to communicate with TIBCO Middleware. The default is WCESI. This entry must match the value specified for the Windchill ESI preferences Data Response Queue Password and Result Queue Password.
Click Next.
17. In the ESI EMS Queues window set the following properties:
◦ Queue name for ESI EMS Data Response: The data response queue name. The default is com.ptc.windchill.esi.DataResponse.<DSN>.The portion of the value that occurs before the placeholder (viz., com.ptc.windchill.esi.DataResponse for the default value) must match the value specified for the Windchill ESI preference Data Response Queue Name.
◦ Queue name for ESI EMS Result:
The result queue name. The default is com.ptc.windchill.esi.Result. This entry must match the value specified for the Windchill ESI preference Result Queue Name.
Click Next.
18. In the Specify Application Name for Deployment window set the application name. This name must be unique for each instance and is used to identify the different applications configured for different instances in the TIBCO Administrator domain. Click Next.
19. Verify your settings and click Install.
Common Installation and Configuration Errors
The following errors could cause problems during the installation and configuration process. Should you have difficulty completing any installation or configuration steps refer to the following for a possible cause:
• The removal and cleaning up of previous versions of TIBCO software was not completed properly.
• Inconsistent domain names were specified while using the custom installation option during multiple runs of the MICU.
• When installing some components on one machine and the remaining components on another machine errors may occur if you set ESISAPAdapter/JMSProviderURL to localhost. Use the EMS server hostname instead. (SAP only)
• Same application name used while deploying.
• Incorrect logon credentials (ERP/EMS/Admin).
• An additional Hawk service is running on UNIX platforms.
• Java parameters not set during manual deployment.
• Incorrect Java version in use. TIBCO installer fails to launch with an exit code 1 if the Java version is incompatible.
• Incorrect SAPJCo libraries are being used (SAP only).
• Incorrect CDs are being used. This often occurs during Solaris installations.
• Not enough space in the temporary installation directories, especially when using VMware machines.
• There is a space in the installation folder name. For example, C:\ptc\esi_10.0\TIBCO Install.
• A Windchill ESI solution deployment error message is displayed during deployment on Solaris SPARC11 using Windchill 11.0 ESI Business Logic for SAP, for the following reasons:
◦ The server is down
◦ The server is too busy to respond
Run the following command from the command prompt: <TIBCO_HOME>/esi/bin/ESILookups.properties/TIBCO-HOME/tibco/tar/5.10/bin/AppManage -deploy -ear /TIBCO-HOME/tibco/esi/ear/ESI_SAP_TIB_11_F00_23.ear -deployconfig/TIBCO-HOME%/template/SAP-deployment_template.xml -app SAP_ESI_Solution -domain domain-name -user admin -pw admin
Alternatively, navigate to the directory: <TIBCO_HOME>/tibco/tra/5.10/bin and run the following command from the command prompt: ../AppManage -deploy -ear %TIBCO-HOME%/tibco/esi/ear/ESI_SAP_TIB_11_F00_23.ear -deployconfig %TIBCO-HOME%/template/SAP-deployment_template.xml -app SAP_ESI_Solution -domain domain-name -user admin -pw admin
Performing Post Installation Steps
This section describes the steps that must be completed after executing the MICU.
Configuring Property Files
If the MICU was executed using the Typical installation option, or with the Custom installation option using Configuring and Deploying Windchill ESI, the properties files are copied into the <TIBCO_Home>/esi/bin folder. The following files are copied:
• FilesToRead_ORA.properties: This file contains the names of certain property files and their location.
• ESIORADefaults.properties: This file contains the default values that are required by Oracle Applications to publish objects successfully.
• ESIORALookups.properties: This file contains cross-referencing information that addresses conversion of data from Windchill to the Oracle Applications equivalent.
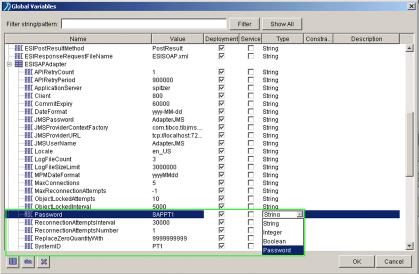
Password Obfuscation (Optional)
Use this procedure to hide the password values displayed in some global variables.
1. Open the project in TIBCO designer.
2. Select the Global Variables tab.
3. Click the pencil icon to modify one or more global variables.
4. Select the appropriate global variable and change the Type to Password. The default type is String. Retype the Value for that global variable. The password is now obfuscated.
5. Save the project.
6. Generate a new EAR.
7. Manually deploy the new EAR from the TIBCO Administrator window.
Manually Deploying the ESI EAR
By default MICU deploys the ESI EAR. However, in some cases, as when you are deploying custom business logic, or supporting multiple Oracle instances you may need to manually deploy the newly generated EAR.
To manually deploy the EAR using the TIBCO Administrator Graphical User Interface use the following procedure:
1. In a browser window login to the TIBCO Administrator in GUI mode using http://<Administratorhostname>:8426. For example: http://localhost:8426
2. In the TIBCO Administrator click Application Management.
3. Click New Application.
4. Browse to and select the following EAR:
◦ <TIBCO_Home/esi/ear/ESI_ORA_TIB_5_6_EAR_10_0_<BuildNumber>.ear”
5. Click OK.
6. Ensure that ProcessArchive.par displays the target as a BusinessWorks host machine, and that ESIOMAdapterConfiguration.aar displays the target as AdapterHostMachine.
7. Click Save.
| The deployment name string can only be modified from the "-" symbol on. The string content before that symbol is the domain name. For example, if the Deployment Name text box displays i2607 - Oracle Apps then: • i2607 is the domain name • Oracle Apps is the deployment name |
8. In the Configuration Builder window click Oracle. This is the application name.
9. Click the Advanced tab.
| Ensure that: • "/" is used as a path separator and that the ESIDirectory path is terminated by "/" . • ESIOMAdapter/Datasource” is appended to ESIJMS/DataResponseQueue name • JMS url in ESIJMS/JNDIContextURL has hostname instead of “localhost”. |
11. Click Save.
12. Click > .
13. Increase the Heap Size, Set Maximum Heap Size (MB) and Java Thread Stack Size (MB) to 512.
14. Click Save.
15. ClickDeploy and then OK.
BusinessWorks Configuration Settings
This section pertains to Windchill MPMLink manufacturing objects.
If the global variable ESIFlags/MPM_UsageFlag is set to true then the value of the following property is used as the usage rate for non-scheduled resources. By default this value is set to 1.
Usage.GlobalRate.*.*=1
The following values are used for the conversion of resource units. By default the following conversions are provided to convert seconds to the appropriate UOM for resources:
UOM.HR.*.*=1/3600
UOM.MIN.*.*=1/60
UOM.s.*.*=1/1
Activities in Oracle Applications are mapped according to the operation times defined in Windchill. By default the following values are provided:
Activity.SetUpTime.*.*=Prerun
Activity.ProcessingTime.*.*=Run
Activity.QueueTime.*.*=Queue
Activity.WaitingTime.*.*=Move
Activity.TearDownTime.*.*=Postrun
Usage rates for resources are mapped to operation times. By default the following mappings are provided
Usage.StepUsageRate1.*.*=SetUp
Usage.StepUsageRate2.*.*=Processing
Usage.StepUsageRate3.*.*=TearDown
Usage.StepUsageRate4.*.*=Queue
Updating the ESIORALookups.properties file for Oracle Applications
The ESIORALookups.properties file resides in the <<TIBCO HOME>>/esi/bin directory. If the existing file is customized ensure that you duplicate these customizations in the installed file from the original (backed up) file. By default the following line is commented
:
#Part.Effectivity_Control.*.* = Unit
If you want to publish a Unit Effective Part, or a BOM with components that have either serial or lot number effectivity values, uncomment the line shown above and comment the following line:
Part.Effectivity_Control.*.* = Date
By default the following property in the file has a value of HJ0051:
ECO.ReviseItem.Part.FromEndItemUnitNo = HJ0051
This value can be changed to any unit number defined in the ERP system. This value can be obtained from the Oracle Applications system and is used to satisfy certain CN revise item requirements. There is no effect on Windchill business object mapping.
Depending on whether or not serial or lot number effectivity values sent from Windchill are to be published by TIBCO to Oracle Applications you must comment or uncomment the following lines:
Unit.Effectivity.Priority.* = SERL
#Unit.Effectivity.Priority.* = LOT
| Serial or lot number effectivity is published to Oracle Applications as unit effectivity. The above property is set to SERL by default, meaning the business logic would publish serial effectivity to Oracle Applications by default. |
Configuring Manufacturing Objects
This section pertains to Windchill MPMLink manufacturing objects.
If the global variable ESIFlags/MPM_UsageFlag is set to true then the value of the following property is used as the usage rate for non-scheduled resources. By default this value is set to 1.
Usage.GlobalRate.*.*=1
The following values are used for the conversion of resource units. By default the following conversions are provided to convert seconds to the appropriate UOM for resources:
UOM.HR.*.*=1/3600
UOM.MIN.*.*=1/60
UOM.s.*.*=1/1
Activities in Oracle Applications are mapped according to the operation times defined in Windchill. By default the following values are provided:
Activity.SetUpTime.*.*=Prerun
Activity.ProcessingTime.*.*=Run
Activity.QueueTime.*.*=Queue
Activity.WaitingTime.*.*=Move
Activity.TearDownTime.*.*=Postrun
Usage rates for resources are mapped to operation times. By default the following mappings are provided
Usage.StepUsageRate1.*.*=SetUp
Usage.StepUsageRate2.*.*=Processing
Usage.StepUsageRate3.*.*=TearDown
Usage.StepUsageRate4.*.*=Queue
Configuring Oracle NLS Language Parameters for use with ESI
To configure the Oracle ERP system to run in a particular language, the Oracle NLS parameters must be set for use with Windchill ESI. The NLS language parameters for Oracle sessions created by Windchill ESI must agree with the language configuration of the TIBCO environment. This will ensure that all TIBCO messages, database error messages, and Oracle ERP system messages are returned in the same language. It also ensures that localized Oracle ERP system data for Objects, Bills of Material, and Engineering Change Orders are saved correctly.
Windchill ESI uses a trigger to set the NLS language parameters for each Oracle database session. The trigger sets the values for NLS_LANGUAGE and NLS_TERRITORY. No other NLS parameters should be set or modified. Doing so may cause publish operations to fail or a possible data corruption.
The script listed below creates a trigger that sets the NLS parameters. The trigger gets installed in the Oracle schema that owns the other Windchill ESI and TIBCO database objects.
esi_nls_parm_trg.sql
To configure the NLS parameters for a particular language, modify the script and set the NLS_LANGUAGE and NLS_TERRITORY values appropriate for your environment. The script contains the settings for valid combinations of NLS_LANGAUGE and NLS_TERRITORY. Configure the trigger for your environment by selecting the desired NLS values by removing the two dashes at the start of each line.
How to check if the Web Service for ERP Part Information is working
If exceptions are being thrown when you try to access ERP cost details for a part, it could mean one of the following; Either the web service hasn't been configured properly, or the service is not running in the background at all. The following procedure will describe how to check for these:
Go to the preferences section and click on the pencil icon to see if the web service can be accessed. You should see a WSDL being used for fetching part costs. In case you face problems with the web service, please check the following with your network or system administrator:
1. Check to see if the port on which the web service is running is blocked for some reason. For example, a firewall, intruder detection software, or virus scan software could be blocking the web service. If it is being blocked, change the appropriate settings to permit data traffic on this port or use an open port for web service.
2. Check to see if the port is being used by another application. If it is being used by another application, use another open port.
Script Sequence for Installation of ESI Objects on an Oracle Applications Instance
After all post installation steps have been completed for an Oracle Applications installation of ESI, the following scripts need to be run in this sequence:
| When deploying the solution using the Middleware Installation and Configuration Utility (MICU), using the options Installing and Configuring the ESI Solution for Oracle or Installing the TIBCO ESI Oracle Business Logic, script files are copied to: <Tibco_Home>/esi/scripts/<<Oracle Applications Version>>. To obtain scripts for a specific Oracle Applications version use the appropriate folder. For example, if using Oracle Applications version 12.2.4 then the scripts will be located in <Tibco_Home>/esi/scripts/12.2.4. |
1. common_all_Mods.sql
2. ptc_esi_parameters_do.sql
3. MasterConfiguration_TIBCOLogTablePublisher_all_Mods.sql
4. MasterConfiguration_OpenItem_all_Mods.sql
5. MasterConfiguration_BillsOfMtlAPI_all_Mods.sql
6. MasterConfiguration_EnggChangeOrder_all_Mods.sql
7. MasterConfiguration_Routing_BOM_do.sql
8. ESI_PartDetails_Mods.sql
9. ESI_nls_parm_trg.sql
Script Sequence for Uninstalling ESI Objects on an Oracle Applications Instance
If you are uninstalling an Oracle Applications instance you must execute the following scripts in this sequence:
1. ESI_PartDetails_undo_Mods.sql
2. MasterConfiguration_Routing_BOM_undo.sql
3. MasterConfiguration_EnggChangeOrder_undo_all_Mods.sql
4. MasterConfiguration_BillsOfMtlAPI_undo_all_Mods.sql
5. MasterConfiguration_OpenItem_undo_all_Mods.sql
6. MasterConfiguration_TIBCOLogTablePublisher_undo_all.sql
7. ptc_esi_parameters_undo.sql
8. common_all_undo.sql
Enabling the Instrumented Feature
To enable the instrumented feature update the PARA_VALUE column to 'Y', in the row where PARA_NAME column has its values set to ‘instrumented’. This can be found in the PTC_ESI_PARAMETERS table available in the Windchill ESI user schema.
You can also use the following statement in the Windchill ESI user schema.
Update PTC_ESI_PARAMETERS set para_value= 'Y' where para_name= 'instrumented';
Once the instrumented feature has been enabled log files are created for each transaction and for each object type. For example, Parts, BOMs, Routings, and CNs.
These files will be generated under the path that was given during script deployment. This path is stored in thePTC_ESI_PARAMETERS table.
| If the debug file path needs to be changed then all default scripts must be un-deployed and re-deployed. |