일반 MPMLink 탐색기 사용자 정의
다음 사용자 정의는 Windchill MPMLink 탐색기에 적용할 수 있는 일반적인 변경 사항에 대해 설명합니다.
Windchill MPMLink 탐색기의 가용성 변경
설치되어 있으면 모든 Windchill MPMLink 사용자가 다음과 같은 탐색기에 액세스할 수 있습니다.
• 제품 구조 탐색기
• 제조 제품 구조 탐색기
• 제조 리소스 탐색기
• 제조 표준 탐색기
• 공정 계획 탐색기
• 제조 Gantt 탐색기
특정 구성에서 탐색기에 대한 액세스를 제한할 수 있습니다. 예를 들어, 제조 사용자만 제조 제품 구조 탐색기에 액세스하고 다른 모든 사용자는 제품 구조 탐색기에 액세스하도록 구성할 수 있습니다.
사이트 또는 조직 레벨에서 이 구성을 설정하려면 다음 절차를 따르십시오.
• 프로파일 탭을 사용하여 제조 사용자용 프로파일을 작성합니다.
• 해당 프로파일에 탐색기에 대한 액세스 권한을 제공할 개별 사용자를 추가합니다.
기본 측정 단위 변경
Windchill MPMLink 객체는 시간, 비용 및 치수와 같은 속성 세트를 사용하여 정의합니다.
기본 측정 시스템은 미터법입니다. 기본 측정 시스템을 예를 들어 미국 시스템으로 변경하려면 기본 설정 관리 유틸리티를 사용하여 다음 기본 설정을 수정합니다.
Attribute Handling > Measurement System
시간, 비용 또는 치수와 같은 개별 속성에 대한 기본 단위를 변경하려면 유형 및 속성 관리 유틸리티를 사용합니다.
• 지정된 시스템의 기본 단위를 변경하려면, 예를 들어 모든 시간을 분으로 변경하려면 측정 시스템 관리 창을 사용합니다.
• 지정된 속성의 기본 측정 단위를 변경하려면 재사용 가능 속성 관리 창을 사용합니다. 변경할 속성으로 이동하여 무시 필드에 새 값을 입력합니다.
작성 마법사에 사용자 정의 속성 추가
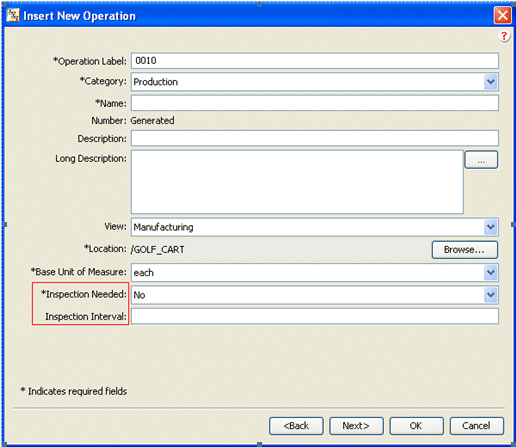
다음 절차에 따라 새 작업 삽입 마법사와 같은 작성 마법사에 속성을 추가합니다.
1. 다음 디렉토리로 이동합니다.
codebase\config\logicrepository\xml\explorer\customization
2. 다음 파일을 편집합니다.
CustProcessPlanExplorerMain.xml
3. 다음 XML 조각을 추가합니다.
|
|
이 예에서는 작업 삽입 마법사에 추가될 속성이 inspectionNeeded 및 InspectionInterval입니다. 사용자 정의할 마법사에 맞게 코드를 수정하고 고유한 사용자 정의 속성을 추가합니다. |
<ExplorerElementGroup>
<LogicContext application="ptc.cust.ProcessPlanExplorer"
dataType="com.ptc.windchill.mpml.processplan.operation.MPMOperation"/>
<AttributeGroup id="ptc.mpm.exp.CreateTab2" scrollable="true" displayMode="edit">
<CellDefinition id="inspectionNeeded">
<Label>
<Resource key="inspectionNeededLabel"/>
</Label>
<AttributeDefinition attributeId="inspectionNeeded"/>
</CellDefinition>
<CellDefinition id="inspectionInterval">
<Label>
<Resource key="inspectionIntervalLabel"/>
</Label>
<AttributeDefinition attributeId="inspectionInterval"/>
</CellDefinition>
</AttributeGroup>
</ExplorerElementGroup>
4. Java 캐시를 지우고 공정 계획 탐색기를 다시 시작합니다.
이 예에서는 다음 사항에 유의하십시오.
◦ 이 XML 조각에 사용된 응용 프로그램 ID는 ptc.cust.ProcessPlanExplorer입니다. 이 ID는 공정 계획 탐색기 사용자 정의 시 권장되는 응용 프로그램 ID입니다.
◦ MPMOperation 객체 ptc.mpm.exp.CreateTab2에 대한 두 번째 기본 작성 마법사는 다음 위치에 정의되어 있습니다.
◦ codebase\config\logicrepository\xml\explorer\mpmexplorer\MPMExplorerForTablesAndPanels.xml
◦ 동일한 작성 마법사에 속성을 더 추가하려면 동일한 AttributeGroup ID인 ptc.mpm.exp.CreateTab2를 사용해야 합니다.
◦ 새 속성에 대한 셀 정의만 이 XML 세그먼트에 추가됩니다.
|
|
기본적으로 셀 정의는 기본 셀 정의 뒤에 추가되어야 합니다. 다른 위치를 지정하려면 Placement 태그를 사용합니다.
|
<Placement insertKey="after|before" insertId="attributeName"replace="true|false"/>
For example:
<CellDefinition id="inspectionNeeded">
<Label>
<Resource key="inspectionNeededLabel"/>
</Label>
<AttributeDefinition attributeId="inspectionNeeded"/>
<Placement insertKey="after" insertId="folder"/>
</CellDefinition>
|
|
폴더는 속성의 ID이며 뒤에 inspectionNeeded 속성이 추가됩니다.
|

