ペットテーブル
1. PetTable クラスを作成します。
a. > > の順にクリックします。
b. 「パッケージ」を com.acme.mvc.buildersに設定します。
c. 「名前」を PetTableに設定します。
d. 「スーパークラス」を AbstractComponentBuilderに設定します (com.ptc.mvc.components から)
e. 「終了」をクリックします。
2. AbstractComponentBuilder は、2 つのメソッドの実装を必要とします (Eclipse がそれぞれのメソッドスタブを生成します)。1 つ目の buildComponentData は、テーブルに表示するオブジェクト (行) を返します。メソッドのボディを次のコードに置き換えて、すべてのペットを照会します。
return PersistenceHelper.manager.find(new QuerySpec(Pet.class));
3. 2 つ目の buildComponentConfig は、表示する列のある完成したテーブルを返します。まず、個々の列を取得するためのコンビニエンスメソッドを作成します (ColumnConfig と ComponentConfigFactory は com.ptc.mvc.components からインポートされます)。
ColumnConfig getColumn(final String id, final ComponentConfigFactory
factory) {
final ColumnConfig column = factory.newColumnConfig(id, true);
column.setSortable(false);
return column;
}
4. 次に、ローカライズされたテーブルの表示名を管理するための新しいクラス acmeManagerResource を作成します。そのコードは、以下のとおりです。
package com.acme.jca;
import wt.util.resource.*;
@RBUUID("com.acme.jca.acmeActionResource")
public final class acmeManagerResource extends WTListResourceBundle {
@RBEntry("Pets")
public static final String PET_TABLE_LABEL = "pet_table_label";
}
5. 次に、buildComponentConfig の生成されたボディを () に置き換えます。
final ComponentConfigFactory factory = getComponentConfigFactory();
final TableConfig table; {
table = factory.newTableConfig();
table.setType(Pet.class.getName());
table.setLabel(WTMessage.getLocalizedMessage(RESOURCE,
acmeManagerResource.PET_TABLE_LABEL, null));
table.setSelectable(true);
table.setShowCount(true);
table.setShowCustomViewLink(false);
final ColumnConfig name; {
name = factory.newColumnConfig(Pet.NAME, true);
name.setInfoPageLink(true);
name.setSortable(true);
}
table.addComponent(name);
table.addComponent(getColumn(ColumnIdentifiers.INFO_ACTION, factory));
table.addComponent(getColumn(ColumnIdentifiers.NM_ACTIONS, factory));
table.addComponent(getColumn(ColumnIdentifiers.LAST_MODIFIED, factory));
table.addComponent(getColumn(Pet.KIND, factory));
table.addComponent(getColumn(Pet.DATE_OF_BIRTH, factory));
table.addComponent(getColumn(Pet.FIXED, factory));
}
return table;
Ctrl + L キーを押して、com.acme.jca.acmeManagerResource、com.ptc.core.components.descriptor.DescriptorConstants.ColumnIdentifiers、com.ptc.mvc.components.TableConfig、および wt.util.WTMessage クラスを解決します。また、RESOURCE をフィールドとして割り当てます。
static final String RESOURCE = acmeManagerResource.class.getName();
6. PetTable をビーンとして登録します。
a. 次のように PetTable クラス宣言にアノテーションを付けます。@ComponentBuilder("acme.pet.table")
b. プロジェクトの除外を変更します。
a. プロジェクトの .classpath (eclipse/cust_Windchill_src/.classpath) を書き込み可能にします。
b. > の順にクリックします。
c. 「Java のビルドパス」を選択し、「ソース」タブを選択します。
d. cust_Windchil_src/src で「除外」を選択し、「編集」を選択します。
e. config/** を選択し、「編集」を選択します。
f. config/** を config/logicrepository/** に置き換え、「OK」をクリックします。
g. 「終了」をクリックし、「OK」をクリックします。
7. Pet-configs.xml という名前の新しいファイルを作成します。
a. > > の順にクリックします。
b. > の順に選択してから、「次へ」を選択します。「XML」または「XML ファイル」が使用できない場合、Helios ソフトウェアサイトを使用している場合は「Web, XML, and Java EE Development」カテゴリにある Eclipse XML Editors and Tools をインストールするか、単に「一般」を選択してから「ファイル」を選択します。
c. cust_Windchill_src/src/config/mvc に親フォルダを割り当て、Pet-configs.xml にファイル名を割り当てて、「終了」をクリックします。
d. 内容は次のようになります。
<?xml version="1.0" encoding="UTF-8"?>
<beans xmlns="http://www.springframework.org/schema/beans"
xmlns:xsi="http://www.w3.org/2001/XMLSchema-instance"
xmlns:context="http://www.springframework.org/schema/context"
xmlns:mvc="http://www.ptc.com/schema/mvc"
xsi:schemaLocation="http://www.springframework.org/schema/beans
http://www.springframework.org/schema/beans/spring-beans-2.5.xsd
http://www.springframework.org/schema/context
http://www.springframework.org/schema/context/spring-context-2.5.xsd
http://www.ptc.com/schema/mvc http://www.ptc.com/schema/mvc/mvc-10.0.xsd">
<!-- Define the builders -->
<bean class="com.acme.mvc.builders.PetTable"/>
</beans>
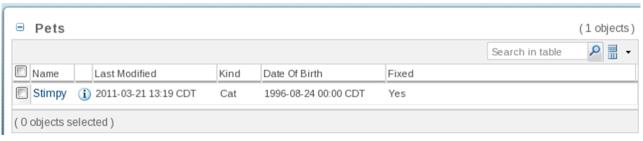
8. Windchill を起動/再起動し、ベースの Windchill URL に /app/#ptc1/comp/acme.pet.table を追加することによって、テーブルが正常に動作することを確認します。次のテーブルが表示されます。