Build and Test the Hello World Demo
After you have installed the Windchill Workgroup Manager Toolkit, compile, link, and run the “Hello World” Windchill Workgroup Manager Toolkit application on each computer you intend to use for development. This process provides an independent test of the following items:
• The installation of Windchill Workgroup Manager Toolkit is present, complete, and visible from your machine.
• The machine you use for development has access to all the necessary C program development tools like the C compiler and linker, in versions supported by Windchill Workgroup Manager Toolkit.
When running the Windchill Workgroup Manager after registering this application you will see the message “Hello WWGM Toolkit” in the Windchill Workgroup Manager main window message area. The application displays this message when initialize() method is called on the Windchill Workgroup Manager startup.
The “Hello World” demonstration is located at examples/wwgmtk_hello_world.
To build and run this application:
1. Close the authoring application if it is connected to Windchill.
2. Close Windchill Workgroup Manager, if it is running.
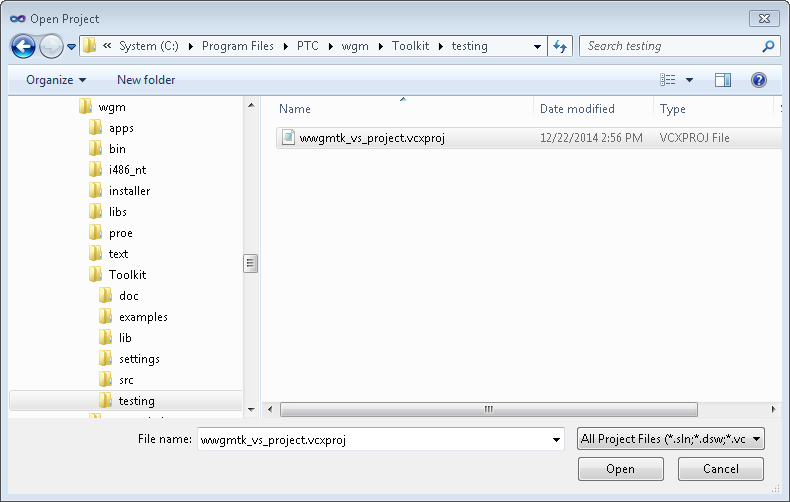
3. Copy the template project from settings/wwgmtk_vs_project.vcxproj to an empty directory.
4. Launch Microsoft Visual Studio.
5. Click > > .
6. Browse to the directory to where you have copied the wwgmtk_vs_project.vcxproj file. Select the wwgmtk_vs_project.vcxproj file and click Open.
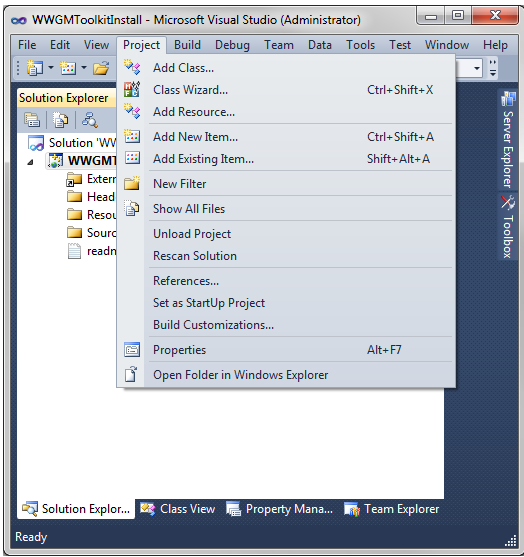
7. In the Solution Explorer window, click > .
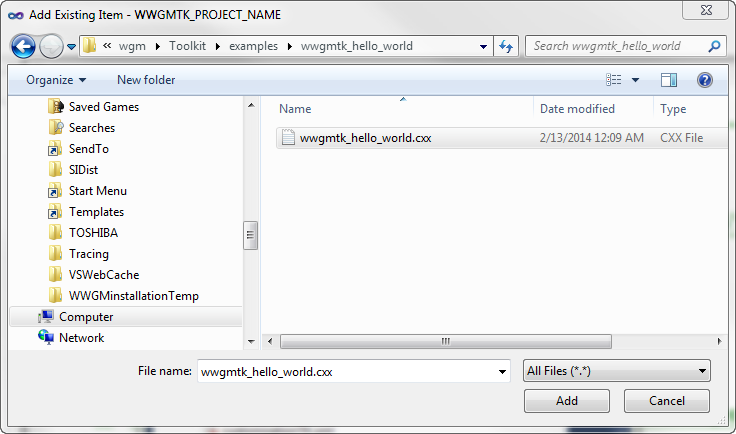
8. Browse to the %WWGMTK_INSTALL_DIR%\example\wwgmtk_hello_world directory and add the wwgmtk_hello_world.cxx file to the project.
9. Select other applicable criteria for the Hello World demo from the ribbon menus above the Solution Explorer window.
10. To build the DLL for the first time:
a. Select >
b. Under Active solution configuration, select New. The New Project Configuration window opens.
▪ Enter a configuration file name in the Name field.
▪ Select to copy settings from <Empty> or Release.
▪ Select the checkbox to Create new project configurations.
▪ Click OK.
▪ The Configuration field under the Project contexts section in Configuration Manager populates with the build configuration name.
▪ Click Close to exit.
11. To rebuild the DLL, select > . The Output window is populated with the latest build configuration.
12. The application should build without errors. If the application fails, check to see if the user environment variable for your operating system is set correctly. For more information, see
Setting up the Development Environment.
13. Run the Windchill Workgroup Manager with the following flag : -wwgmtk_create_reg_file “helloworld” <full\path\to\built\dll1>.