Configuring a Worker on a Different Windows Machine
The worker can be configured on a Windows machine that is different from the Windchill server machine commonly referred to as a Remote Worker. The configuration procedures for this scenario are exactly the same as the example of configuring the worker on the same machine as the Windchill server, commonly referred to as a Local Worker, except for these differences:
• The need for a Common File System shared between the two machines.
• The use of the Worker Daemon to execute the worker startup script on a different Windows machine. This communication is handled by using a small executable called WorkerDaemon.exe. The WorkerDaemon.exe is installed and optionally configured as a Windows Service called “GS Worker Daemon”, as part of the Creo View Adapters installation. These instructions assume that you installed the Worker Daemon during this installation.
• The secure alternative to the Worker Daemon, leveraging the Execute Locally option to execute a script on the local Windchill machine that can initiate a secure connection to the worker to execute the worker execution script, for example, over SSH.
Creating a Common Windows-to-Windows File System
For the Windchill server machine and the worker machine to exchange files, the two machines must share a common file system directory. This directory, which can be located on either machine (or even on a third machine), serves as a file transfer point between the server and worker machines. It is highly recommended that the physical file system resides on the worker machine, as this provides the best performance.
|
|
Because there are many ways in which a common file system can be created (mapped Windows drives, FTP, and so forth), no attempt is made to describe the creation of a shared file directory in these procedures. Windows mapped drives require additional configuration steps.
|
|
|
If you are using a network file system (NFS), this directory can exist on any machine in the network; but you must be able to mount the directory on both the Windchill machine and the worker machine. If you are using FTP, the Windchill machine must be able to connect with an FTP server running on the worker machine and the worker path must be a directory which is local to the worker machine.
|
After creating the common file system, make note of the full path to the common directory used by the server machine and by the worker machine. Each of these paths must be entered during subsequent procedures.
For example, from the server machine, the full path to the common file system could be:
X:\D_drive\shared_Worker_dir
The full path from the worker machine to the same common file system could be:
D:\shared_Worker_dir
The shared folder must reside on the worker machine and not the server. If you are using mapping, add a step to the Windchill server startup script to map the drive before starting Windchill services and the Worker Agent that uses it to ensure that it is supported as a service.
|
|
This common file system must be fully accessible from the user account specified during the initial installation of the Windchill server. The common file system folder must reside on the worker machine, and the server must have access to it. This can require that both machines have the same log on account. This is a security concern the administrator must address by policy before installing the worker.
|
Adding a Worker to a Different Windows Machine
The Worker Agent must know where the worker is on the system. The next set of procedures explains how to configure the Worker Agent to use this worker.
Because the worker configuration steps are similar regardless of whether the configuration being performed is local or remote, the common configuration steps are not repeated. Where possible, you are directed to the detailed instructions described in the “Configuring a Worker on the Same Machine” section.
2. In the Worker Location window, select A different Windows NT machine, as in this scenario, the Windchill server and the worker machines are different, and the worker resides on a Windows machine. Click Next.
3. Complete the Worker Execution Command instructions:
In this panel, you specify the script used to start the worker and the execution settings. Enter values for the following parameters:
◦ Executecommand— The execute command is the worker script created during the Creo View Adapter configuration. (For more information, refer to the Server-Controlled Publishing chapter in the relevant Adapter section of the Creo View MCAD Adapter Installation and Configuration Guide.) Type the complete path to this script in the Executecommand text field. Specify the batch file which starts the worker executable on the host machine. An example of an execute command follows: C:\ptc\creo_view_adapters\inventor_setup\inventorworker.bat.
| The Worker Agent Configuration test is not successful unless the worker.exe.whitelist.prefixes property is configured as described above. |
◦ Execute locally — The Execute locally option is available when "A different Windows NT machine" or "A different UNIX machine" is selected in the Worker Location window. It specifies whether the Execute command is local to the Windchill machine or to the host machine. If the Execute locally option is selected, the command is local to the Windchill machine, and the Windchill server executes it directly. The command decides how to start the worker executable on the host machine.
If the Execute locally option is not selected, the command is local to the host, and the Worker Daemon executes it at the Windchill server's request.
◦ Startup Time (sec) — Specify an amount of time in seconds that it takes for the worker and the system to completely start, initialize, and be able to return a message confirming this. If this value is not large enough, the worker does not start reliably. Adjust the setting to work on your system.
◦ Max Instances — Specify the maximum number of instances of this worker that can be started. Only set this value to be greater than one (1) if the worker machine is capable of running multiple copies of the application effectively (that is, a multiprocessor system with sufficient memory).
◦ AutoStart — Select this option to set the worker to start automatically whenever it is needed. Use this option if you want your system to automatically start up after a reboot or if you want the Worker Agent to automatically satisfy heavy demand.
◦ AutoIdleStop (sec) — Specify an amount of time in seconds that determines how long the worker can remain idle before it is automatically stopped. If you leave this field empty or set it to zero (0), the worker is not stopped automatically at idle time. Use this option if you need to release the license when it is not being used.
◦ AutoErrorStop — Click this option to set the worker to stop automatically whenever it returns an error from a conversion request. Use this option if you need to make sure that the application is not left in an unstable state after an error condition.
| It is better to control the worker’s error behavior using the related worker Recipe Editor settings ( > > > ). |
◦ AutoBusyStop (sec) — Specify an amount of time in seconds that determines how long the worker can spend on a single conversion request without automatically being stopped upon finishing that conversion. If you leave this field empty or set it to zero (0), the worker is not stopped automatically when it has completed a conversion.
| It is better to control the worker’s conversion request activity using the related worker Recipe Editor settings ( > > > ). |
◦ Available Time — You can control the availability of this worker by listing the time and days for the worker to be enabled. This is a comma-separated list of times in the following format: <start-time> - <end-time> -<day-of-week>. Refer to the Windchill Help Center for more information.
4. In the Worker Daemon Port window, specify the port number that the Worker Daemon, running on the Windchill server, listens to. This instruction assumes that the Worker Daemon was installed and configured during the installation of the Creo View Adapter(s).
Accept the default, 601, or enter the correct port number. For more information about installing and configuring the Worker Daemon, see “Running Worker Daemon as a Windows Service” in the Creo View MCAD Adapters Installation and Configuration Guide.
5. In the Common File System window, enter the information needed to connect to the common file system.
◦ Windchill Machine Path — Enter the location of the common file system relative to the Windchill machine; for example, the drive mapped to the share on the worker machine as follows: K:\jsmith\SharedFolder.
◦ WorkerHost(i.e., <machine_name>)Path (Worker) — Enter the location of the common file system on the CAD worker machine; for example, the shared folder to which the Windchill server must connect to via a mapped drive. In this example, the path is:
C:\SharedFolder\
◦ FTP Username — Type the FTP user name (only relevant if FTP is used as transfer mechanism).
◦ FTP Password — Type the FTP password (only relevant if FTP is used as transfer mechanism).
| PTC does not support anonymous FTP communication between workers on different machines. The user must provide an FTP Username and Password for a worker to FTP to another machine; otherwise, Windchill does not recognize the Worker Agent. |
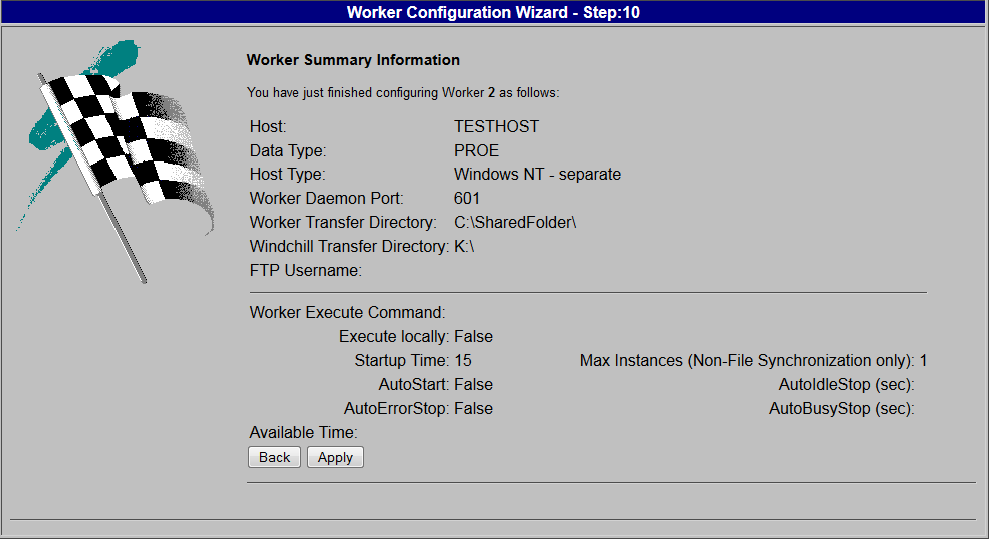
6. Click Next to display the Worker Summary Information panel. This panel displays the values you entered or selected during the add worker process.
7. Review the worker configuration information in this panel. If needed, use Back to return to the appropriate step and make any corrections. When you have verified that the worker information displayed in this panel is correct, click Apply.
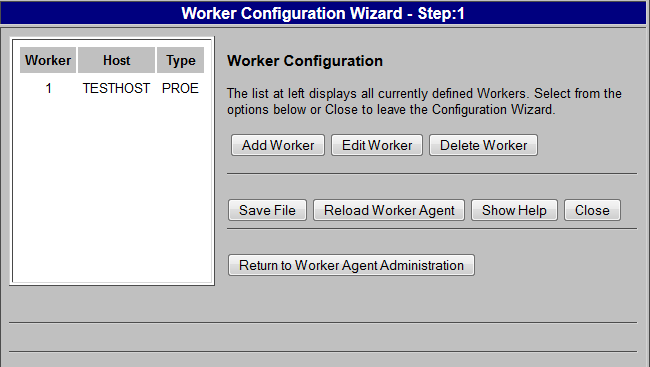
8. You are returned to the Worker Configuration window (step 1 of the configuration). Click Save File to update the <Windchill>\codebase\agent.ini file with your configuration changes.
9. Click Reload Worker Agent to commit the changes and update the Worker Agent Administration worker entries.
10. Click Return to Worker Agent Administration.
11. Follow the “Enhanced Security Measures in Worker Configuration” instructions below.
Enhanced Security Measures in Worker Configuration
When configuring a worker for WVS, the command used to start that worker, either on the Windchill server or on a remote worker machine, is configured in the agent.ini file by an administrator. A security update in Windchill 10.2 prevents malicious changes to that file that could allow other OS commands to be executed.
Beginning at Windchill 10.2, a new, mandatory WVS property called worker.exe.whitelist.prefixes was introduced to provide extra protection for the worker executables. A worker is used only if its executable matches one of the prefixes specified in the property; otherwise, the worker is ignored.
Before an OS command is executed, the prefix containing the command must be configured in wvs.properties by adding the appropriate values to the site.xconf file. The details of the property settings can be found in the wvs.properties.xconf file in the WORKER EXECUTABLE PREFIX SETTINGS section.
• The property worker.exe.whitelist.prefixes can be used to provide a list of command prefixes that can be used for any worker on any host.
• Additionally, properties of the form worker.exe.whitelist.prefixes.<worker_host> can be used to provide a list of command prefixes on a per-worker host basis.
The following sample use case illustrates the configuration of the worker.exe.whitelist.prefixes property.
<Property name="worker.exe.whitelist.prefixes" overridable="true"
targetFile="codebase/WEB-INF/conf/wvs.properties"
value=" C:\|D:\|G:\|/|nohup /"/>
This configuration honors all Windows workers residing on the C, D, and G drives, along with all the Unix/Linux workers. The vertical bar (pipe) is used to separate the prefixes.
| The Worker Agent Configuration test is not successful unless the worker.exe.whitelist.prefixes property is configured as described above. |
You have now finished configuring the Worker Agent to use a worker on the same machine as the
Windchill server. Refer to
Testing the Worker Agent Configuration for details on how to test and confirm that your configuration is correct.