Mapping User-defined SolidWorks Parameters
By default, user-defined CAD parameters are mapped to Windchill attributes with the same name. The administrator defines the ability for SolidWorks to access parameters that are mapped to Windchill attributes. Errors and conflicts may occur upon upload if a parameter from a CAD document is trying to be mapped to a soft attribute in Windchill with a type mismatch or constraint violation. Because Windchill attributes are pushed to the CAD document upon download, only attributes that have changed since content upload are modified on check out or download. The user may set changes to user-defined attributes into SolidWorks using Update.
SolidWorks User-Defined Attributes
SolidWorks and Windchill support the following types of user-defined attributes:
• Number
• Integer: The system accepts pure numbers, e.g. 1, If there is a , or a . character, then the number is not valid. If there are any characters that are not numbers, then the number is not valid.
• Real Numbers:
The system accepts pure numbers, e.g. 1 to be 1.00. The system interprets any number with a . or , to be valid. That is: 1.00 or 1,00 are interpreted to be the real number 1.
If there is more than one . or , then the value is invalid. If the number is in exponential format, it is valid. For example,: 1E+06 is 1000000.00.
The user can write the E character in either upper or lower case. For example, 1e+06 and 1E+06 are both valid.
If the user can write a positive exponential value with or without a + sign. For example, 1E06 and 1E+06 are valid.
If there are any characters that are not numbers, then the number is not valid.
• Yes/No or Boolean
• String
• If a SolidWorks parameter uses a value other than these, it will not be published.
|
|
SolidWorks does not support mapping the Date type attribute. Instead, use the SolidWorks Text Type parameter for mapping with the Windchill Date and Time attribute.
|
Enabling SolidWorks BOM Item Number Propagation to Windchill
Beginning at Windchill 11.0 F000, you can propagate the BOM item number information in SolidWorks to “Find Number” and/or “Line Number” of a Part Structure in Windchill. You can also propagate Component Reference values from a SolidWorks assembly to Find Number and Line Number attributes in Windchill.
|
|
Only the Top Level in the BOM table is supported for BOM Item Number propagation.
|
|
|
PTC supports propagation of Find Number and Line Number from SolidWorks to Windchill. Propagation from Windchill to SolidWorks is not supported.
|
The preference to map a CAD Document Uses Link Attribute to a WTPart Uses Link Attribute is defined in WindchillPreference Management. Navigate to > > (or Line Number Attribute) and define the attribute in the Value field.
Use Case Scenario #1 — Propagation of Item Number in SolidWorks BOM Table inserted in an assembly to Find Number and Line Number
1. Administrator— Create an attribute called BOM_TABLE_ITEM_NUMBER for CAD Document Usage Link using the Type and Attribute Management utility.
2. Administrator— Set the attribute BOM_TABLE_ITEM_NUMBER to map BOM Item Number MSP:BOM_ITEM_NUMBER.
3. Administrator— Set a mapping attribute for Find Number Attribute or Line Number Attribute preference at the Site context.
◦ Find Number Attribute: BOM_TABLE_ITEM_NUMBER
◦ Line Number Attribute: BOM_TABLE_ITEM_NUMBER
4. User — In SolidWorks, open a SolidWorks assembly with some components.
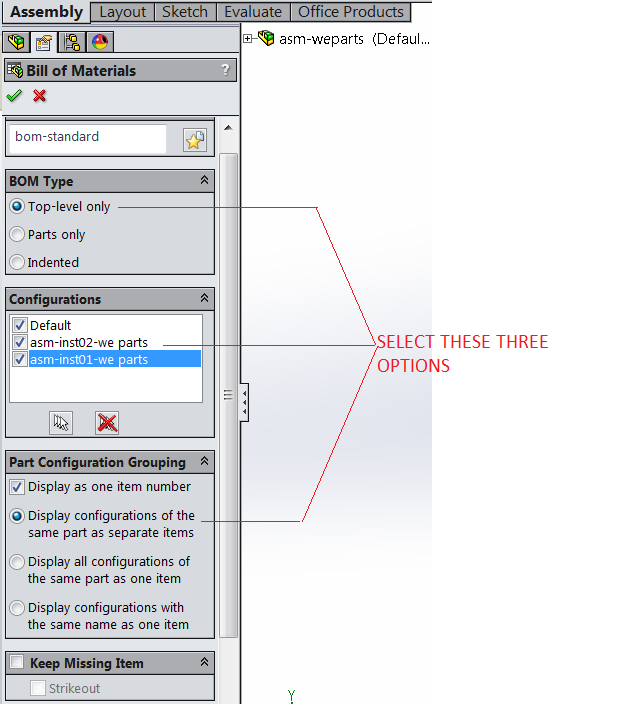
5. User — Create a new BOM table in the Assembly (make sure the assembly has only one BOM table). Use the following options to create this BOM table:
◦ Set the BOM Type as Top-level only
◦ For Configurations, select all the configurations listed, including Default, even if an active configuration open is Default or any other.
◦ Set the Part Configuration Grouping as Display configurations of the same part as separate item
|
|
Only the combination of options specified above is supported. If any of the above values is changed, the feature will not work.
|
6. User — After inserting the BOM table, Rebuild the assembly. Save the assembly to the workspace.
7. User — Check in the assembly using Auto Associate WTParts.
8. User — Go to the CAD Document Property Page of the Assembly CAD Document > tab to check if each component has value of BOM_TABLE_ITEM_NUMBER. . (Configure the view to display the BOM_TABLE_ITEM_NUMBER attribute.)
9. User — Go to the Details page of the part associated to the assembly and check if Find Number and Line Number show the same value.
Notes to above:
• In the case of a multi-level assembly, open each subassembly and then insert the BOM table in it with the above options; perform an explicit rebuild; and then save each subassembly. Open the top-level assembly and add the BOM table to it, perform an explicit rebuild after inserting the BOM table, and then save the top level assembly and perform check-in with Auto-associate. In short, a rebuild is necessary for any change in the BOM table due to any part addition/deletion etc., and also each sublevel assembly needs to be saved for any change in its structure. If Rebuild is not done explicitly after inserting the BOM table and before a save of the subassembly/top-level assembly, than Item number propagation may not happen. This has been confirmed with SolidWorks.
• If the assembly has multiple BOM tables inserted, the Item Number value propagation will happen from the first BOM table inserted in the assembly. If you delete the earlier BOM table and insert a new one, then Item Number propagation will happen from the subsequent BOM table.
Use Case Scenario #2 — Propagation of Component Reference value of SolidWorks assembly children to Find Number and Line Number
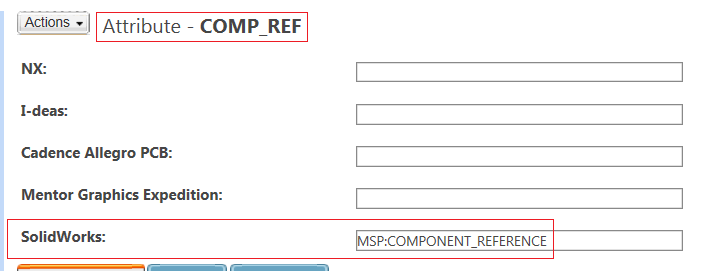
1. Administrator— Create an attribute called COMP_REF for CAD Document Usage Link using the Type and Attribute Management utility.
2. Administrator— Set the attribute COMP_REF to map BOM Item Number MSP:COMPONENT_REFERENCE.
3. Administrator— Set mapping attribute for Find Number or Line Number, e.g., Find Number Attribute: COMP_REF, Line Number Attribute: COMP_REF
4. User — In SolidWorks, open a SolidWorks assembly with some components.
5. User — Assign proper values to Component Reference as shown.
6. User — Save the assembly to the workspace.
7. User — Perform checkin with Auto Associate for the assembly.
8. User — Check in the assembly along with its associated Part Structure.
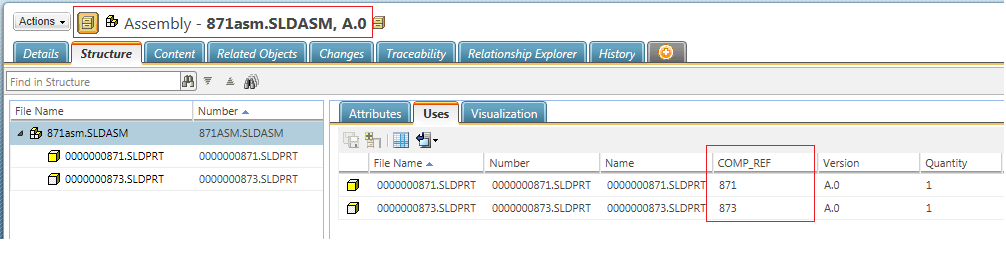
9. User — Go to the CAD Document Property Page of the > tab to check if each component has value of COMP_REF.
10. User — Go to the Details page of the part associated to the assembly and check if Find Number and Line Number are available, as shown.
| In the case of a multi-level assembly, for any update/change of the Component Reference value of the child, the parent subassembly needs to be saved explicitly, and then the top level needs to be saved to have the new values propagated after check-in with Auto-Associate. |