Using Autodesk Inventor Frame Generator with Windchill
Beginning at Windchill 10.2, support is provided for working with Autodesk Inventor Frame Generator parts. Frame Generator is used to create frame assemblies and structures using standard profiles of the Autodesk Inventor Content Center Library. To enable this functionality, the Autodesk Inventor Content Center Library must be installed during the Autodesk Inventor installation.
Frame assembly, skeleton part (Reference Model), and Frame components have their own autonumbering scheme applied to their file names to avoid uniqueness conflicts. The numbers will depend upon the CAD Document autonumbering scheme. The auto-generated number created for Frame components will be different when CAD Document autonumbering is ON and when it is OFF.
When CAD Document Autonumbering is ON
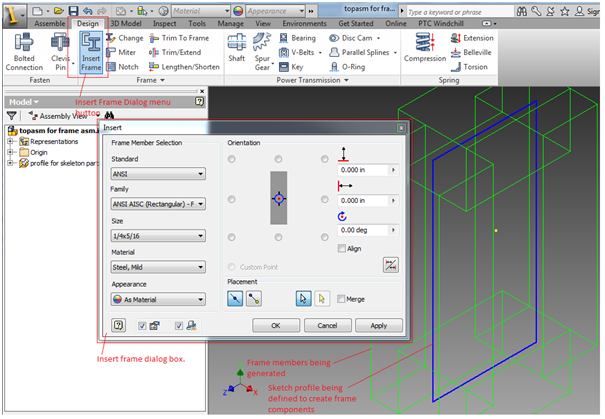
As shown in the illustration below, to create frames, the Insert Frame option is available from the Design tab in an Autodesk Inventor Assembly Document. In order to generate a frame, you must have a child part with a sketch profile that is treated as a path to generate the frame.
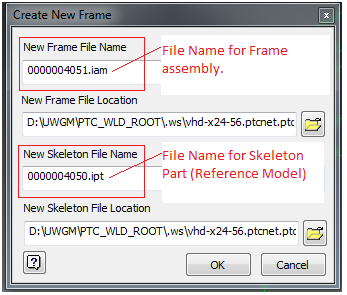
In Windchill Workgroup Manager connected mode, clicking Apply or OK in the Insert window (shown above) displays the Create New Frame window. The file name generated for the New Frame File Name (for the frame assembly) and the New Skeleton File Name follow the CAD Document autonumbering scheme, and therefore will have a new number assigned to them.
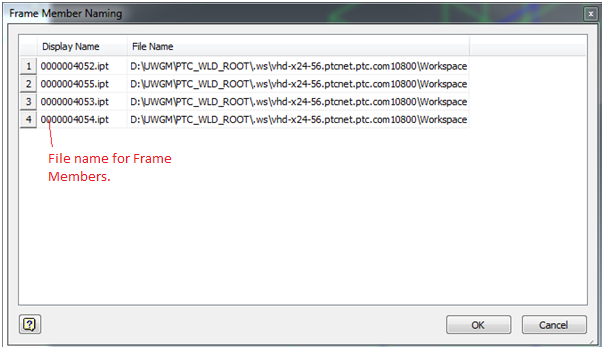
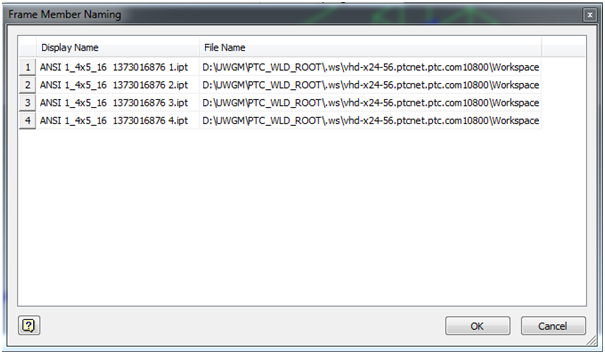
The name fields in the Create New Frame window are editable, so you can change the name of the assembly and the skeleton part if desired. Clicking OK displays the Frame Member Naming window, which lists the frame members with the auto-generated numbers for their file names.
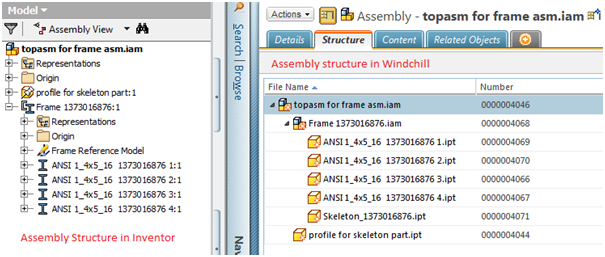
The structure in the Autodesk Inventor Assembly Tree displays the respective frame components with the auto-generated numbers as name designations. The following illustration compares the assembly structure in Autodesk Inventor and Windchill.
| The file names for parts edited using the Autodesk InventorEdit with Frame Generator option also follow the above numbering scheme. |
When CAD Document Autonumbering is OFF
This section explains how to work with Autodesk Inventor Frame Generator when autonumbering set to OFF, or when the Synchronize Number and File Name preference is set to No. In this situation, Frame Generator naming is different.
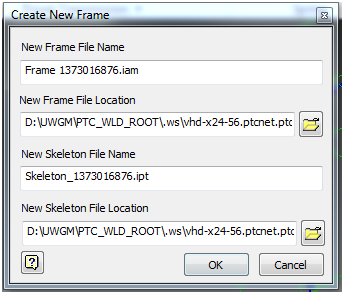
In the illustration above, the file names for the Frame and the Skeleton Part in the Create New Frame window take the form Frame nnnn and Skeleton nnnn, where nnnn is the auto-generated number based on the existing timestamp. The names of Frame members are generated by grouping the Frame part as Standard, Size, and Auto-generated Number as shown below.
In this case, the assembly structure in Autodesk Inventor and Windchill would appear as shown below.
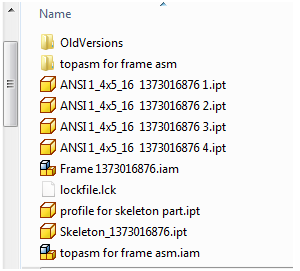
| In the WFS Workspace, even if the folder with the name “Frame” is created in the top assembly, the Frame assembly, skeleton part, and members are available in the WFS Workspace as shown below, and not in the Frame folder. |
Autonumbering for Frame Generator parts will be applied only to the new frame components created for an assembly existing in the WFS Workspace, or for those frame members created using the Edit with Frame Generator command. Autonumbering will not be applied for data saved to the workspace during the Save to Workspace action from Autodesk Inventor, or from the Import to Workspace action from Windchill Workgroup Manager.
Limitations
• When you save a Frame Generator assembly to workspace, avoid renaming the assembly and its child components from the Windchill Workgroup Manager client. If you rename the assembly and components, the Create New action does not work with any assembly in existing Autodesk Inventor session. You must restart Autodesk Inventor to perform Create New action.
• While importing an Autodesk Inventor frame generator assembly using Import to Workspace, import all the related CAD documents together to avoid creating ghost objects for frame reference model (skeleton part). If you import the parent frame generator assembly using None option and then import the dependents separately, ghost objects are created for the frame reference model (skeleton part).