Import to Workspace
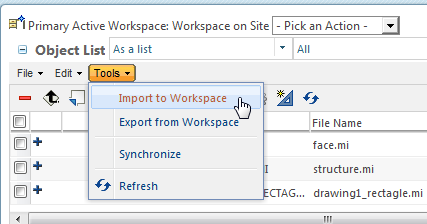
The Import to Workspace action enables you to import objects to your active workspace. For example, you can import CAD documents and all dependent files. Import is supported only via the Windchill Workgroup Manager embedded browser and from an active workspace that has access to cache. Importing objects from a non-active workspace is not supported.
|
|
• Initiating Import to Workspace and Save to Workspace concurrently causes error messages to appear.Creo Elements/Direct Drafting does not allow multiple operations to run simultaneously.
• Creo Elements/Direct Drafting does not import drawing frames as such, but only as drawing elements. Upon checkin, the imported frames are not saved to the location specified by the preference, Default Drawing Frame Location. Instead, the frame must be explicitly saved to Windchill by using the Save Frame to Windchill command available in Creo Elements/Direct Drafting.
• In addition, the Import to Workspace action does not collect a drawing’s related frame separately. Instead, it is saved as an embedded element of the drawing. Consequently, no dependency is created between the drawing and frame in Windchill.
|
You import objects by using the Import to Workspace window, on which you specify the following information:
• Files to import
• Import options
The Import to Workspace window allows you to navigate to the following step by clicking Next, or to the preceding step by clicking Back. You can also return to a step previously completed by clicking its corresponding numeral.
Select Files to Import
1. From Windchill Workgroup Manager active workspace, select > .
The Import to Workspace window opens at the Select files to import phase.
| The Target Workspace field indicates the active workspace where the imported objects will be placed. |
2. The Add Dependencies field is not applicable to importing for the Creo Elements/Direct Drafting integration. No dependents are collected during a drawing import.
3. Click the add object icon

to navigate and select objects that you would like to import from your local file system. When you have selected an object, click
Open to add it to the
Files panel.
The Files panel lists all the files that you have collected for import and is described in the following table:
Column | Description |
Row selection | To apply toolbar actions to individual rows, click (check) its box to select. Clicking the top check box selects or deselects all rows. |
Object type | Displays object type icons. |
File Name | Displays object file name. |
Size | Displays the file size of the object. |
Last Modified | Displays date and time of last modification of the file. |
File Path | Displays the directory path to the file to be imported. |
4. Optionally, select an object and click the remove object icon

to remove the object from the
Object List panel.
5. Click Next to go on to the Specify Options phase.
Or
Click Finish to initiate the import without specifying options.
Specify Options
The options available in this phase can help resolve conflicts with objects in the target workspace or in the commonspace.
To specify import options:
1. Examine the objects you selected in the Select files to import phase, which are listed in the Object List panel described in the following table.
Column | Description |
Rows selection | To apply toolbar actions to individual rows, click (check) its box to select. Clicking the top check box selects or deselects all rows. |
Workspace content status | Displays the object’s local workspace status icon (if applicable). |
Action status | Indicates if the object is set for checkout. |
General status | Displays the object’s general status icon (if applicable). |
Status messages | Displays a status message icon and the text message in a tooltip (if applicable). |
Object type indicator | Displays the object type icon. |
File Name | Displays the object filename. |
Size | Displays the file size of the object. |
Last Modified | Displays the date and time of the last object modification. |
Location | Displays the storage location for the object. |
File Path | Displays the directory path to the file to be imported. |
2. Optionally, use the View menu to select an alternate view of the Object List table.
3. Flag the collected set of import objects for further action. You do this by selecting an object and clicking toolbar controls as described in the following table.
| Clicking the reset icon  resets the Object List to its initial state. |
| You can also click Back at any time to return to the Select files to import phase. |
Control Icon | Action |
| Invoke the Set Location window to select a database location for the selected object. |
| Add the imported object as a new object. |
| Add the imported object as a modified object. |
| Reuse an existing workspace or commonspace object of the same name, rather than importing the selected object. |
| Check out the selected object upon import. |
| Revise the selected object upon import. |
| Excludes selected object from the import. Clicking again (while the same object is selected) reincludes the object. |
4. Click Finish to commit to the import of the collected objects.
The import objects appear in the target (active) workspace.