Check In
When you have finished making changes to a CAD object and are ready to publish and share those changes with users in the enterprise community that have access permissions, you check the object into the Windchill commonspace. This action transfers the data for the selected object from the active workspace to the Windchill commonspace. Auto Check In and Custom Check In actions are available on the Windchill action bar in CATIA 3DEXPERIENCE. They are also available in Windchill from the File menu of the active workspace. The following figure illustrates the data flow.
A Check In action accomplishes the following.
• Transfers a working copy of your object from your workspace to the shared area of the server (the commonspace).
• Creates a new iteration of the checked-out object in the commonspace. For example, A.1 to A.2.
• Releases the lock on the object in the commonspace if the object was checked out by you, so that others can access it.
| Check In actions are not available if a server and primary workspace are not designated. You must register a server and activate a primary workspace using server management  in CATIA 3DEXPERIENCE, or > in Windchill Workgroup Manager. |
CATIA 3DEXPERIENCE Check In Actions
On the Windchill action bar, clicking the down-arrow next to the check in icon enables you to select one of the following actions from a drop-down menu.
• Auto Check In—

When you select Auto Check In, your object is automatically copied to the commonspace and checked in without further interaction on your part. This process uses default settings that you or your administrator have set up for checking objects into Windchill.
• Custom Check In—

When you select Custom Check In, your object is checked in using custom settings that you specify on-the-fly. In the Check In window, two pages are presented where you specify these settings, and apply them to the objects that you are checking in.
Custom Check In Procedure
To check in an object using custom settings:
1. From the
Windchill action bar in
CATIA 3DEXPERIENCE select
, or in
Windchill from the
File menu of the active workspace, select
Custom Check In.
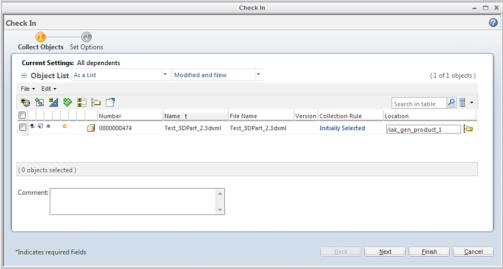
The Check In window opens with the Collect Objects page displayed as shown in the following figure.
2. On the Collect Objects page, select the objects that you want to check in by selecting (checking) the check-boxes next to the objects that you don't want to be visible to others on the Windchill server. Click Edit and select Set for Check In from the menu to deselect the selected objects for check in.
3. Select Next.
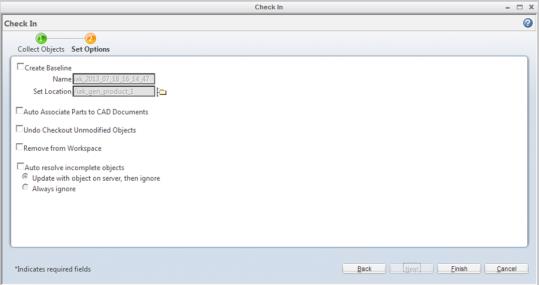
The Set Options page displays as shown in the following figure.
4. On the Set Options page, select one, or more check in options for the objects that you are checking in, then click Finish.
The objects are checked into Windchill using the custom settings that you have selected.