Usage Examples
Populating Business Object Details in CADDS 5 from Existing Parts in Windchill
This scenario assumes that the business object generator has identified business objects in a newly created Creo CADDS 5 part that already exists in Windchill. This might happen if, for example, a top-down development process was being used, and parts had been designated in Windchill before they had actually been designed. The designer might design the part in Creo CADDS 5 at some later date, and then associate it with the previously defined WTPart.
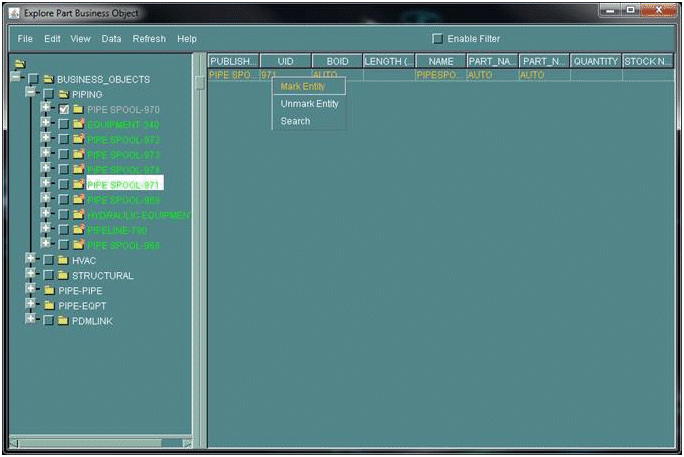
1. Open the part in Creo CADDS 5 and launch the business object explorer.
2. Select a business object in the Explorer.
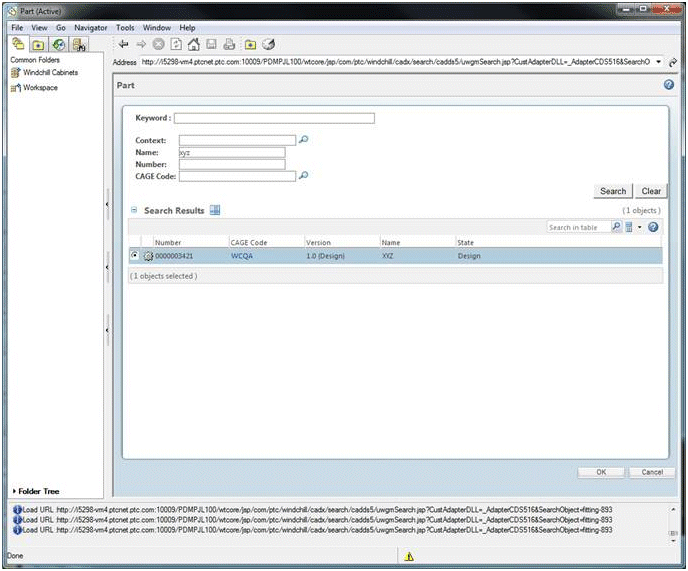
3. Right-mouse click and then select Search from the drop down menu. The Windchill Workgroup Manager user interface opens.
| When searching a Windchill part on business object, you need to set the Business Explorer view to single level. Whereas for catalog item occurrence, the search can be launched after setting multi-level view. |
4. In the Windchill user interface, define a search criterion (for example, Number=1234 or Name=XYZ). In the search results, locate the Windchill part (WTPart) that corresponds to the desired business object, and click OK.
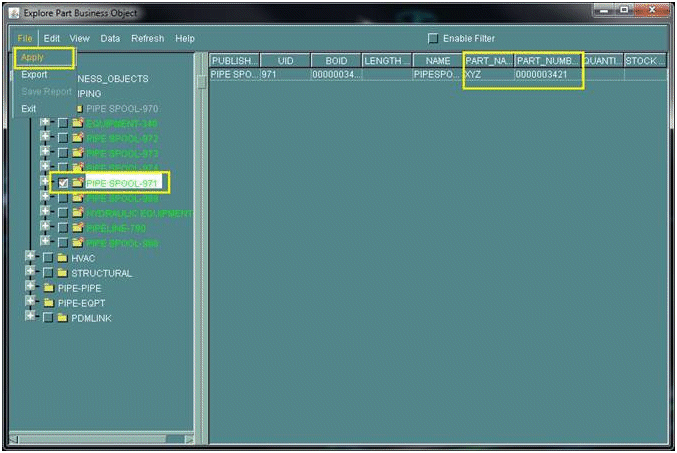
The BO ID field in the Business Object Explorer will now be populated with the corresponding Windchill part number.
If you want to save the information of the searched WTPart, then you must select the business object (on which WTPart was searched for publishing) as follows:
| These steps also mark the selected business object for publishing. |
1. Check the box for the business object in the navigator tree for the Business Object Explorer as shown below.
2. Select > from the Business Object Explorer.
Omitting these steps will cause the information for the searched WTPart from the Business Object Explorer to be lost upon refreshing the explorer view or closing the explorer.
Checking In a Part with Some Business Objects Generated
This scenario assumes the following:
• The part is active in Creo CADDS 5
• BOs were defined and marked for publishing:
◦ Check the check box next to the desired business object in the Business Object Explorer and then select > to mark the BO for publishing. The part, along with the business object report are stored in the workspace local directory and the local workspace cache.
| While the business object as a whole can be selected, its subcomponents can not. |
• The proper XML for the business objects exists.
• Global attributes defined in model items subtype. (See section on attribute mapping below)
• Windchill part subtypes are defined for the appropriate types of model items.
| This must be done by a Windchill server administrator, via the Type and Attribute Manager utility, which can be accessed by logging in as an administrator, and selecting > > . In Type and Attribute Manager, select Manage Types, then expand the Model Items entry, and select the appropriate subtype. For more information on using the Type and Attribute Manager, please see Working with the Type and Attribute Management Utility, or see the Windchill Help Center topic, > . |
From the File menu in Creo CADDS 5, select Check In (either Auto or Custom). If auto-association of the CAD part and model item with Windchill parts is required then this should be specified during check in. Also, building the structure of the Windchill parts can be specified. For custom check in this is the Auto Associate area. Build options can be set from the user interface. For Auto-Check in these can be set using the WindchillPreference Management utility.
At this point, Creo CADDS 5 re-runs the Business Object Gernerator to see if any of the business objects have been updated since they were first defined. If they were, the checkin fails. If not, the old business object report is used. The Windchill Workgroup Manager creates model items for each business object and populates their attributes from the business object report. The part along with all of the associated information is uploaded to Windchill and checked in. The CAD doc and model item documents are associated with corresponding Windchill parts. These actions occur without user interaction.
To publish structural objects to Windchill with associated WTParts, you must calculate the ST quantities on the structural objects before forming associations with WTParts. Otherwise, the association with WTParts fails and consequently the checkin fails as well. An error message displays "Quantity is not calculated or zero" when you check in a CAD part containing structural objects with uncalculated quantities, and with the auto-associate option marked for publishing. The check in should succeed if you disable the Auto-Associate option. To calculate quantities, run the Creo CADDS 5 command “Calculate STQuantities” on each of the structural objects that are marked for publishing.
When the checkin process has completed, the information in Creo CADDS 5 and the information in Windchill is in sync. The business objects that were identified are checked in as model items belonging to the part (which will also be checked in). The CAD document and model items are all associated with corresponding Windchill parts of the appropriate type.
Typically, the Windchill part structure for a CAD part with BO published and WTPart associated and built should show the following structure:
• WTPart of CAD Doc
◦ WTPart of business object (BO)
▪ WTPart of Occurrence
▪ WTPart of Library Item (Catalog part)
Checking in a Part from the Workgroup Manger Client
This scenario is similar to the previous one, however, instead of using the Creo CADDS 5File menu to do the checkin, we use the Windchill Workgroup Manager client. Further, we assume that the business object report is NOT in sync with the changes that have been made in the most recent Creo CADDS 5 session.
Check in the part as described in
Check In.
The same sequence of events occurs as in the previous scenario, however, in this case, the business object generator runs "behind the scenes" and generates a new business object report. If the model items in Windchill are out of sync with respect to any changes in the business objects that may have occurred, the checkin fails.
Using Lifecycle State
We may wish to lock a part in order to prevent unwanted changes from being made to it. This is done by changing the lifecycle state in Windchill.
In this scenario, we assume that a part, along with all of the associated business objects and model items are checked into Windchill and properly associated with the correct Windchill parts, and that each model item is defined to store the Windchill Part Lifecycle State system attribute.
At this point, you select the appropriate model item in Windchill and update its state to Released. This is done by checking the object out to the workspace and selecting Set State from the Actionsmenu (you must be an administrator or have permission to modify the object). Now when the part is activated in Creo CADDS 5, and the Business Object Explorer is launched, the business object shows as Locked. You can verify this running the following command in the Creo CADDS 5 command window: List Property: <UID of the BO>, this should display the properties on the business object. This symbol shows that the business object is in the Released state. In addition the RDON property should have a value of 1, indicating that it is now read-only.
You cannot make any changes to it. (You can verify this by going to the Windchill Workgroup Manager user interface and observing that the corresponding Windchill part is showing it's lifecycle state as Released.)
| If the CAD part is already open in Windchill with the Windchill part state changed to Released, you must close and re-open the part file to see the read-only state for the business object. |
Default CADDS 5 Model Item Attributes
The following attributes are passed from Creo CADDS 5 business objects by default:
• UID — Unique ID number
• stockno — Stock number
• Description — Description of business object
An administrator can add these attributes to model items in Windchill Workgroup Manager using theType and Attribute Manager, as described above. They should be added as string type attributes, and should be added to the model item and WTPart subtypes that are going to be used to manage Creo CADDS 5 business objects.
Using the Data Dictionary Mapping File
As mentioned, the data dictionary is an XML file that describes the relationship between attributes of business objects in Creo CADDS 5 and their corresponding model items in Windchill Workgroup Manager. This file is given the name bo2mi_mapping.xsl, and resides in the usr/apl/cadds/data/businessobject directory, and is the default location for the mapping file. You can customize the mapping file and use it from a non-default location by setting the environment variable: setenv BOXSLMAPPINGFILE "<PATH to directory containing mapping file>/bo2mi_mapping.xsl">.
The example below shows how a mapping is created for a business object called DUCTLINE and an occurrence item DUCT_NLINE:
----------------------------DUCTLINE-----------------------------------
<xsl:template match="SUPER_ITEM[@NAME='DUCTLINE']">
<bo>
<xsl:call-template name="BO_ATTRS"/>
<iba Name="Description">
<xsl:attribute name="VALUE">
<xsl:value-of select="CLASS[@NAME='MAIN']/LABEL/@VALUE"/>
</xsl:attribute>
</iba>
<iba Name="UID">
<xsl:attribute name="VALUE">
<xsl:value-of select="@UID"/>
</xsl:attribute>
</iba>
<xsl:apply-templates select="CLASS[@NAME='LIBRARY']/descendant::
ITEM[@NAME='DUCT_NLINE']"/>
<xsl:apply-templates select="CLASS[@NAME='LIBRARY']/descendant::
ITEM[@NAME='DUCT_FITTING']"/>
<xsl:apply-templates select="CLASS[@NAME='LIBRARY']/descendant::
ITEM[@NAME='DUCT_NLINE_GASKET']"/>
</bo>
</xsl:template>
----------------------------DUCTLINE_NLINE-----------------------------
<xsl:template match="ITEM[@NAME='DUCT_NLINE']">
<!--Occurence-->
<occurence>
<xsl:call-template name="OCCURENCE_ATTRS"/>
<iba Name="UID">
<xsl:attribute name="VALUE">
<xsl:value-of select="@UID"/>
</xsl:attribute>
</iba>
<library>
<xsl:call-template name="LIBRARY_ATTRS"/>
<iba Name="stockno">
<xsl:attribute name="VALUE">
<xsl:value-of select="PROP[@PUBLISH_NAME='STOCK NUMBER']/@VALUE"/>
</xsl:attribute>
</iba>
</library>
<link>
<xsl:call-template name="OCC_TO_LIB_LINK_ATTRS"/>
<xsl:attribute name="mQuantity">
<xsl:value-of select="LENGTH/@VALUE"/>
</xsl:attribute>
<xsl:attribute name="mUnits">
<xsl:value-of select="LENGTH/@UNITS"/>
</xsl:attribute>
</link>
</occurence>
</xsl:template>
As you can see, common templates are provided for mapping the attributes of the business object, occurrence and library nodes (BO_ATTRS, OCCURRENCE_ATTRS, LIBRARY_ATTRS). A template is also provided for the link between the occurrence and the library (OCC_TO_LIB_LINK_ATTRS). Some of these attributes are required for the business object population process to work correctly and should not be changed. Comments are shown in the file to indicate this.
1. Call the common template (BO_ATTRS) for attribute population.
2. Global attributes are the user-defined attributes of the Model Item. You can add, modify, or delete global attribute tags depending on the attributes you need for a particular Model Item.
3. An apply_templates operation MUST be called for each type of occurrence item in a business object.
When creating template for Occurrence node:
1. Call the common template (OCCURENCE_ATTRS) for attribute population.
2. The Occurrence template must enclosed in <occurence> </occurence> tags.
3. The <library> and <link> tags must be present if the occurrence model item must link to a catalog item. They are not required otherwise.
4. In the <library> </library> section, call the common template for attribute population (LIBRARY_ATTRS).
5. In the <link> </link> section call the common template for attribute population (OCC_TO_LIB_LINK_ATTRS). However the attributes quantity and units are excluded in the common template as the xpath values for these are different for each occurrence type. You must add them after calling the common template.
Defining Attributes on Model Item
These value type formats are for global attributes in the bo2mi_mapping.xsl file. Unless mentioned otherwise, the data type is a string.
Type | Value |
Integer | <iba Name=”PSO_MI”>
<xsl:attribute name=”TYPE”>INTEGER</xsl:attribute>
<xsl:attribute name=”VALUE”>101</xsl:attribute></iba> |
String | <iba Name=”PSO_MI”>
<xsl:attribute name=”TYPE”>STRING</xsl:attribute>
<xsl:attribute name=”VALUE”>string value</xsl:attribute></iba> |
Real | <iba Name=”PSO_MI”>
<xsl:attribute name=”TYPE”>REAL</xsl:attribute>
<xsl:attribute name=”VALUE”>10.11</xsl:attribute></iba> |
Boolean | <iba Name=”PSO_MI”>
<xsl:attribute name=”TYPE”>BOOLEAN</xsl:attribute>
<xsl:attribute name=”VALUE”>Yes</xsl:attribute></iba> |
Defining Subtype Usage for CADDS 5 Model Item
To use the EPMDefaultSoftTypes.xml in the Windchill codebase, create a file called EPMDefaultSoftTypes.xml with the following content and add it to Windchill Workgroup Manager server $WT_HOME/codebase directory, then restart the server.
<?xml version="1.0" encoding="UTF-8"?>
IMP NOTE: PLEASE do NOT edit this file directly. In order to override the
subtypes specified here,
create a similar file [with the same name] under $WT_HOME/codebase
directory and restart the server.
Document : EPMDefaultSoftTypes.xml
Created on : August 21, 2009, 2:14 PM
Author : kboora
Description:
Specify the out-of-the-box subtype mappings for a given type and subtype of a
model item / EPM document per authoring application
-->
<SoftTypeDescriptor xmlns='http://www.ptc.com'
xmlns:xsi='http://www.w3.org/2001/XMLSchema-instance'
xsi:schemaLocation='http://www.ptc.com
SoftTypeDescriptor.xsd'>
<AuthAppSoftTypeInfo authAppName="CADDS5">
<ObjectClassInfo classType="ModelItem">
<ObjectTypeInfo type="COMPONENT">
<SoftTypeInfo softTypeId="${internet_domain_name}.BOM"/>
<SoftTypeInfo subType="CUSTOM"
softTypeId="${internet_domain_name}.MI_BO"/>
<softTypeInfo subType="LIBRARY" softTypeId="${internet_domain_name}.BOM"/>
</ObjectTypeInfo>
</ObjectClassInfo>
</AuthAppSoftTypeInfo>
</SoftTypeDescriptor>
To use a global attribute on the model item to define the subtype, log in as a site administrator in Windchill Workgroup Manager and navigate to the site level’s Preference Management utility. Search for the Subtype Parameter preference. Out-of-the-box, the global attribute defined on this preference is ‘UPLOAD_SOFT_TYPE’.
You can readily use the above global attribute in the ‘bo2mi_mapping.xsl’ data dictionary mapping file as follows to define the subtype for the model item. (It is assumed that you have already created the required model item subtypes and the corresponding WTParts subtype.)
<!-- ===========================BO PIPE SPOOL
================================================== -->
<!-- ====================================================================
======================= -->
<xsl:template match="SUPER_ITEM[@NAME='PIPESPOOL']">
<bo>
<xsl:call-template name="BO_ATTRS"/>
<iba Name="Description">
<xsl:attribute name="VALUE">
<xsl:value-of select="CLASS[@NAME='MAIN']/LABEL/@VALUE"/>
</xsl:attribute>
</iba>
<iba Name="UID">
<xsl:attribute name="VALUE">
<xsl:value-of select="@UID"/>
</xsl:attribute>
</iba>
<iba Name="UPLOAD_SOFT_TYPE">
<xsl:attribute name="VALUE">com.ptc.ptcnet.C5_MI_BO</xsl:attribute>
</iba>
| ‘com.ptc.ptcnet.C5_MI_BO’ is the internal name of the model item subtype. |


