Attribute Tables
Objective
This documentation provides developers with the information required for implementing the attributes table component for a given business object in information page.
The Attribute Table component was developed to give the Windchill products consistency for displaying all necessary attributes of any object in details page. The component should also make developing attributes table much easier. Using this component, a developer only needs to configure attributes tables page only, while the main layout of the page is provided by the component.
Applicability
This documentation should be used by a developer who is responsible for configuring the info page for some object in one of the Windchill products. This design pattern shows how to configured and where the configuration should be done for the attributes table.
Participants
The readers of this documentation should have a basic understanding of JSP, tag libraries and JSTL.
Consequences
By following this documentation the configuration of all attributes table for any business objects should be done in a consistent manner. This will make maintaining these attributes table much easier and more manageable task.
Solution
Overview
The attributes table component was developed using the Windchill Client Architecture. This component provides a common layout for an object’s attributes as it is displayed in any of the Windchill products. Using the attributes table component will provide consistency between all objects and Windchill products.
What is the component
• Attributes table Image neededIt is a combination of a JSP, bean, taglib, renderers and service call(s).
• It displays all the attributes and its value configured for a given object.
• Not yet implemented: It displays the classification attributes table for WTParts.
• Follows user interface standards
• Supports customization requirements
The default attributes table implementation have been added for parts and documents. However both these tables need to be reworked so that necessary or required attributes can be configured.
For all the business objects that need to use the attributes table, the developer will need to create a new JSP that is configured for your type. All the details links to attributes table will lead to a servlet which will figure out which page to forward to based on the object type.
Using the component
Create a JSP for your object type
• Creating a JSP
• Registering the JSP
Creating a JSP
Your attributes.JSP will have only the describeAttributesTable tag and list of attribute names as id in describeProperty. Based on the configuration in the describeAttributesTable, the showSoftAttribute.jspf component will render the attributes table panel and its content.
Here is the example of attributes.jsp for document object.
<jca:describeAttributesTable var="attributesTableDescriptor"
mode=”VIEW”>
<jca:describeProperty id="<Logical Form>" />
<jca:describeProperty id="<Logical Form>" />
</jca:describeAttributeTable>
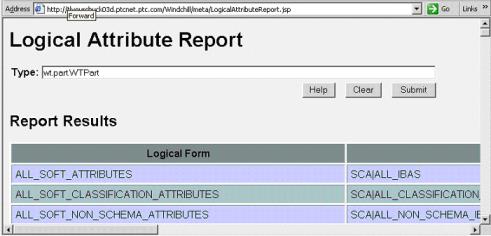
The attribute values are based on logical attribute mapping using the mechanism in place for type instances. For a given object type, you can see what the logical attribute names are by using the LogicalAttributes.jsp. This JSP can be accessed from a running Windchill build; http://<machine>/<Windchill-app-name>/meta/LogicalAttributeReport.jsp
In the type input field, type the fully qualified class name and click Submit. This should give you a listing of the attributes that can be used for the given object type. Either the logical or the external form can be specified, although the logical form is preferred.
Registering the JSP
For the info page servlet to know which JSP to forward to for your type, an entry for your JSP needs to be specified in a properties file that is used by the type based service. The default properties file for this is typedservices.properties which can be found directly in codebase. The entries should be in the following format:
wt.services/rsc/default/com.ptc.netmarkets.util.misc.FilePathFacto
ry/Attributes/wt.doc.WTDocument/0=/netmarkets/jsp/document/attribu
tes.jsp
wt.services/rsc/default/com.ptc.netmarkets.util.misc.FilePathFacto
ry/Attributes/wt.part.WTPart/0=/netmarkets/jsp/part/attributes.jsp
Here is an example of the xcong format:
<!--Info page fragments, Resource is the filepath to a jsp fragment
that will configure the info page -->
<Resource context="default"
name="com.ptc.netmarkets.util.misc.FilePathFactory">
<Option requestor="wt.part.WTPart"
resource="/netmarkets/jsp/part/attributes.jsp"
selector="Attributes"/>
<Option requestor="wt.doc.WTDocument"
resource="/netmarkets/jsp/document/attributes.jsp"
selector="Attributes"/>
</Resource>
Windchill/src/typedservices.properties.xconf file is the default xconf file used for type based application context lookups. For your type, you would create your own xconf file within your module that targets typedservices.properties.
Sample Code
Example implementation for the attributesTableComponent
This is an example of how the attributes table could be configured for some object type. However these steps reference to codebase locations only. These steps do not include instructions for source placement or best practices for entering information in xconf files or building of the content or entering in xconf files. This is only to communicate the concepts for getting started.
1. Create a JSP file called attributes.jsp and place it in the following location in your codebase.
codebase/netmarkets/jsp/part/
For now, just add the following content to the page
<%@ taglib uri="http://java.sun.com/jsp/jstl/core" prefix="c"%>
<%@ taglib uri="http://www.ptc.com/windchill/taglib/components"
prefix="jca"%>
<jca:describeAttributesTable var="attributesTableDescriptor"
mode="VIEW" id="view.setAttribute"
label="Attributes" scope="request">
<jca:describeProperty id="containerName" />
<jca:describeProperty id="name"/>
<jca:describeProperty id="number"/>
<jca:describeProperty id="creatorName" />
<jca:describeProperty id="currentPrincipal" />
<jca:describeProperty id="cabinet"/>
<jca:describeProperty id="cabinetName"/>
<jca:describeProperty id="checkoutInfo.state" />
<jca:describeProperty id="comment"/>
<jca:describeProperty id="displayIdentifier"/>
<jca:describeProperty id="endItem"/>
<jca:describeProperty id="folderName"/>
<jca:describeProperty id="lifeCycleName" />
<jca:describeProperty id="usedBy"/>
<jca:describeProperty id="version"/>
<jca:describeProperty id="view" />
<jca:describeProperty id="viewName"/>
<jca:describeProperty id="owner.id"/>
<jca:describeProperty id="ALL_SOFT_SCHEMA_ATTRIBUTES"/>*
</jca:describeAttributesTable>
Also, Edit action can be launched with below steps. The step to initially display can be set on request with this form.
startStep=<step id>
* “ALL_SOFT_SCHEMA_ATTRIBUTES” display all the global attributes and its value.
2. Register your JSP so the info page servlet will know to forward to it.
Add the following entry into codebase/typedservices.properties:
wt.services/rsc/default/com.ptc.netmarkets.util.misc.FilePathFa
ctory/Attributes/wt.part.WTPart/0=/netmarkets/jsp/part/attribut
es.jsp
3. Test your new jsp. The icons from the Home page or from the Folders page should lead to the new info page servlet. The URL will look something like this:
http://<machine>/<WindchillAppName>/servlet/InfoPage?oid=OR:wt.
part.WTPart:62028
The servlet will look up which JSP to forward to in typedservices.properties. You should see the list of attributes name and its value in Third Level Navigation for attributes table.