Customization Points
Procedure - Removing a Main Tab
Copy the “main navigation” action model from navigation-actionModels.xml to custom-actionModels.xml. Remove the required action model.
<!-- Main navigation -->
<model name="main navigation">
<action name="home" type="navigation"/>
<action name="product" type="navigation"/>
<action name="project" type="navigation"/>
<action name="change" type="navigation"/>
<action name="library" type="navigation"/>
<action name=”mytab” type=”navigation”/>
<action name="org" type="navigation"/>
<action name="site" type="navigation"/>
</model>
After removing the “change” tab from the main navigation action model above. The list will look like this:
<!-- Main navigation -->
<model name="main navigation">
<action name="home" type="navigation"/>
<action name="product" type="navigation"/>
<action name="project" type="navigation"/>
<action name="library" type="navigation"/>
<action name=”mytab” type=”navigation”/>
<action name="org" type="navigation"/>
<action name="site" type="navigation"/>
</model>
Procedure — Removing a Second Level Navigation Link
Copy the action model definition which needs to be updated to custom-actionModels.xml from navigation-actionModels.xml. Update the action model definition by removing the action definition from it.
Original definition of product navigation action model :
<model name="product navigation">
<action name="list" type="product"/>
<action name="separator" type="separator"/>
<action name="view" type="object"/>
<action name="listFiles" type="product"/>
<action name="listTeam" type="product"/>
<action name="listProduct" type="work"/>
<action name="changeMonitor" type="product"/>
<action name="view_forum" type="project"/>
<action name="MyWorkspace" type="product"/>
<action name="listTemplates" type="product"/>
<action name="listUtilities" type="product"/>
</model>
After removing the Change Monitor action from the product action list above, the list will look like this:
<model name="product navigation">
<action name="list" type="product"/>
<action name="separator" type="separator"/>
<action name="view" type="object"/>
<action name="listFiles" type="product"/>
<action name="listTeam" type="product"/>
<action name="listProduct" type="work"/>
<action name="view_forum" type="project"/>
<action name="MyWorkspace" type="product"/>
<action name="listTemplates" type="product"/>
<action name="listUtilities" type="product"/>
</model>
Procedure — Customize a Navigator
If required, there is a way to override default navigation behavior in the navigator. This can be achieved by implementing com.ptc.windchill.enterprise.navigation.NavigationListDelegate and providing a custom behavior. For example, there is a requirement that a particular first level navigation tab should show all the nodes instead of showing only recently accessed nodes.
The following section will illustrate an example of showing all the context nodes instead of default behavior of showing only recently accessed ones.
Create a Custom Navigation List Delegate
In general it is not recommended to implement the interface NavigationListDelegate directly. You should subclass one of the existing out of the box implementations like com.ptc.windchill.enterprise.navigation.delegates.DefaultNavigationListDelegate.
Example:
public class MyTabNavigationListDelegate extends DefaultNavigationListDelegate {
/**
* Returns list of all the c.
*/
@Override
public Vector<ObjectVisitedInfo> getRecentStack(String node,
Vector<ObjectVisitedInfo> recent)
throws WTException {
// Specific code for getting all the contexts for that particular tab
return recent;
}
}
There are also other methods that you may wish to override but getRecentStack() is the only one required for this particular use case.
Register MyTabNavigationListDelegate
To register this custom delegate, the property should be added to a specific customized service.properties.xconf file or site.xconf.
In the above example you would register it something like the following:
<Service name="com.ptc.jca.navigation.NavigationListDelegate">
<Option serviceClass="com.ptc.myTab.navigation.MyTabNavigationListDelegate"
requestor="java.lang.Object" selector="MyTab"/>
</Service>
After registering you will need to run xconfmanager -p from a windchill shell and restart the method server.
Adding Multiple Levels in the Navigation Tree
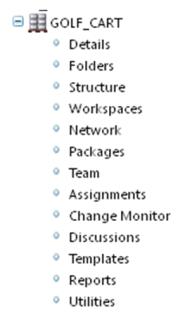
Out of the box, “browse” tab in navigator has a tree with two levels. More levels can be added by adding a sub-model to existing action model.
Example: Original tree
To add a new navigation hierarchy:
1. Create a model in custom-actionModels.xml.
<model name="productNav1">
<action name="info" type="product"/>
<action name="listFiles" type="product"/>
</model>
2. Copy the existing action model in navigation-actionModels.xml to custom-actionModels.xml. Add above model as a submodel to this action model definition.
<model name="product navigation" defaultActionName="list"
defaultActionType="product">
<description>
Sub tabs under the product main tab
</description>
<action name="info" type="product"/>
<action name="aspsStructure" type="asps" />
<action name="listPubStructures" type="arbortext"/>
<action name="listFiles" type="product"/>
<action name="structureSubTab" type="product"/>
<action name="MyWorkspace" type="workspaces"/>
<action name="listNetwork" type="network"/>
<action name="list" type="wp"/>
<action name="listTeam" type="product"/>
<action name="listProductAssignments" type="work"/>
<action name="changeMonitor" type="change"/>
<action name="view_forum" type="project"/>
<action name="listTemplates" type="product"/>
<action name="reports" type="product"/>
<action name="listAgreements" type="agreements"/>
<action name="listUtilities" type="product"/>
<submodel name="productNav1" />
</model>
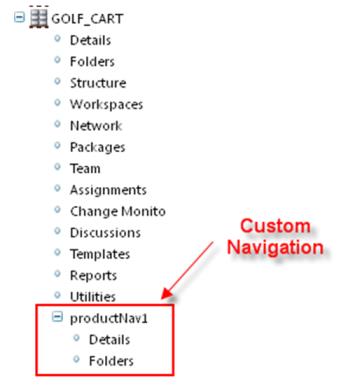
The new Navigation tree will look like:
The sub-model can be nested into other submodel to add multiple levels of navigation
Example:
The above model can have more submodels as
<model name="productNav1">
<action name="info" type="product"/>
<action name="listFiles" type="product"/>
<submodel name="productNav2" />
</model>
Where
<model name="productNav2">
<action name="someAction" type="object"/>
<action name="someMoreAction" type="object"/>
….
</model>